Thursday 15 March 2018

Somewhere over Bomb Alley - 1:600 Argentine Mirages

After quite a hiatus, my 1:600 Falklands War aircraft are slowly making their way off the painting table. Today I offer a few pictures of my recently completed Tumbling Dice Mirage 5 'Dagger' of the Argentine Air Force. (to be honest, it's been long enough I don't recall which model of Mirage I purchased!).
Carrying extra fuel tanks, these pilots made the long trek from airfields on the Argentine mainland to the Falklands to engage the British Harriers over San Carlos Waters (Bomb Alley). With no capacity for aerial refueling, the Argentine pilots only had five minutes over the target in their before they had to turn for home and refuel.
And yes, I've taken the foolhardy step of not waiting for decals and painting the roundels and other markings by hand (yep, I'm 'cheap' and impatient!). Happy enough with the result although photography accentuates the failings! ;)

At this stage I plan to use AirWar: C21 rules by Wessex games

Harriers and Avro Vulcan nearly done. More picture soon.

Wednesday 14 March 2018

Fields of Blue & Grey - 2mm ACW AAR

Fields of Blue & Grey by Dan Abbott are a set of American Civil War war-gaming rules for fighting up to Corps sized battles with a regiment being the smallest maneuver unit. Abbott notes that "Ground scale is 1 inch = approx 50 yards and the players are meant to be divisional and corp commanders, instead of brigadiers."

Abbott's rules are successful, I feel in making effective command and control as important to victory ad combat outcomes. Brigades are given orders by Division (and Corps) commanders at the beginning of the game and these can be changed under certain conditions. Brigade commanders can also request an order change by sending a messenger with a status report to his superior.

The combat mechanism is fairly simple based around opposing d6 rolls modified by the presence of leaders, terrain, the level of fatigue of the brigade and morale. Combat losses are essentially reflected by a build-up of fatigue at the Brigade level each time a regiment is in action. As the fatigue level of the Brigade increases it can effect the combat factor of the unit (called its 'volume of fire') and the morale status.

I used an older version of the rules (attached as a PDF at the bottom of the page linked to above) win which Brigades (and divisions) must pass a morale test every turn. A 2012 update moves away form Brigade and Division morale checks. Instead, the units fatigue and morale impact on the brigade's capacity to activate each turn.

Overall, I feel the first use of these rules gave an interesting game and I really liked the 'orders' mechanism and the inevitable consequence of the build up of fatigue. The impact of sustained combat on brigades is well modeled by the fatigue rules - a nice touch. I felt it gave quite a good 'feel' for the challenges faced by brigade and divisional commanders during the Civil War.

As a first time player, I did find the occasional situation where the rules were not explicit. For example, it was not clear on the difference between mounted an dismounted cavalry (except a reduction in movement for dismounted).

One of the difficulties I had was around understanding the impact of varying morale levels (disordered, shaken, beaten) on game play. Again, I believe this is addressed by the new activation system. There was a bit of record keeping (orders, morale status, commander ability and troop quality) but with a little planning and some more subtle on-board counters and a simple roster sheet, it would be handled easily.
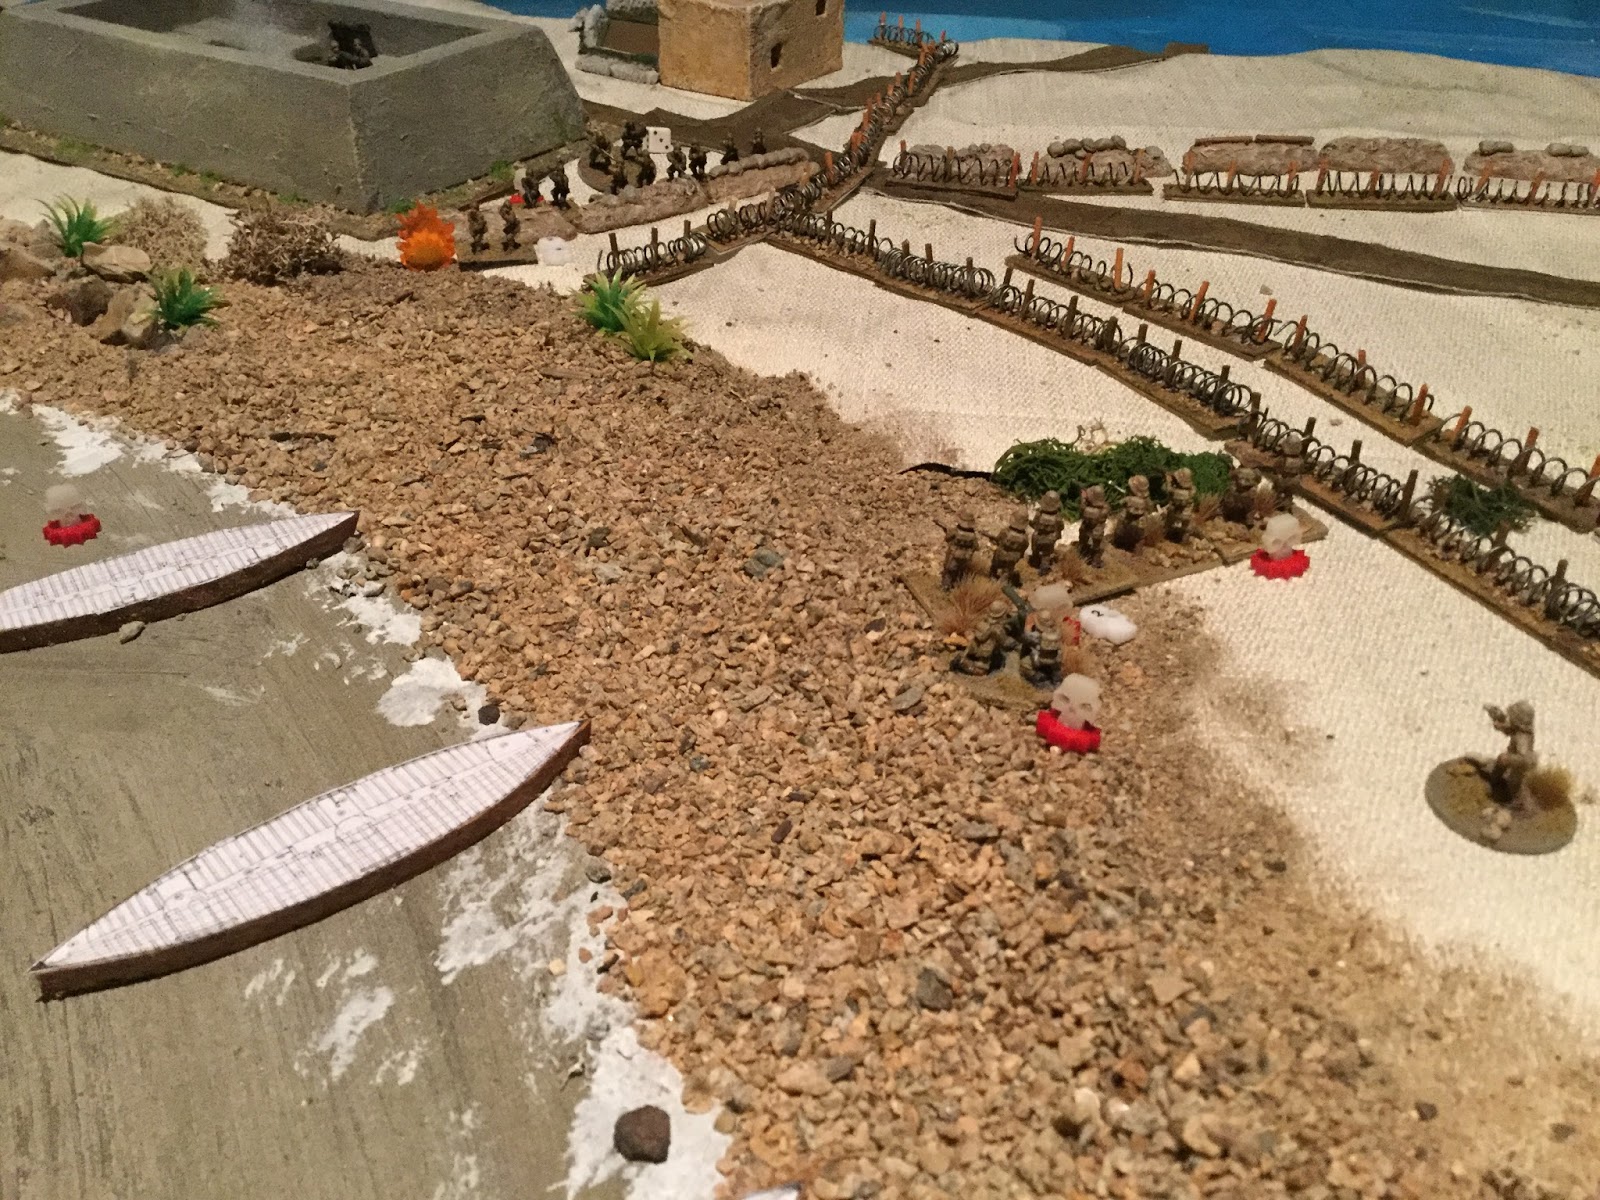
Example of some of the on-board counters that I used. The Litko skulls record the build-up of fatigue. Cardboard counters note the morale status of the unit/brigade. I used a Litko skull on a red base to show when a brigade commander is killed (they are replaced with a commander of lesser ability after 1 full turn. The red Litko 'cross hairs' mark a brigade commander that is wounded. I'll work on reducing the visual impact of these for future games.
Here are a few images of the first battle I fought using my 2mm Irregular ACW forces. The scenario was sent early in the war and saw the Confederate forces (top of board) pursuing a Union infantry brigade that had retreated from an earlier fight. The Union commander had some support (cavalry, sharpshooters and artillery) hurrying in from the bottom of the board to reinforce the line.
The Union 1st Brigade  holds the open ground NE of a village (let's assume the top of the image is north) having fallen back in good order from a previous engagement. A column of union artillery (2 batteries) and cavalry regiment enter from the SW. Union sharpshooters hold the hill on the Union left flank.
Brigadier General Tyndale's Brigade deployed in line of battle with a small reserve and his right flank holding the heights.
From the SE, elements of Anderson's Brigade pursue the remnants of a Union division that fell back after an  action that earlier that morning.
From the SW, Brown's Brigade march quickly to deploy in the open ground to the south of the Union position. Brown's men are fresh having been in reserve during the morning's action. His men are still in column having marched hard to keep pressure on the retreating Union troops.
The Union relief column cross the stream and the cavalry swing wide on the left flank. Tyndale's Brigade has hold orders while the cavalry and artillery have orders to advance to Tyndale's left flank and hold.

The Confederates deploy into line. The final advance begins.
Tyndale's Brigade have rifled muskets so get the first volley in as the Confederates close on their line.
The Union troops are spooked as the Rebs advance and their musketry has little impact.
The Confederate line advanced to musket range (being armed with smooth bore muskets) and loose the first volley in return. The Union sharpshooters march down into the woods on Tyndale's left to deal with the Confederate overlap. they are elite troops and hold their own!
The musketry of the Confederate left flank finds its mark and the forced a Regiment back over the crest of the hill. On the Union left, the artillery unlimbers at the foot of the hill.
The musketry over the next couple of rounds takes a toll on the Brigade commanders. Tyndale is out of action for a full turn. The Confederate Brigadier, Anderson, is shot from his horse and falls to the ground, dead.
The lines of infantry continue to hammer each other with lead as the fatigue (white skulls) builds up. The intensity of the musketry from the Confederate left drives back yet another Union regiment. On the left, the Union cavalry seeks to take the mill on the Confederate right flank. Anderson's cavalry (dismounted) forms a line in front of the mill and holds firm!
The last remaining Union regiment has to fall back under sustained fire from the Confederates.
The Confederate advance falters on their left with a regiment driven back form the hill-top. Moral on both sides is beginning to falter. Both sides are now shaken but the Confederate advance pushes on.
The Union cavalry assault on the left fails. The Union morale falls again - Tyndale's Brigade is battered!
Finally, the union artillery opens fire on the second Confederate line on the right flank and yet another Confederate Brigade commander falls! However, sensing the Union troops are nearly spent, a yell springs up from the Confederate line on the right and they charge into the woods to clear out the Union sharpshooters.
A Change of orders on the Confederate right redirects their attack towards the undefended artillery. Brown's Brigade (Confederate left) keep up the musketry on the Union troops that have now fallen back to the stream.
On the Confederate right flank, Anderson's cavalry push forward. Both sides have been contact for a couple of hours now and exhaustion is setting in. Ammunition is short and morale sits on a knife edge! Anderson and Brown know that all they have to do is keep pressure on the Union troops and they will break soon.
The Union Brigade commander on the left is still out of action having been wounded in the melee in the woods. The Union forces have been battered but are not yet defeated. This is where the action concluded, without a clear victory for either side (although, definitely advantage to the Confederates). I expect another turn or two of Confederate musketry might have tipped the balance in their favour.

Monday 19 February 2018

2mm ACW ... progress!

The curse of the blogger is your proclamations of new projects are there for the world to see. Looking back, I see I started this 2mm ACW project in June 2014! Curiously, this first post on 2mm has become on the the most visited pages on this blog with 1473 views to date! Must have been something I said! it's ^%$#&*-well time I finished it and actually posted some AARs!

Nevertheless, every project gets its moment in the sun, and 2mm ACW seems to be having just that. Besides, I want to start a Thirty Years War project in 2mm so it was time to get a wriggle on.

So, after a flurry this weekend painting is nearly complete and I am now working on basing (40x20mm). For me, one of the challenges with 2mm basing is to ensure they help show the direction the blocks are facing (very helpful with my dodgy eyesight).

When I based the Confederate force I was thinking I would need a label the rear corner for unit identification - I've since decided against that as I feel it detracts from the overall look on the table. Instead, I have decided to paint muddy ground behind the base to reflect the tramping of brogans through the pasture. I think this gives a good sense of movement for the units too.
I am working on some subtle 'landscaping' on each base with gravel, static grass and minute pieces of clump foliage. At this scale even the finest gravel looks like I'm recreating the Devil's Den! So some subtlety is required (in short supply here).
I can feel the project nearing the point where I can game with them (if I could only settle on a set of rules*!). In the meantime, I couldn't resist a quick layout for some pictures. I think the pictures show that 2mm - even with fairly rudimentary basing and paintwork can give a really good drones-eye view of civil war engagements!

*which will, of course, need to be sympathetic with my rather arbitrary decisions around basing!
 The next challenge is to flock all the bare spots I left for labels on the CSA bases! Doh!


Monday 12 February 2018

2mm ACW is back on the table!

Just a quick post to signal a return to the most challenging of scales - 2mm. I've had a pile of Irregular Miniatures 2mm ACW blocks painted (except the cavalry) for some time. Each time I get them out I go into a nose dive over basing and rules and away they go again.

I've grasped the nettle and based them on a 40mm x 20mm (1 1/2" x 7/16") with two infantry blocks on each. I've been experimenting with adding a little detail to the base - in this case, the muddy path across the field left by the companies as they advance.


I'll look at adding some bushes and hopefully a fence or two (pebbles for stone or flywire for post and rail).

The 2mm project lives!

Tuesday 12 December 2017

Desert gaming mat

I’ve had a couple of attempts over the years of making gaming mats using latex caulking compound. My last attempt - a gaming mat for desert terrain, was my most successful.


The approach I took was to:
1. Paint a plastic backed canvas dropsheet with an undercoat of off white acrylic house paint
2. Once dry, scrape on a thin layer of grey caulking compound (painting first meant less compound was lost in the porous canvas - used less product!)*
3. Sprinkle with fine grit while soft (I used sand)
4. Once dry, paint with an acrylic house paint again - sand coloured - then dry brush with a range of other suitable colours - eg. browns and greys

*Its worth hiughlighting Lasgunpacker's comment below - there may be a durability issue with the latex not bonding as well to ;pain as it would to the canvas - good point, time will tell!

 Here's what it looks like with some minis on it:


I have 6mm Irregular and 15mm Eureka Miniatures minis on the painting bench for some WW2 Operation Compass gaming - the 15mm are the Eureka range sculpted as the Australian 6th Division at Bardia. However, below I have laid out some of the Eureka Miniatures World War 1 Palestine range in preparations for a Second Battle of Gaza scenario.


I have since completed a platoon of Bersaglieri, again from Eureka. The next step is to get them on the table for a little Operation Compass 'fun' using my recent purchase of Iron Ivan's Disposable Heroes.

Sunday 27 August 2017

A bloody morning on V-Beach

I recently managed to get a table set up to play the TFL If the Lord Spares Us scenario of the landings on V-Beach on 25 April 1915. V-Beach saw one of the costliest landings of on the 25th April 1915. 

V-Beach was a "...sandy strip some 10 yards wide and 350 yards long, backed along almost the whole of its length by a low sandy escarpment about 4 feet high, where the ground falls nearly sheer down to the beach." (Sir Ian Hamilton's Dispatch of the 20th May, 1915). Behind was a concave grassy slope rising  to the cliff edge between Sedd ul Bahr village and Cape Helles. The slope was lined with thick entanglements of wire set by the Turkish defenders.
 
Defenses of V-Beach, 25th April 1915

In the early morning of the 25th April, 1915, was to be made by boats containing three companies of the 1st Royal Dublin Fusiliers, followed by the collier "River Clyde" with the rest of the Dublins, the 1st Royal Munster Fusiliers, half the 2nd Hampshire Regiment, and other troops. The place was very strongly fortified, and during the 25th the landing was partially carried out at the cost of very heavy casualties. On the morning of the 26th, Colonel Doughty-Wylie and Captain Walford, who were killed during the fight, led the survivors on the beach to the capture of Sedd ul Bahr village and the Old Castle above it. (Source: http://battlefields1418.50megs.com/v_beach_cemetery.htm)

The boats with the 1st Royal Dublin Fusiliers row ashore while the SS River Clyde (bottom left) prepares to ground itself in the early hours of 25th April 1915.
Turkish machine gunners in Sedd ul Bahr fort survey the empty shoreline. A stove in Fort No. 1 send out a lazy plume of smoke in the cold morning air.
The Turkish wire entanglements and entrenchments behind V-Beach present a major obstacle
to anyone who gets off the beach.

The boats of the Royal Dublin Fusiliers make the final approach to the shore in the early light. The locations of the Turkish defenders are not yet known.
The Royal Dublin Fusiliers are under fire the moment their boats touch the shore as Turkish MGs sweep the beach from Sedd ul Bahr fort and the trenches beside Fort No. 1 (top left).

"Get ashore, Lads!"
The SS River Clyde runs smoothly ashore 'without a tremor' under the fort. Sally ports cut into the site of the ship are opened and gangways set in place. Commander Unwin and Able Seaman William Williams (of the SS River Clyde) climb down to set up the lighters to form a bridge between the ship and the nearby spit of sand under heavy fire.
The MG and shell fire was murderous as Unwin and Williams fixed the lighters in place while two companies of the Royal Musters stored out of the sally ports. Williams died in Unwin's arms later that morning and Unwin, severely wounded, was taken back onto the SS River Clyde. He later said:
I stayed on the lighters and tried to keep the men going ashore but it was murder and soon the first lighter was covered with dead and wounded and the spit was awful; the sea around it for some yards was red. (In Les Carlyon, Gallipoli, MacMillan, 2014)
The Royal Dublin Fusiliers take heavy fire from the Turkish MGs as they leave their boats.

The Royal Dublin Fusiliers can't get off the beach and the Turkish MGs are taking a terrible toll.
The remaining Royal Dublin Fusiliers push up the beach but Turkish rifle fire from the trenches halts them. One company is already annihilated.
The Royal Munsters charge out the sally ports on the SS River Clyde and are met with a hail of bullets.
Above the Ottoman Lines
The British just can't get the initiative - the Tea Break card comes up all to regularly and the Turkish MGs get to fire as they are within 'effective range'.
The Turks start to file down the trenches to a position in front of Fort No. 1
Another company of the Royal Dublin Fusiliers is lost.
The number of troops now exiting the SS River Clyde starts to give the British some hope of getting a toe hold on the spit. The Royal Dublin Fusiliers continue to fight for their lives.
'Keep going Lads!'

The bloody end of the Royal Dublin Fusiliers.
Finally, some of the Munsters get ashore on the spit - at a terrible price.
Fire from the Munsters and the British MG on the SS River Clyde starts to suppress the Turkish MG
in Sedd ul Bahr fort
The 2nd Hampshire Regiment finally makes its way down the gangways slippery with blood and littered with dead and wounded.

A small detachment of Turkish infantry below Sedd ul Bahr fort also slow the British advance.
Having decimated the Royal Dublin Fusilier, at the far end of V-Beach the Turks file down and deploy their MG to the commanding walls of Fort No. 1.
The MG in Sedd ul Bahr fort is suppressed by rifle fire from the spit and the MG on the SS River Clyde, but the MG in Fort No. 1 now sweeps the beach.
The Munsters are enfiladed by the MG at the other end of the beach and take heavy losses.
Push on! Push on! The British MG returns fire.
The tide turns! The Turkish MG in Fort No. 1 is suppressed. The remnants of the Munsters and the Hampshire's push up the beach having driven the Turkish infantry and MG from Sedd ul Bahr fort
The suppression among the Turkish infantry below Fort No. 1 up, and they eventually break and
start to drift away.
One last push to the trenches, boys!

Despite a stubborn defense, finally the pressure is too much on the Turks and they abandon their trench-line.
We've done it boys!

V-Beach after the landing - a costly piece of real estate.