My favourite pre-dreadnought action is the clash of Vice Admiral Karl Jessen Vladivostok Independent Cruiser Squadron (armored cruisers: Rossia, Rurik, and Gromoboi) and Japanese 2nd Fleet under Admiral Kamimura (four armored cruisers Izumo, Azuma, Tokiwa, Iwate, and two protected cruisers Naniwa and Takachih) off Ulsan in the Korean Strait on 14 August 1904.
The Imperial Japanese Navy close in on the Vladivostok Cruiser Squadron on my newly made
naval gaming mat.
It's a great scenario for a relatively quick game (although pretty challenging for the Russian player) and a good one for testing out new rules. For me, it highlights the great range of outcomes possible in naval gaming. I've played it about eight times now and each game has been quite different. Only one or two, by memory, have see the Imperial Russian Navy prevail, alas!
Now, to get yourself in the pre-dred mindset I can always recommend watching the clip from Turning Point (that you all know so well, I'm sure) if you can put up wth the soundtrack:
Not being a devotee of the rivet-counting end of naval wargaming rules, my go-to rules for a fun game (especially when playing solo) are Coaling Stations by Twylight Games. What I like most is the card-based order mechanism where each squadron allocated a series of individual orders (move, turn, fire, make smoke, evade etc) by placing the cards in the order you wish to enact them, and then the player rolls against their allocated command rating (7 inferior commander, 8 average commander, 9 superior commander) using 2d6 and if the roll is equal to or less than the command rating, that number of orders are put in place.
In this case the IJN protected cruiser squadron (command of 9) had rolled a 6 and were able to put all four orders into action. They have to be performed int he order they are laid out in (L to R in this picture).
Alas, in this case, the shift to flank speed meant they steamed right past the Russians (top of picture) before being able to launch their torpedoes!
So, if you have a command rating of 8 for your squadron and you lay out five orders (eg. cruise speed, fire main guns, fire secondary guns, turn 90 degrees and make smoke), a roll of 7 means you get to move forward at cruising speed, then for your main guns only that turn.
It's an interesting and easy to use mechanism. I place my cards for each squadron face down in order (top to bottom) before rolling against the commend. Sometimes I accidentally mix up the order which I put down to fog of war style mistakes by the crew. As you will see below, sometimes this has devastating consequences.
So, here's a photo-story of how the game played out.
The fleets sight each other
First IJN salvo mostly straddles the Russian cruisers, but one shot finds its mark.
Naniwa and Takachih swing to port to close on the Russians.
The second IJN salvo bites hard at the Russian cruisers
Vice Admiral Jessen steers to port to try and distance himself from Admiral Kamimura's heavy guns.
Another IJN salvo starts to slow the Russian cruisers. Naniwa and Takachih close on the rear of the Russian line of battle in the hope of coming within torpedo range.
Naniwa and Takachih pull within range of their primary guns and start to hammer the tail end of the Russian line.
The effect of the furious salvos from the IJN must have interrupted communications - no Russian orders are passed on this turn.
Jessen's gunnery officers finally receive the command to open fire as the stokers shovel coal for all they are worth. The Russian armored cruisers swing back parallel tot he IJN and open fire. Alas, to little effect.
Another salvo from the Japanese takes out a forward turret on the Gromoboi.
Rurik receives more hot stuff from the protected cruisers. The Russian fleet is badly damaged and
only limping along.
Lines of command in Admiral Kamimura's division are winning the day for the IJN, four orders are executed in one turn!
Jessen orders a punishing salvo - with several shots penetrating the Japanese armour.
But, it is too little, too late?
Fore form the main and secondary guns of the IJN protected cruisers hits home with devastating
effect on the Rurik.
Five hits and the Rurik is slowly sinking from the damage.
Steaming past the Russian line, the Takachih bring her starboard side torpedo tubes into action.
Jessen orders his crippled ships to make smoke in a last ditch attempt to avoid destruction.
Another Japanese salvo (not pictured) sends the Rurik, and Gromoboi to the icy depths. But then disaster strikes the IJN. After exercising excellent command under fire, Admiral Kamimura's orders are misinterpreted and his armoured cruisers are ordered to steer hard to port and slice through the Naniwa sending her to the bottom with all hands.
Admiral Kamimura reels with the shame of ramming his own shipas the IJN prepares to
annihilate the Russians.
Takachih avenges the loss of her sister ship by dealing a fatal blow to the Rossia.
As always, Coaling Stations and the Battle off Ulsan gives exciting results! However, a Russian victory seems always just beyond reach in this scenario.
Having spent the last few weekends focused on study, I decided to treat myself to an hour in the shed today to finish off my third gaming mat. My 2mm Thirty Years War project (see previous post) requires more attention than I can give it at present, so I was looking for an easy task.
I've had a sea mat half-made for some time and wanted to get it done to encourage me to return to some naval gaming. It's been some time since my 1:2400 Russo-Japanese War, Second Balkan War Ottoman and Greek fleets and WW1 ships have seen any action.
I've been pleased with the results I've had from gaming mats constructed from a painter's drop-sheet with acrylic caulking compound applied to provide some texture.
For this mat I used a dark grey caulk which provided a good base color. Over this I laid a wash of ultramarine blue then, after that dried, I picked up the texture with a dry-brush of off-white acrylic house paint. Once the paint was dry I applied an acrylic, semi-gloss clear sealant I purchased from an automotive supplies shop (for another job).
The result is a moody sea with a slight hint of reflection provided by the sealant (it was looking a little too matt without that). Someone with more patience than I would, no doubt, find the ideal method to provide the impression of the white caps on the waves. Perhaps using a sponge might have been the way to go?
For less than 2 hours work in total (not including drying time), I'm happy with the outcome and can't wait to get the ships out (well, I already have, as you will see!).
Update 22/04/18
The mat will be good for my air war over the Falklands project too.
Argentine Mirages send some 'hot stuff' towards a Vulcan bomber and its escort.
I've had a Thirty Years War (TYW) project in 2mm on the 'back burner' for a long time. A very long time! As I have mentioned in a previous post, there are some terrific 2mm gamers out there who I am 'leaning on' heavily for this project.
For instance, for the 2mm enthusiast I thoroughly recommend a wander around Sydney Roundwood's blog (Roundwood's World) and check out his wonderful Lützen (1632) and Nördlingen (1634) projects in 2mm. I liked the result so much, I have shamelessly copied the winter basing Sydney has used. After all, Imitation is the sincerest form of flattery that mediocrity can pay to greatness!
What I love about 2mm as a scale, one small bag contains a few weekends of work!
Hmmmm. So, what to do with them...
However, I have added my own mark to the project by indulging my interest in 17th century military theory when basing the 2mm blocks. Rather than limiting myself to the standard approach of pike with two wings of musket, I have sought to reproduce the various deployments outlined in tomes such as Richard Elton's The Complete Body of the Art Military (1650) and Collonel (sic) William Bariffe's Military Discipline, for the Young Artilleryman (1657).
While in many cases the deployments of foot troops discussed in these manuals tend towards the theoretical rather than actually reflecting those used in the field, it helped me better understand the texts and posed interesting challenges in working with the blocks and the space available on the base.
RBG7, 45 figure 1-2 pike/shot unit (15 pike/30 shot);
RBG12, 3-rank Forlorn Hope - 15 figures;
RBG33, 15 figure Pike block;
RBG25 Command - 2 figures;
RBG9, Swiss/Landsknecht pike unit (40 pikes);
BG2, Infantry in three ranks (24 figures) (these are from the Horse and Musket range; but make great musket units);
Oh, and of course, the Tercio! - RBG10, Tercio (100 figures 40 pike/60 shot).
What rules, you ask? I have yet to track down a set of rules that I am totally happy with for either TYW or ACW gaming in 2mm. Nevertheless, for TYW, I have been considering Polemos ECW, the 2 by 2 variants from the 2mm Yahoo Group, Jackson Gamers' English Civil War Rules 'Charge yr Pike! and the free older version of Father Tilly (version 3).
My basing scheme is using a 50mm x 25mm bases (c. 2"x1") for foot and cavalry with each foot base being a regiment and each cavalry base a squadron. Command and artillery (and possibly detachments of shot) will be on 25 x 25mm (c. 1" x 1") bases. So, basically, a scaled down Polemos basing system.
For larger regiments of foot I used the RBG9 pike block with wings of two blocks of BG2 for the musket. In come cases I used some RBG12 as musket either deployed forward as the Forlorn Hope or to the
rear as reserves.
When laying out the regiments I found it very useful to rule up the base to help with positioning the pike and musket blocks (RGB12 and RGB33 in this case). It gave them a nice, crisp military feel.
In this case, I'm laying out 'a squadron or third part of a Swedish Brigade' as described by Bariffe, in Military Discipline..., p. 172.
All three squadrons deployed in the style of the Swedish Brigade.
Rather than laying out some units in with their pike to the left or right (depending on their flank), and with musket in reserve at the rear, I based all of the three squadrons as laid out on p. 172 - assuming the commander would deploy as necessary!
Bariffe goes on to describe a series of deployments for 'imbattelling larger numbers' (Military Discipline..., p. 130. In the next series of bases I have adopted various forms of the 'double Crosse-Battle.' In describing these forms of deploying regiments/squadrons of foot, Bariffe notes they '...may bring most hands to the fight, with conveniency, so that one part of your Battle doe not cumber or hinder the other...' (p. 130).
In this second form, after the musketeers have '...fired once or twice over, the Front-division of Pikes may move forwards, porting, until they range-even with the front of the Musquettiers, and there charge their Pikes: The Musquettiers still continuing their Firing. The Reer divisions of Pikes, in the mean time facing to the right and left-outward, and sleeving-up the flanks of the Reer-division of Musquettiers; there in like manner charging their Pikes. either to the front or flanks...' (p. 132)
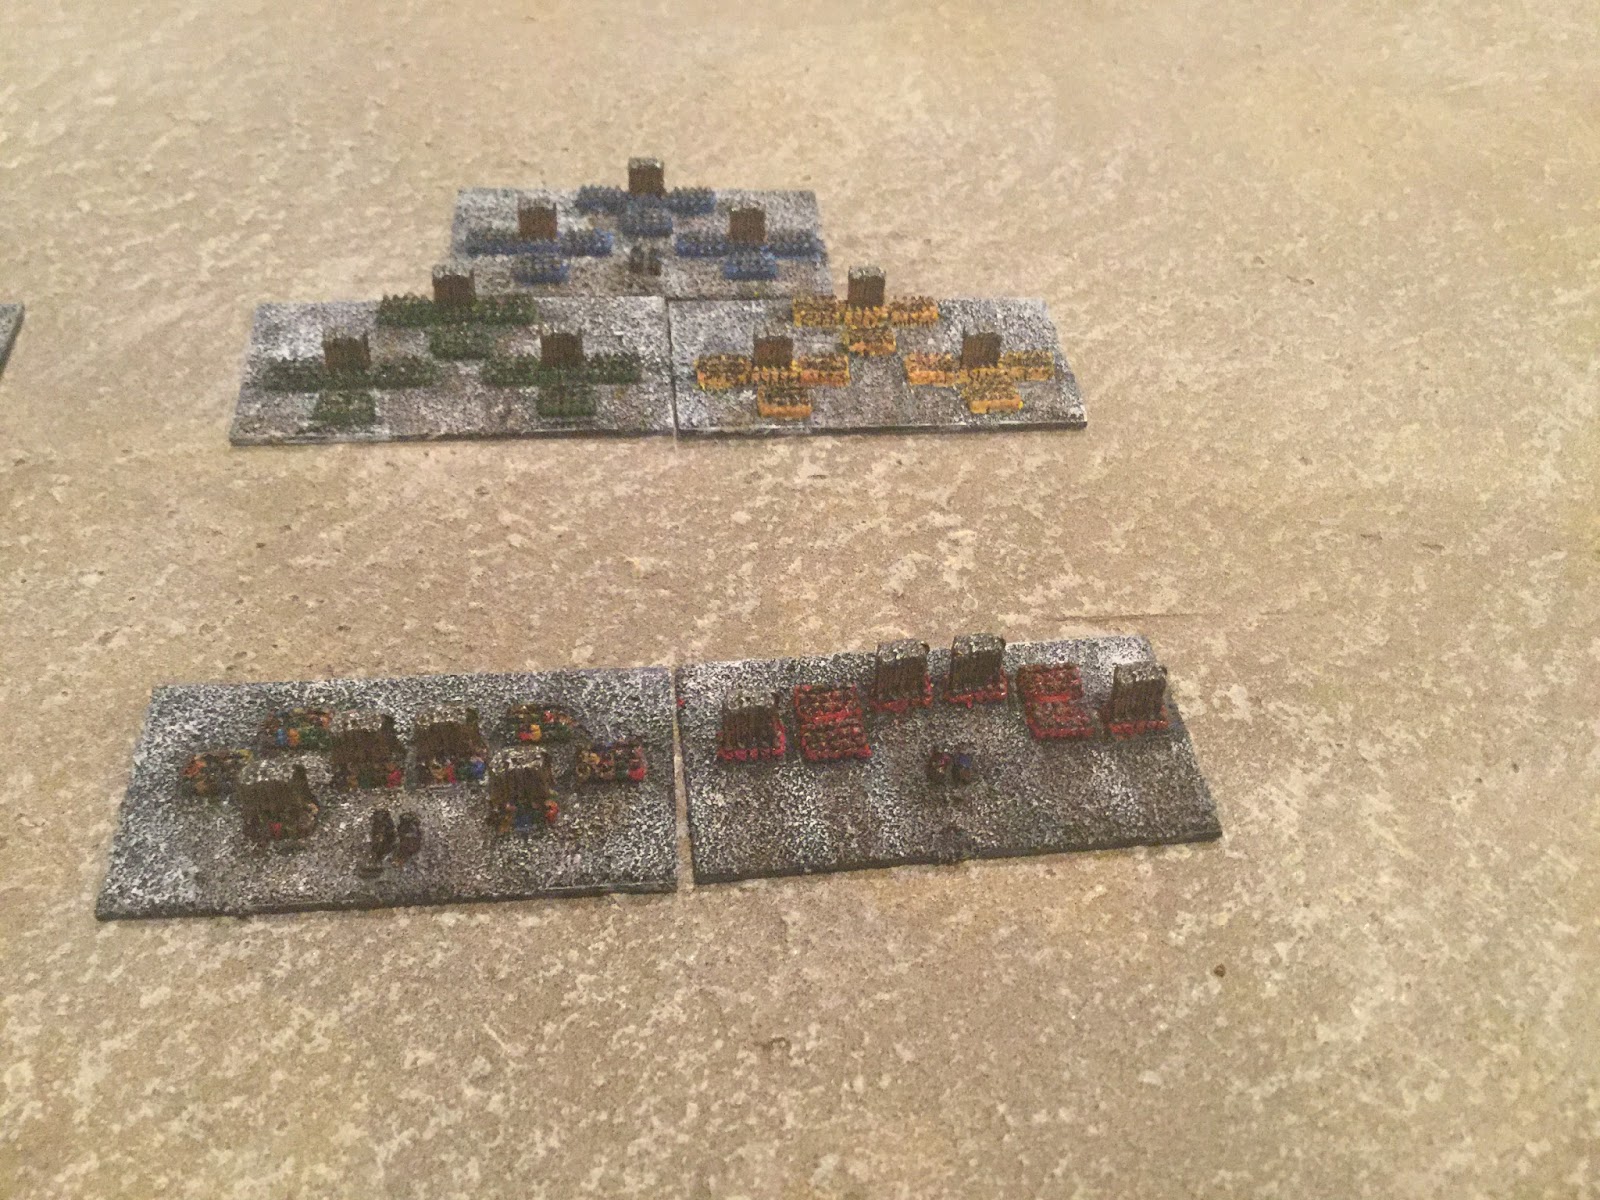
Finally, below are a few pictures of my first attempts to pain some of the above bases. I have gone for fairly generic colour schemes. I have used the same approach as my ACW 2mm basing where I paint a discoloured patch to the rear of units to represent their footprints in the frost/snow.
After quite a hiatus, my 1:600 Falklands War aircraft are slowly making their way off the painting table. Today I offer a few pictures of my recently completed Tumbling Dice Mirage 5 'Dagger' of the Argentine Air Force. (to be honest, it's been long enough I don't recall which model of Mirage I purchased!).
Carrying extra fuel tanks, these pilots made the long trek from airfields on the Argentine mainland to the Falklands to engage the British Harriers over San Carlos Waters (Bomb Alley). With no capacity for aerial refueling, the Argentine pilots only had five minutes over the target in their before they had to turn for home and refuel.
And yes, I've taken the foolhardy step of not waiting for decals and painting the roundels and other markings by hand (yep, I'm 'cheap' and impatient!). Happy enough with the result although photography accentuates the failings! ;)
At this stage I plan to use AirWar: C21 rules by Wessex games
Harriers and Avro Vulcan nearly done. More picture soon.
Fields of Blue & Grey by Dan Abbott are a set of American Civil War war-gaming rules for fighting up to Corps sized battles with a regiment being the smallest maneuver unit. Abbott notes that "Ground scale is 1 inch = approx 50 yards and the players are meant
to be divisional and corp commanders, instead of brigadiers."
Abbott's rules are successful, I feel in making effective command and control as important to victory ad combat outcomes. Brigades are given orders by Division (and Corps) commanders at the beginning of the game and these can be changed under certain conditions. Brigade commanders can also request an order change by sending a messenger with a status report to his superior.
The combat mechanism is fairly simple based around opposing d6 rolls modified by the presence of leaders, terrain, the level of fatigue of the brigade and morale. Combat losses are essentially reflected by a build-up of fatigue at the Brigade level each time a regiment is in action. As the fatigue level of the Brigade increases it can effect the combat factor of the unit (called its 'volume of fire') and the morale status.
I used an older version of the rules (attached as a PDF at the bottom of the page linked to above) win which Brigades (and divisions) must pass a morale test every turn. A 2012 update moves away form Brigade and Division morale checks. Instead, the units fatigue and morale impact on the brigade's capacity to activate each turn.
Overall, I feel the first use of these rules gave an interesting game and I really liked the 'orders' mechanism and the inevitable consequence of the build up of fatigue. The impact of sustained combat on brigades is well modeled by the fatigue rules - a nice touch. I felt it gave quite a good 'feel' for the challenges faced by brigade and divisional commanders during the Civil War.
As a first time player, I did find the occasional situation where the rules were not explicit. For example, it was not clear on the difference between mounted an dismounted cavalry (except a reduction in movement for dismounted).
One of the difficulties I had was around understanding the impact of varying morale levels (disordered, shaken, beaten) on game play. Again, I believe this is addressed by the new activation system. There was a bit of record keeping (orders, morale status, commander ability and troop quality) but with a little planning and some more subtle on-board counters and a simple roster sheet, it would be handled easily.
Example of some of the on-board counters that I used. The Litko skulls record the build-up of fatigue. Cardboard counters note the morale status of the unit/brigade. I used a Litko skull on a red base to show when a brigade commander is killed (they are replaced with a commander of lesser ability after 1 full turn. The red Litko 'cross hairs' mark a brigade commander that is wounded. I'll work on reducing the visual impact of these for future games.
Here are a few images of the first battle I fought using my 2mm Irregular ACW forces. The scenario was sent early in the war and saw the Confederate forces (top of board) pursuing a Union infantry brigade that had retreated from an earlier fight. The Union commander had some support (cavalry, sharpshooters and artillery) hurrying in from the bottom of the board to reinforce the line.
The Union 1st Brigade holds the open ground NE of a village (let's assume the top of the image is north) having fallen back in good order from a previous engagement. A column of union artillery (2 batteries) and cavalry regiment enter from the SW. Union sharpshooters hold the hill on the Union left flank.
Brigadier General Tyndale's Brigade deployed in line of battle with a small reserve and his right flank holding the heights.
From the SE, elements of Anderson's Brigade pursue the remnants of a Union division that fell back after an action that earlier that morning.
From the SW, Brown's Brigade march quickly to deploy in the open ground to the south of the Union position. Brown's men are fresh having been in reserve during the morning's action. His men are still in column having marched hard to keep pressure on the retreating Union troops.
The Union relief column cross the stream and the cavalry swing wide on the left flank. Tyndale's Brigade has hold orders while the cavalry and artillery have orders to advance to Tyndale's left flank and hold.
The Confederates deploy into line. The final advance begins.
Tyndale's Brigade have rifled muskets so get the first volley in as the Confederates close on their line.
The Union troops are spooked as the Rebs advance and their musketry has little impact.
The Confederate line advanced to musket range (being armed with smooth bore muskets) and loose the first volley in return. The Union sharpshooters march down into the woods on Tyndale's left to deal with the Confederate overlap. they are elite troops and hold their own!
The musketry of the Confederate left flank finds its mark and the forced a Regiment back over the crest of the hill. On the Union left, the artillery unlimbers at the foot of the hill.
The musketry over the next couple of rounds takes a toll on the Brigade commanders. Tyndale is out of action for a full turn. The Confederate Brigadier, Anderson, is shot from his horse and falls to the ground, dead.
The lines of infantry continue to hammer each other with lead as the fatigue (white skulls) builds up. The intensity of the musketry from the Confederate left drives back yet another Union regiment. On the left, the Union cavalry seeks to take the mill on the Confederate right flank. Anderson's cavalry (dismounted) forms a line in front of the mill and holds firm!
The last remaining Union regiment has to fall back under sustained fire from the Confederates.
The Confederate advance falters on their left with a regiment driven back form the hill-top. Moral on both sides is beginning to falter. Both sides are now shaken but the Confederate advance pushes on.
The Union cavalry assault on the left fails. The Union morale falls again - Tyndale's Brigade is battered!
Finally, the union artillery opens fire on the second Confederate line on the right flank and yet another Confederate Brigade commander falls! However, sensing the Union troops are nearly spent, a yell springs up from the Confederate line on the right and they charge into the woods to clear out the Union sharpshooters.
A Change of orders on the Confederate right redirects their attack towards the undefended artillery. Brown's Brigade (Confederate left) keep up the musketry on the Union troops that have now fallen back to the stream.
On the Confederate right flank, Anderson's cavalry push forward. Both sides have been contact for a couple of hours now and exhaustion is setting in. Ammunition is short and morale sits on a knife edge! Anderson and Brown know that all they have to do is keep pressure on the Union troops and they will break soon.
The Union Brigade commander on the left is still out of action having been wounded in the melee in the woods. The Union forces have been battered but are not yet defeated. This is where the action concluded, without a clear victory for either side (although, definitely advantage to the Confederates). I expect another turn or two of Confederate musketry might have tipped the balance in their favour.
Thanks for dropping by! I've been interested in model soldiers, board gaming, reenacting and miniatures wargaming for over 40 years. This blog is to share occasional gaming reports, my painting and scratch building attempts and to connect with gamers worldwide. I've had a range of interests over the years from ancients to modern and 2mm to 28mm.