Amidst the mountain of rules I’ve downloaded over the years, I’ve recently found a copy of Who Shall Rule this American Nation? - simple ACW rules written with the 2mm gamer in mind. They are aimed at divisional or corps level gaming.
The mechanics of movement, shooting, melee and morale are provided but the set lacks a turn sequence and the morale rules are a bit unclear - but the rest is solid. I’m playing through a game to the identify gaps and will write up some homegrown solutions.
Update: thanks for a Review by Ryan Morgan on the above BGG page, I have learned that 'In chapter one Mr. Bobek lays out the ground work for interpreting his rules in the further chapters as well as discusses his philosophy for wargaming.'
At this point I just wanted to post some shots of the initial few turns and I will update on my thoughts soon. This blog has been quiet for too long!
I’ve also been experimenting with creating woods terrain for 2mm using Casuarina cones coated in flock - there are some WIP images below. I'll post a short tutorial next.
Fields of Blue & Grey by Dan Abbott are a set of American Civil War war-gaming rules for fighting up to Corps sized battles with a regiment being the smallest maneuver unit. Abbott notes that "Ground scale is 1 inch = approx 50 yards and the players are meant
to be divisional and corp commanders, instead of brigadiers."
Abbott's rules seek to emphasise command and control game mechanics. Brigades are given orders by Division (and Corps) commanders at the beginning of the game and these can be changed under certain conditions. Brigade commanders can also request an order change by sending a messenger with a status report to his superior.
The combat mechanism is fairly simple based around opposing d6 rolls modified by the presence of leaders, terrain, the level of fatigue of the brigade and morale. Combat losses are essentially reflected by a build-up of fatigue at the Brigade level each time a regiment is in action. As the fatigue level of the Brigade increases it can effect the combat factor of the unit (called its 'volume of fire') and the morale status.
I used an older version of the rules (attached as a PDF at the bottom of the page linked to above) win which Brigades (and divisions) must pass a morale test every turn. A 2012 update moves away form Brigade and Division morale checks. Instead, the units fatigue and morale impact on the brigade's capacity to activate each turn.
Overall, I feel the first use of these rules gave an interesting game and I really liked the 'orders' mechanism and the inevitable consequence of the build up of fatigue. The impact of sustained combat on brigades is well modeled by the fatigue rules - a nice touch. I felt it gave quite a good 'feel' for the challenges faced by brigade and divisional commanders during the Civil War.
As a first time player, I did find the occasional situation where the rules were not explicit. For example, it was not clear on the difference between mounted an dismounted cavalry (except a reduction in movement for dismounted).
One of the difficulties I had was around understanding the impact of varying morale levels (disordered, shaken, beaten) on game play. Again, I believe this is addressed by the new activation system. There was a bit of record keeping (orders, morale status, commander ability and troop quality) but with a little planning and some more subtle on-board counters and a simple roster sheet, it would be handled easily.
Example of some of the on-board counters that I used. The Litko skulls record the build-up of fatigue. Cardboard counters note the morale status of the unit/brigade. I used a Litko skull on a red base to show when a brigade commander is killed (they are replaced with a commander of lesser ability after 1 full turn. The red Litko 'cross hairs' mark a brigade commander that is wounded. I'll work on reducing the visual impact of these for future games.
Here are a few images of the first battle I fought using my 2mm Irregular ACW forces. The scenario was sent early in the war and saw the Confederate forces (top of board) pursuing a Union infantry brigade that had retreated from an earlier fight. The Union commander had some support (cavalry, sharpshooters and artillery) hurrying in from the bottom of the board to reinforce the line.
The Union 1st Brigade holds the open ground NE of a village (let's assume the top of the image is north) having fallen back in good order from a previous engagement. A column of union artillery (2 batteries) and cavalry regiment enter from the SW. Union sharpshooters hold the hill on the Union left flank.
Brigadier General Tyndale's Brigade deployed in line of battle with a small reserve and his right flank holding the heights.
From the SE, elements of Anderson's Brigade pursue the remnants of a Union division that fell back after an action that earlier that morning.
From the SW, Brown's Brigade march quickly to deploy in the open ground to the south of the Union position. Brown's men are fresh having been in reserve during the morning's action. His men are still in column having marched hard to keep pressure on the retreating Union troops.
The Union relief column cross the stream and the cavalry swing wide on the left flank. Tyndale's Brigade has hold orders while the cavalry and artillery have orders to advance to Tyndale's left flank and hold.
The Confederates deploy into line. The final advance begins.
Tyndale's Brigade have rifled muskets so get the first volley in as the Confederates close on their line.
The Union troops are spooked as the Rebs advance and their musketry has little impact.
The Confederate line advanced to musket range (being armed with smooth bore muskets) and loose the first volley in return. The Union sharpshooters march down into the woods on Tyndale's left to deal with the Confederate overlap. they are elite troops and hold their own!
The musketry of the Confederate left flank finds its mark and the forced a Regiment back over the crest of the hill. On the Union left, the artillery unlimbers at the foot of the hill.
The musketry over the next couple of rounds takes a toll on the Brigade commanders. Tyndale is out of action for a full turn. The Confederate Brigadier, Anderson, is shot from his horse and falls to the ground, dead.
The lines of infantry continue to hammer each other with lead as the fatigue (white skulls) builds up. The intensity of the musketry from the Confederate left drives back yet another Union regiment. On the left, the Union cavalry seeks to take the mill on the Confederate right flank. Anderson's cavalry (dismounted) forms a line in front of the mill and holds firm!
The last remaining Union regiment has to fall back under sustained fire from the Confederates.
The Confederate advance falters on their left with a regiment driven back form the hill-top. Moral on both sides is beginning to falter. Both sides are now shaken but the Confederate advance pushes on.
The Union cavalry assault on the left fails. The Union morale falls again - Tyndale's Brigade is battered!
Finally, the union artillery opens fire on the second Confederate line on the right flank and yet another Confederate Brigade commander falls! However, sensing the Union troops are nearly spent, a yell springs up from the Confederate line on the right and they charge into the woods to clear out the Union sharpshooters.
A Change of orders on the Confederate right redirects their attack towards the undefended artillery. Brown's Brigade (Confederate left) keep up the musketry on the Union troops that have now fallen back to the stream.
On the Confederate right flank, Anderson's cavalry push forward. Both sides have been contact for a couple of hours now and exhaustion is setting in. Ammunition is short and morale sits on a knife edge! Anderson and Brown know that all they have to do is keep pressure on the Union troops and they will break soon.
The Union Brigade commander on the left is still out of action having been wounded in the melee in the woods. The Union forces have been battered but are not yet defeated. This is where the action concluded, without a clear victory for either side (although, definitely advantage to the Confederates). I expect another turn or two of Confederate musketry might have tipped the balance in their favour.
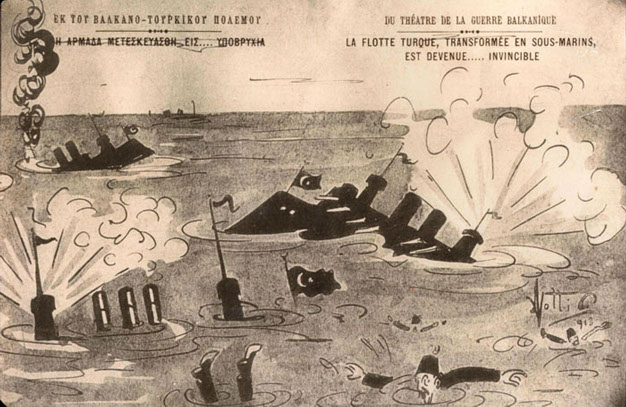
The First Balkan War (October 1912 to May 1913) saw the Balkan League (Bulgaria, Serbia, Greece and Montenegro) go to war against the fading Ottoman Empire. Ultimately, the Balkan League defeated the Ottoman armies capturing almost all of the Empire's remaining European territory.
The Bulgarian attack at Çatalca (near Istanbul) .
On the outbreak of war, the Hellenic Navy moved quickly to secure the island of Lemnos for its strategic importance as an anchorage close to the Dardanelles Straits. The Ottoman navy had not ventured out of the Black Sea (focussing on operations against the Bulgarian Navy), despite its superiority over the Greeks in speed and broadside weight. The broadside weight of a ship is '... a measurement of a vessel's maximum simultaneous firepower which can be delivered upon a single target.' (source)
However, after leaving the Hellenic Navy with two months to consolidate it's hold on the Aegean, on 16 December, 1912, the Ottoman Navy sortied out from the Dardanelles and sparked the largest sea battle of the war.
Ottoman Navy, Cpt Ramiz Bey
2 battleships (Barbaros Hayreddin and Turgut Reis), these were Brandenburg-class battleships purchased from the Imperial German Navy in 1910.
2 old battleships (Mesudiye and Âsâr-ı Tevfik)
1 protected cruiser (Mecidiye)
4 destroyers (Muavenet-i Milliye, Yadigâr-i Millet, Taşoz and Basra)
Hellenic Navy, Rear Adm Pavlos Kountouriotis
1 armoured cruiser (Georgios Averof)
3 coastal defence battleships (Hydra, Spetsai and Psara)
4 destroyers (Aetos, Ierax, Panthir and Leon)
The Battle
The Ottoman fleet sortied from the Dardanelles at 9:30; the smaller craft remained at the mouth of the straits while the battleships sailed north, hugging the coast.
The Royal Hellenic Navy, led by Rear Admiral Pavlos Kountouriotis on board the flagship Averof, defeated the Ottoman Navy, just outside the entrance to the Dardanelles (Hellespont).
During the battle, Kountouriotis, frustrated by the slow speed of the three older Greek battleships Hydra, Spetsai and Psara, hoisted the Flag Signal for the letter Z which stood for "Independent Action", and sailed forward alone at a speed of 20 knots, against the Ottoman fleet.
Taking full advantage in her superior speed, guns and armour, Averof succeeded in crossing the Ottoman fleet's "T" and concentrated her fire against the Ottoman flagship Barbaros Hayreddin, thus forcing the Ottoman fleet to retreat in disorder. The Greek fleet, including the destroyers Aetos, Ierax and Panthir continued to pursue the Ottoman fleet off-and-on between the dates of December 13 and December 26, 1912.
Gaming the Battle of Elli
1. The Fleets
Postcard: Turkish warships before the Battle of Elli on December 5, 1912 upon leaving the Dardanelles
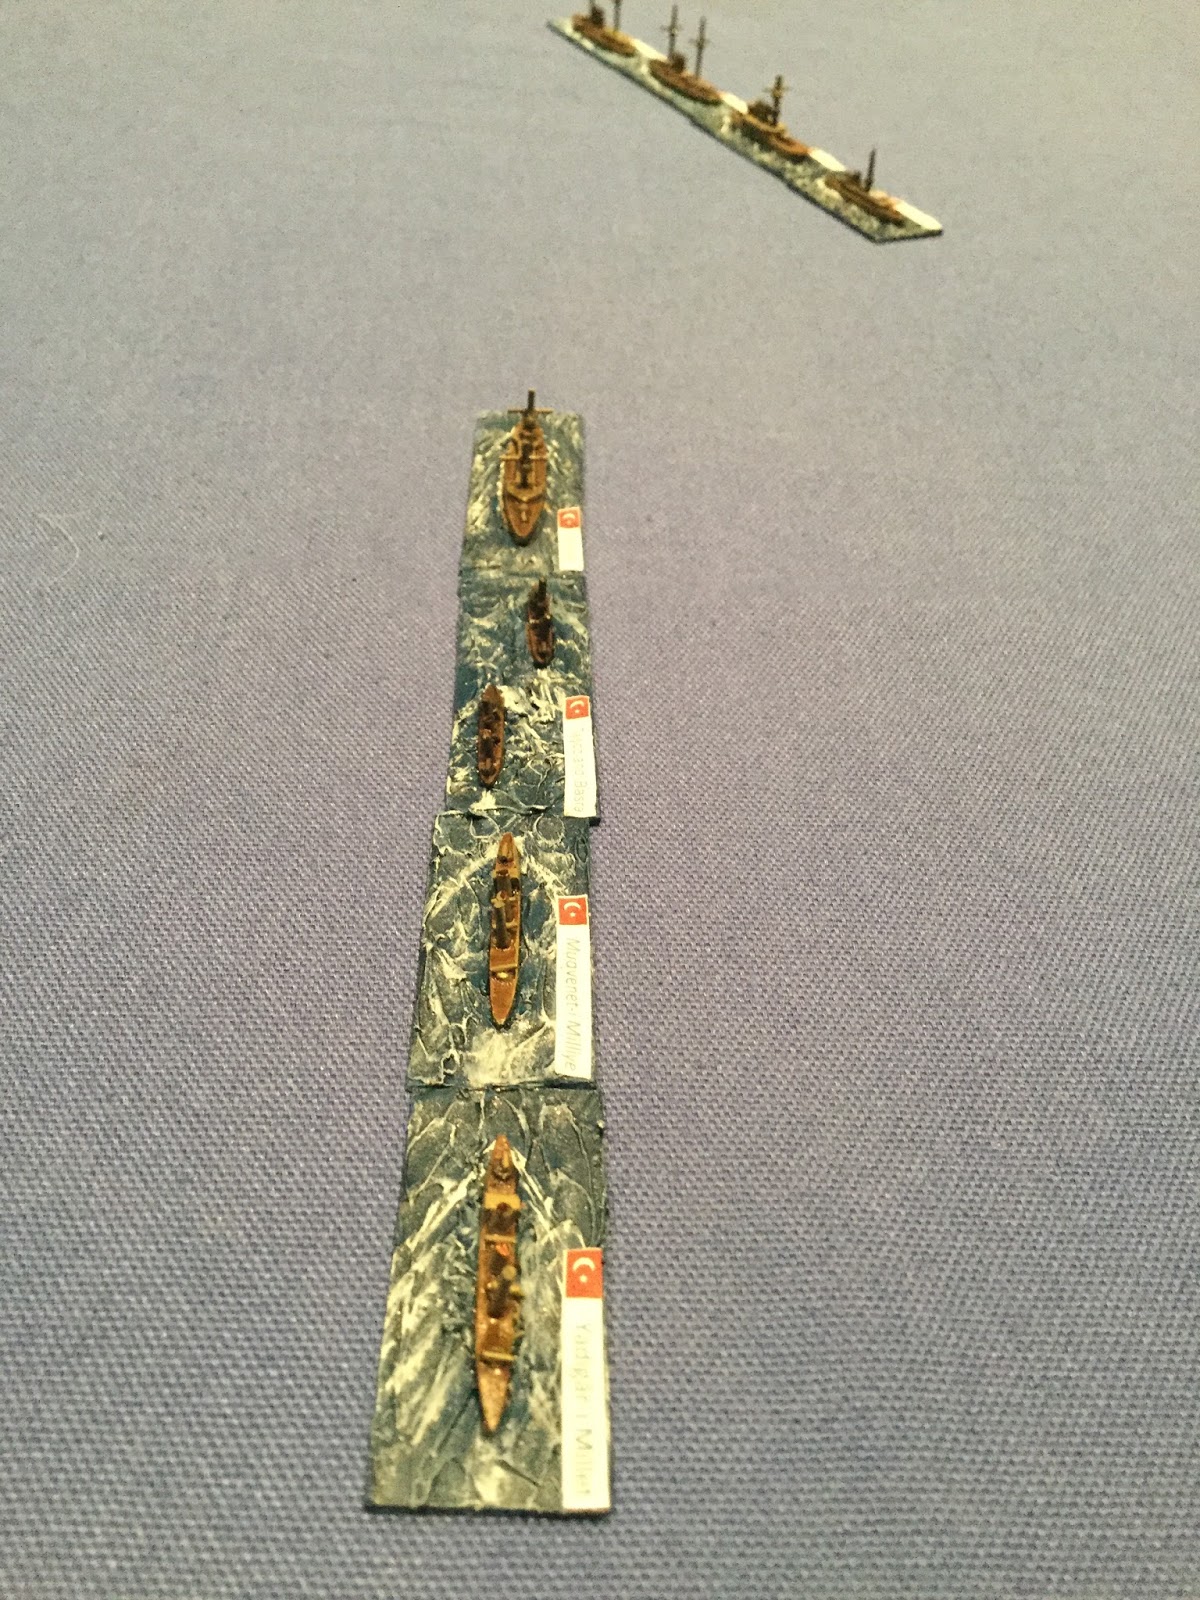
The Ottoman navy battleship division: Barbaros Hayreddin (flagship), Turgut Reis, Mesudiye and Âsâr-ı Tevfik.
The Ottoman destroyer division: The protected cruiser Mecidiye (flagship) and destroyers Muavenet-i Milliye, Yadigâr-i Millet, Taşoz and Basra (multi-ship base).
The Hellenic Navy: The armoured cruiser Georgios Averof (flagship), and coastal defence battleships Hydra,
Spetsai and Psara.
The Hellenic Destroyer Division: Aetos, Ierax, Panthir and Leon (foreground)
2. The Battle
The Ottoman Navy, under Cpt Ramiz Bey, steamed out of the Straits of the Dardanelles at 8am on 16 December 1912. The weather conditions were good and the sea was quiet.
Cpt Ramiz Bey orders the Barbaros Hayreddin and Turgut Reis to open fire on the Greek fleet after steaming out of the Dardanelles Strait. Some keen Ottoman gunnery in this opening round results in two hits on the Averoff.
Rear Adm Pavlos Kountouriotis orders the main battery of the Averoff to return fire on the Turgut Reis scoring a single hit in retaliation.
The Ottoman battleships close in on the Greeks with the 9.2" guns of the Mesudiye also searching for the Averoff.
Ottoman salvoes straddle the Averoff but another hit sees her reach 'damaged' status early in the engagement (giving the Ottomans the first victory points of the game). By this stage two checks for critical damages have been made on the Averoff seeing a loss of attack dice on all batteries and the for'ard torpedo tubes put out of action.
The Ottoman destroyer division (left centre) led by the protected cruiser Mecidiye move in to screen the battleships as the Greek destroyers (top right) start to pose a threat. The flag of the Greek destroyers - the Aetos (centre right) - turns its guns turn on the Mecidiye equally concerned about the possibility of the Ottoman destroyers getting in close to the Averoff and the slow moving Hydra, Spetsai and Psara.
Swinging in front of their battleships, the Ottoman destroyers (top centre) lay smoke giving the battleships time to slip away. The Greek destroyer division (bottom) - Aetos, Ierax, Panthir and Leon - open fire damaging the Mecidiye and Taşoz and Basra (multi-ship base) as they close on the Averoff (top right). Damage rolls result in two critical hits on the Mecidiye disabling her rudder and causing flooding.
The Greek battleship division - Averoff, Hydra and Spetsai - home in on the Mecidiye and under a fierce bombardment she breaks up and sinks. Psara scores a lucky hit on the Barbaros Hayreddin (centre left) as the Ottoman flagship emerges from behind the smoke screen.
In retaliation for the loss of the Mecidiye, all three batteries of the Barbaros Hayreddin (centre left) score hits on the Psara. The ageing ironclad was severely damaged resulting in a loss of firepower and a significant loss of speed.
At this stage of the engagement, the destroyer divisions began to dominate the action. The Hellenic Destroyers (bottom centre) engaged the Âsâr-ı Tevfik scoring multiple hits with their light guns with critical hits resulting in a loss of speed. Meanwhile, the remaining Ottoman destroyers launched torpedo attacks against the Hydra and Spetsai. The Averoff retaliated damaging the Yadigâr-i Millet, Taşoz and Basra.
Both the Ottoman and Hellenic destroyers turn into line abreast hoping to close on the capital ships to launch torpedo attacks. The Greek gunners continue to pound the Âsâr-ı Tevfik (left centre) which begins to fall behind the division. The Mesudiye returns fire with a deadly salvo sinking the Hellenic destroyer Ierax.
The Hellenic cruisers concentrate their fire on the Ottoman destroyers as they home in on the crippled Psara and sink her with torpedoes. The remaining Greek cruisers fire punishing salvos that sink the Muavenet-i Milliye.
As the battered destroyer divisions circle looking for any last kills with their remaining torpedoes (centre), the Ottoman (centre left) and Hellenic (bottom right) capital ships stay clear of the maelstrom for fear of torpedo attack.
Both commanders realise the battle hangs in the balance (both side are approaching their victory point target based on the ships already sunk and the damage to those still afloat) and order their destroyers to make one last effort to sink the capital ships of their enemy.
The remaining Ottoman destroyers steam into close quarters and launch the final torpedoes against the Hydra - which is subsequently sunk.
The Hellenic destroyers 'cross the T' of the Ottoman battleships to launch final torpedo attacks - the Âsâr-ı Tevfik having fallen out of command. The Ottoman battleships retaliate heavily.
In a final blow to the Ottomans, the guns of the Hellenic cruisers (top right) home in on the Barbaros Hayreddin (top left), sinking the Ottoman flagship in a last desperate attempt at victory before they slip away into the safety of the Dardanelles.
The heavy guns of the Ottoman battleships and the Hellenic cruisers pick off the remaining destroyers on each side, resulting in both sides exceeding the victory point tally required for victory.
This refight of the Battle of Elli has depleted both the Hellenic and Ottoman fleets with their relatively new destroyer divisions destroyed and several capital ships lost. Neither Ottoman or Greek can claim outright victory, both having inflicted serious damage on their opponents.
However, for the Ottoman Navy the loss of their flagship, Barbaros Hayreddin - now at the bottom of the Aegean along with the fleet commander Cpt Ramie Bey - will reduce the likelihood of any further sorties into the Aegean.
While the Hellenic Navy's flagship Georgios Averof is damaged, and their modern destroyer division is now but a memory, one can imagine Rear Admiral Pavlos Kountouriotis will be quick to re-assert Hellenic influence in the Aegean.
Thanks for dropping by! I've been interested in model soldiers, board gaming, reenacting and miniatures wargaming for over 40 years. This blog is to share occasional gaming reports, my painting and scratch building attempts and to connect with gamers worldwide. I've had a range of interests over the years from ancients to modern and 2mm to 28mm.