Showing posts with label AARs. Show all posts

Friday 1 July 2016

A tough day at El Mughar

After driving the Turks out of Gaza, General Allenby continued to put pressure on the Turkish 7th Division in the hills to the north and north East. The hill villages were good defensive positions for the Turks, but Allenby was determined not to give them time to dig in and make them impregnable!

The 155th Brigade, holding the right flank of the 53rd Infantry Division, was ordered to advance with all haste. The Scots of the brigade had spent an uncomfortable night in Beshshit after the assault of the previous day. There was on;y one well and the Turks had partially destroyed it as they abandoned the position. Men and horses, alike, were thirsty. They had to push on for water.

Allenby had quickly reorganised the 155th brigade after it's successful assault of Beshshit the day before. They needed to push on to take the hill villages of El Mughar and Katrah -before the Turks had time to entrench. Anyway, both villages had better wells ... and the brigade needed water, and fast! In the last hour before dawn, the 155th moved down out of Beshshit to the edge of the Wadi Jamus - the line for where the assault would kick off.

The assault of the 155th Brigade begins in ernest. Kick off time is 05:00 with the first glint of dawn on the horizon.


... and on they marched in the first light of day!

Any element of surprise now lost, the pipers of the Royal Scottish Fusiliers rang out in the morning air despite the dry mouths all round!

A squadron of the Australian Light Horse galloped up to ensure a connection was maintained between the left flank of the 155th Brigade and the 5th Mounted Brigade to their left.

Turkish lancers sweep onto the plains hoping to neutralise the support being provided by the Australian Light Horse .

The British left found itself well in advance of the right flank due to delays caused by the broken ground of the Wadi Jamus. The order was given to press home the assault on El Mughar in the hope that the left flank would soon catch up.


British artillery registration was first rate during the initial assault. The town square of El Mughar screamed with HE and shrapnel that decimated the troops of the 20th Alay who were lining the cactus hedges.

Having scaled the slopes to El Mugha, the Royal Scots laid down heavy rifle fire against the remaining Turkish defenders.

After the initial lack of momentum for their assault, the ANZACs cornered the Turkish lancers behind El Mughar and put them to flight.

By mid morning, the British left closed on El Mughar despite scattered gun fire taking its toll. 

The ANZAC mounted infantry swept around the walls of El Mughar, putting the Turkish cavalry to flight (and a flighty bunch of 'Damned Sodomites' they were!). Withering fire from the Royal Scots cleared the village square. A Bolus of the 20th Alay had already routed - would the remnants be able to hold out in the mud huts to the rear of the village?

The morning had seen a successful assault on El Mughar, now the 155th Brigade tuned its attention to the stalled right flank. As the signallers of brigade HQ established contact, the order to advance and assault Katrah galvanised the battalion commander into action.

As the assault turns to Katrah in early afternoon, the concentration of Turkish defenders started to take a toll on the advancing British infantry.

The musketry of the Royal Scots Fusiliers had cleared El Mughar but the troops had lost the impetus to make the final assault on the village.

As the brigade's assault reaches it's high water mark, Turkish and British artillery began to take a heavy toll in the centre.

Katarrh held out all day without looking like falling.The concentration of troops would certainly have suffered had more British artillery support been available.

British casualties were heavy.

The casualty count for the Turks was likewise heavy. Notable was the loss of two Alay commanders and the routing of a Tabur from the 20th Alay.

The final capture of El Mughar and the failure of the assault on Katrah suggests the game concluded with a draw. With reinforcements, the British would surely take Katrah the next day, if the Turks didn't slip away or reinforce their position overnight.  Neither side can claim a strategic victory at this stage.


Mentioned in dispatches:

There were some units a that deserve special mention for gallantry and poltroonery. 

The Pasha Bashers of the 2nd Tabur of the 20th Alay. The 20th Alay was decimated in the defence of El Mughar but the 2nd Tabur held out in the mud huts until the village was lost. In the face of an earnest assault by the Royal Scots Fusiliers they still managed to charge out  behind a stone wall and wipe out an entire company of the attackers.

Was it poltroonery or was it incompetence? The elements of the 155th Brigade MG Company under Captain Harry Flashgun, never made it out of the marshland at the end of the Wadi Jamus beneath the British start line.

The 1/4 Kings Own Scottish Borderers deserve special mention and a smattering of VCs for their determined frontal assault on the hill village of Katrah. Having reached within 400 yards of the objective, the withering machine gun and rife fire from the 21st Alay halted their advance the battalion having suffered over 600 casualties. 


The Turkish 21st Alay inflicted serious damage on the British right and centre throughout the second half of the assault.  A special mention is deserved for the right flank of the Alay that was nearly wiped out on the south-western slopes of Katrah. They may have fallen like flies, but they took just as many with them.

Sunday 17 April 2016

Somewhere in Palestine, 1916 ... If the Lord Spares Us

A bloke needs a shed. I have one, but it has been perpetually full of junk for years now (good junk, but full nonetheless). But, after a number of merciless 'chucking sessions' in recent weeks, I have finally come to the point where the shed becomes a plausible gaming venue – even if it is somewhat lacking in creature comforts (e.g. leaking roof (not over the tables), hot in summer and cold in winter).
A New Hope! Wargaming in the shed!
I've been keen to get some serious gameplay under my belt using the Too Fat Lardies classic, If the Lord Spares Us (WW1 in the Middle east). Previously, trying to war-game in a busy household had led to rushed set-ups, late at night when all was quiet, only to have to pack up after a few turns to clear the decks for morning. No longer shall the domestic needs of the many curtail the wargaming needs of the few (well, me).

So, my first decent attempt at ITLSU with my Eureka Miniatures 15mm troops, was a 'somewhere in Palestine' encounter where a brigade of British infantry supported by a troop of armoured cars, assault and Ottoman stronghold surrounding an Oasis town of El-Gouna. The British have occupied a small Oasis from where they will launch their attack.  but not enough to maintain their current position. Their only hope is to capture the wells held by Johnny Turk, a few miles to the 

The task of capturing El-Gouna and its wells, intact, fell to Brigadier-General A.W. Tufnel (classified as an Eaton commander) and the 126th East Lancashire Brigade:
  • 1st Battalion, 4 companies of 4 bases, infantry + 1 x MG (Jolly Good Fellows, spunk rating 0)
  • 2nd Battalion, 4 companies of 4 bases, infantry + 1 x MG (Saturday Boys, spunk rating 1)
  • 3rd Battalion, 4 companies of 4 bases, infantry + 1 x MG  (Saturday Boys, spunk rating 1)
  • 2 Armoured cars (1 base, Jolly Good Fellows, spunk rating 0)
Initial deployment with the Ottoman forces deployed in two redoubts overlooking the oasis. I randomly allocate troops to each blind once they are spotted or choose to come out of cover. The Empire troops have limited water at this oasis (bottom of picture) but must push on to secure the more reliable water supply at El-Gouna.
The Empire troops advance cautiously across the open ground before El Gouna. On the British left cover is taken behind a rocky hill.

The Empire forces are spotted from the air by a lone Taube (due to the Biggles card turning up this turn). 
I've never found time to finish this post so will upload the pictures I have to hand. Ultimately, the British force managed to push the Turks off the hill on their left (by sweeping around the wire). However, the Turks managed to hold the hill on the British right flank.


The 3rd battalion of the East Lancs in the British centre manages to push along the wadi with support from a pair of armoured cars on their left. This was the beginning of the end for the Turkish defence.


Wednesday 30 September 2015

GWSH II - Rolling with the punches, France, August 1914

I am pleased to report that my 6mm Great War project that I started back in July 2014, has finally got off the blocks. After months of (occasional) painting and gathering terrain, I finally played my first game of  Great War Spearhead II last weekend.

I thought it best to start with a simple scenario so I chose Rolling with the Punches - one of Robin Sutton's excellent GWSH II introductory scenarios from his Great Adventure site. This scenario has a small BEF force seeking to delay a German advanced guard during the Great Retreat of August and September 1914.
This gave me the first opportunity to try out my MDF hex terrain. This is a no frills version of the very effective method of using Hexon terrain to build up contours under a terrain mat employed by Robert Dunlop. Alas shipping Hexon terrain to the Antipodes costs more in postage than it cost me to buy this magnificent collection (and you see only a portion of it here) of hand cut (!!!) MDF hexes. I obtained these as a bit of a one off from a local supplier (thanks Mike!). Not that the postage cost is the fault of Kallistra, just a fact of geography!
Hills are laid out in preparation for the felt cloth

I ironed around the hills to improve definition of the contours through the felt.
The aim of this scenario is for this detachment of the British Expeditionary Force (BEF) to hold the bridge for 6 turns to allow the remaining elements (not depicted) of the BEF to secure a defensive position further south. I was playing solo so to add a level of surprise, I set up he BEF and provided four possible lines of attack for the Germans all of which culminated at the bridge.
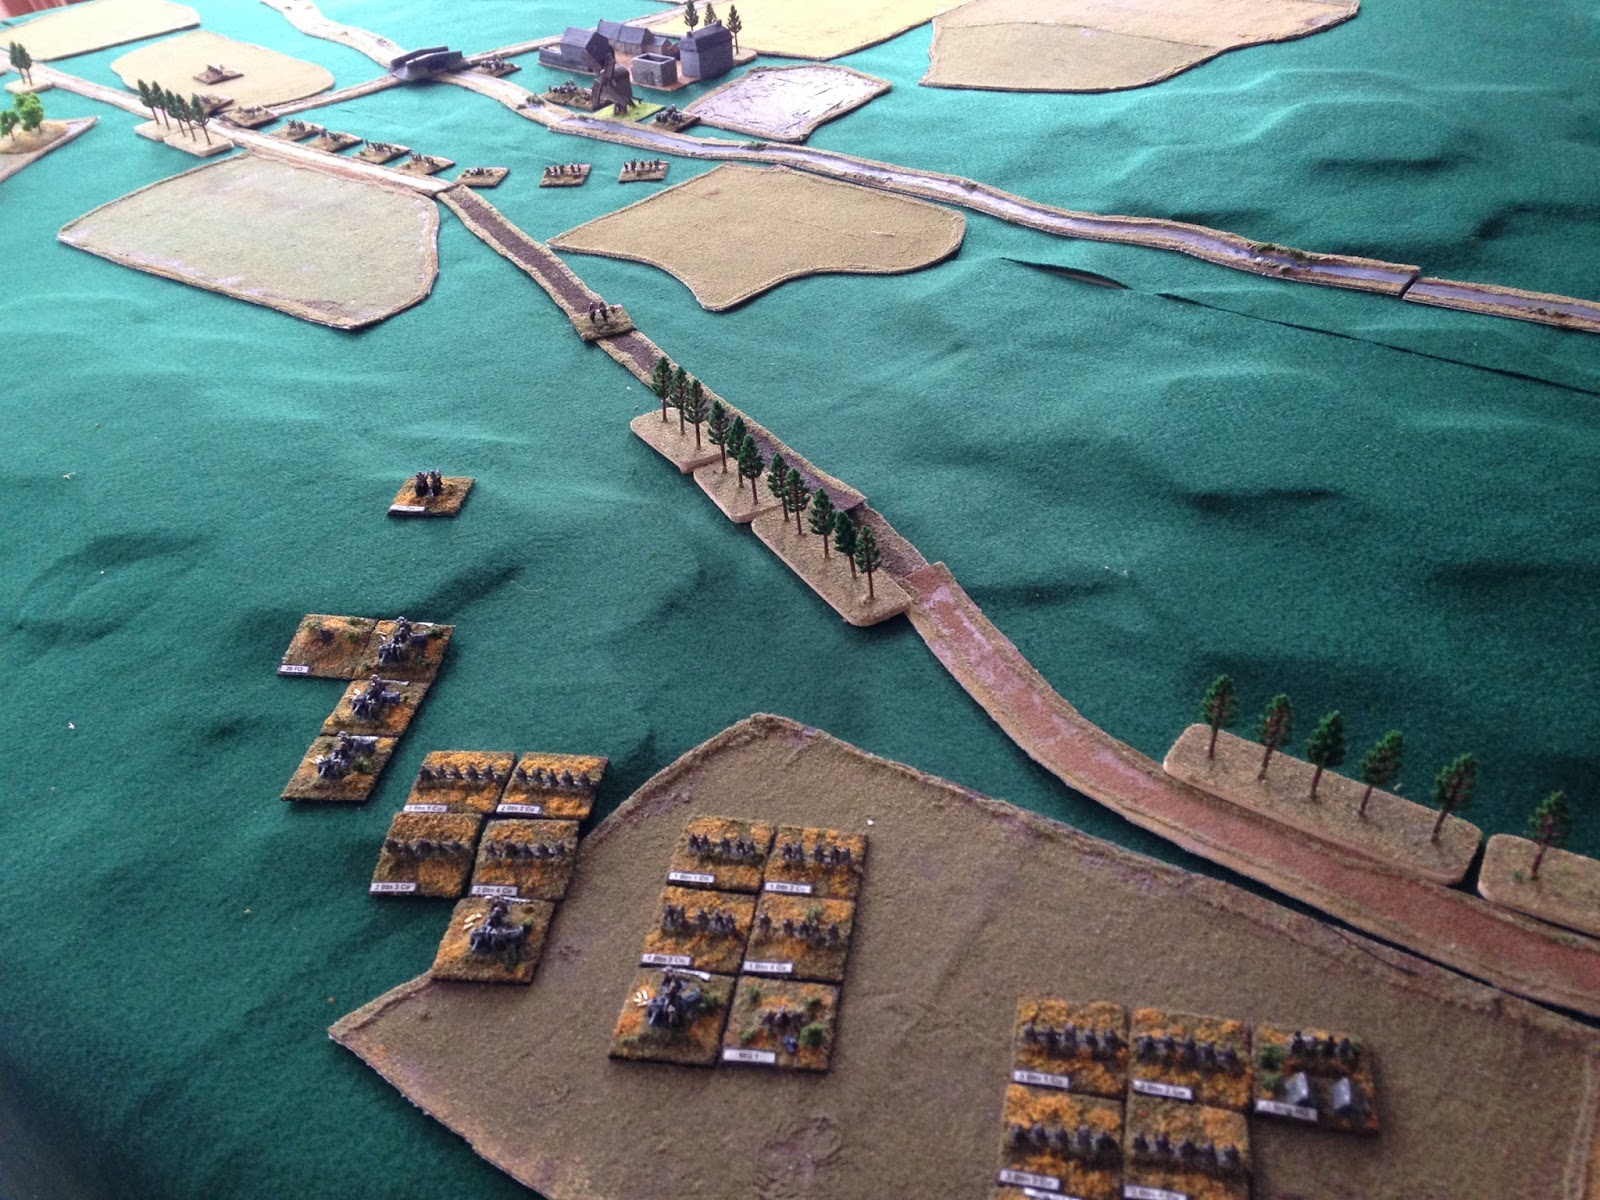
The Germans took the initiative but drew the furthest entry point from the bridge. They approach in a series of columns while the BEF defends a perimeter in front of the bridge. British artillery lined the far side of the river near the village and their HQ.
The BEF were under 'defend' orders so had to sight the Germans before they could adjust their deployment.  
German infantry are sighted as they advance up the valley. The German commander orders a regiment of  77mm field guns to deploy on the nearby hill (middle left)
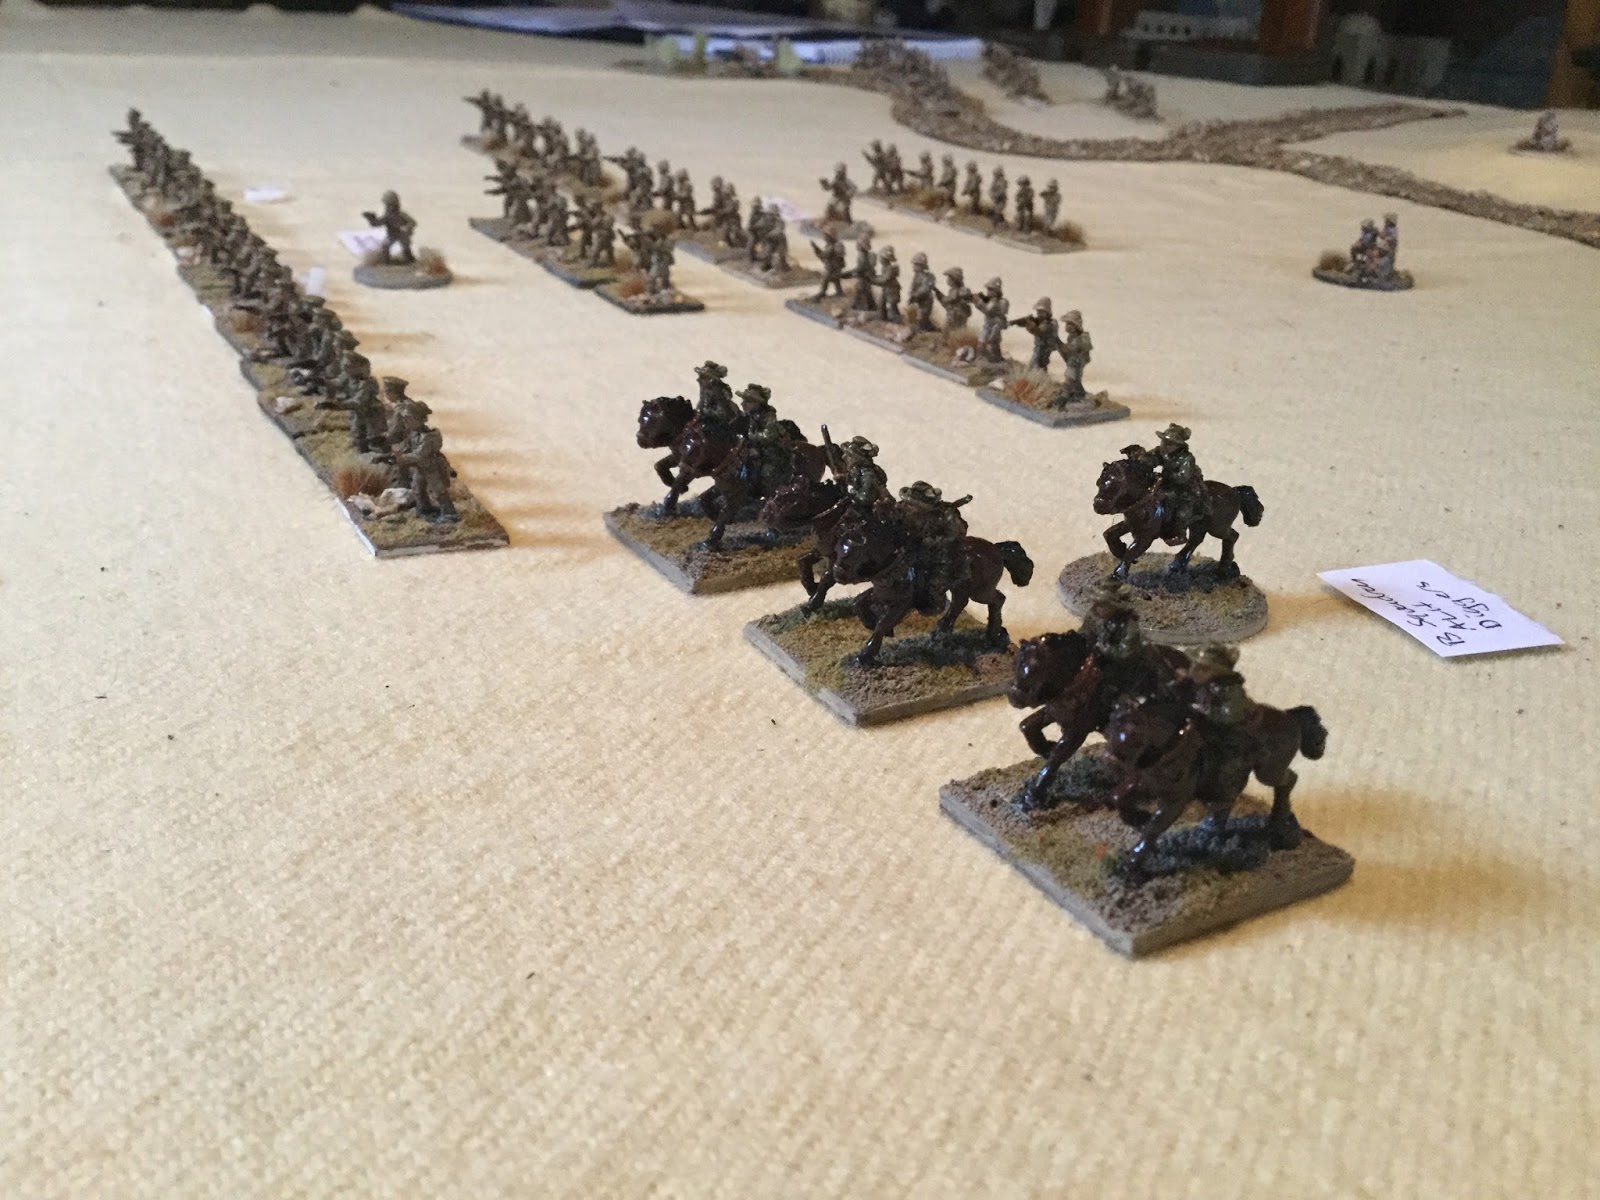
On a tight schedule, the Germans surge forward into small arms range.
Small arms fire takes its toll on the German left while a battery of British 18 pdrs open fire. 

Finally, German field gun regiment lays down a barrage on the British centre hoping to punch a hole through which the advance can continue. Despite the fury of the barrage, the Old Contemptibles stood their ground. At this stage I realised the 6 turns given to the Germans was unrealistic given their distant entry point and decided to extend the time
available to 8 turns.

As the volume of fire increased, companies of infantry were being mown down (destroyed companies marked with white skulls on red bases) on both sides and  those remaining troops were largely suppressed (white skull)


Turn 8: The German advance has stalled. The BEF have paid a heavy price but the order is given to fall back as the main body is now well on its way to the next defensive position. The BEF live to fight another day.
I really enjoyed this first touch of the GWSH II rules. I'm sure I made many mistakes but time and rereading in the light of this experience will sort that out.

I know I've got a long way to go towards learning the intricacies of industrial warfare. The overwhelming feeling from this game was that of blundering into contact, with the Germans driven to accept heavy losses to keep to their tight timetable. Not unlike the events of 1914!

Thursday 25 December 2014

Māori skirmish

My Evil Gong Māori took to the field last night in a late night gaming session while the Christmas pudding was steaming away on the hob! Here's a couple of snaps of the early stage of the game.
The warriors entering the clearing from the south (bottom) see their opponents forming up on the far side.
First contact - individual combats dominate the game while the larger warrior groups close on each other.
I took advantage of a sunny morning the next day to get some close up shots.