Showing posts with label 6mm. Show all posts

Monday 21 November 2022

Great War terrain in 6mm

I’m a dyed in the wool lead miniatures guy. 3-D and plastics just don’t feel right to me but each to their own. So, when I’m not scratch building, my default range of scenics for 6mm and 2mm is Irregular Miniatures. 

I’ve had a bunch of their shelled buildings awaiting attention for some time. I’m itching to get into some Great War gaming so time to upgrade the terrain. Here’s a few work in progress shots of a couple of shelled villages. 

After mounting a number of pieces from the 6mm scenics range on MDF, I based with ground up cork (for additional fallen masonry surrounding the buildings), gravel, find sand then grout. These were sprayed black then the masonry painted with Vallejo French Mirage Blue followed by Army Painter Runic Grey Speed Paint. I picked out some additional features in various colours (more to do on this). Following this was a drybrush with Army Painter Drakes Tooth then finally a Nuln Oil wash.

The Poilus are Irregular Miniatures 1914 French Infantry (GWF01-06). 


Still a WIP as I’ll do more dry brushing and details then flock when all the washes are dry.

Sunday 30 October 2022

Wolseley versus Arabi Pasha, 1882: HotE in 6mm

Exploring how I might use the Wargames Research Group fantasy rules, Hoards of the Things, has been on my to-do list for years, nay, decades! There is an active Facebook group and WRG released a second edition in 2002. There is talk of 2.1 being out there but I have yet to track a set down. 


While the fantasy setting has some interest to me as an another option for gaming in the style of Osprey’s Of Gods and Mortals, the adaptations of HOTT:

1. Hordes of the Empire (HotE): the Victorian colonial Mr wars adaptation of HOTT by Paul Potter, Blake Radetzky and Terry Webb.

HotE and related resources can be obtained through the DBA & HOTT Wargaming Facebook group. If I find a reliable web link I will update this post.

2. Hoards in the Trenches: the Great War version by Matt Kirkhart.

There are some (somewhat questionable) downloadable versions of HitT for those Google savvy types among you, the only link I feel comfortable advertising is the v.5 http://ianjgow.blogspot.com/p/hordes-in-trenches.html?m=1

To that end, my first project for HotE will be the Anglo-Egyptian war of 1882. I came separately, rather surprisingly, to the same view as Featherstone that Lieutenant-General Wolseley’s 1882 expedition to overthrow the dictator Said Ahmed Arabi foreshadows the British expedition to the Falkland Islands to eject the Argentinian junta one hundred years later (Featherstone, Tel El Kabir 1882, Osprey Campaign 27). 

Both campaigns lasted four and a half weeks and, due to logistical constraints, required the British to deploy their crack regular regiments not normally used for these purposes. While in wargaming terms the engagements are a little unbalanced, the variety of units on both sides make for a fun miniatures project - household cavalry, armoured trains, the Naval Brigade, Egyptian veterans redrafted into service, Sudanese conscripts, Bedouins, Krupp ordinance! 

There are no doubt some great new lines in 6mm Colonial  miniatures out there - more-so with the growth of 3-D printed options - but I am an avowed metal figure gamer and rusted-on (or the non-ferrous equivalent) user of Irregular Miniatures. https://www.irregularminiatures.co.uk/6mmRanges/6mmColonial.htm

In typical fashion, I rushed into the first set of elements, probably sacrificed the paint job a bit and went with what I had for basing - I may add some detail later - but here they are (With HotE/HOTT descriptors):

Egyptian/ Sudanese lancers would be classified as ‘Riders’ in the HotE Egyptian 1882 army list.

A Bashi ‘Hoard’ (back left), two Sudanese ‘shooters’ (centre) and Bashi-Bazook ‘riders’ (right).

Egyptian infantry in foreground (Shooters) 

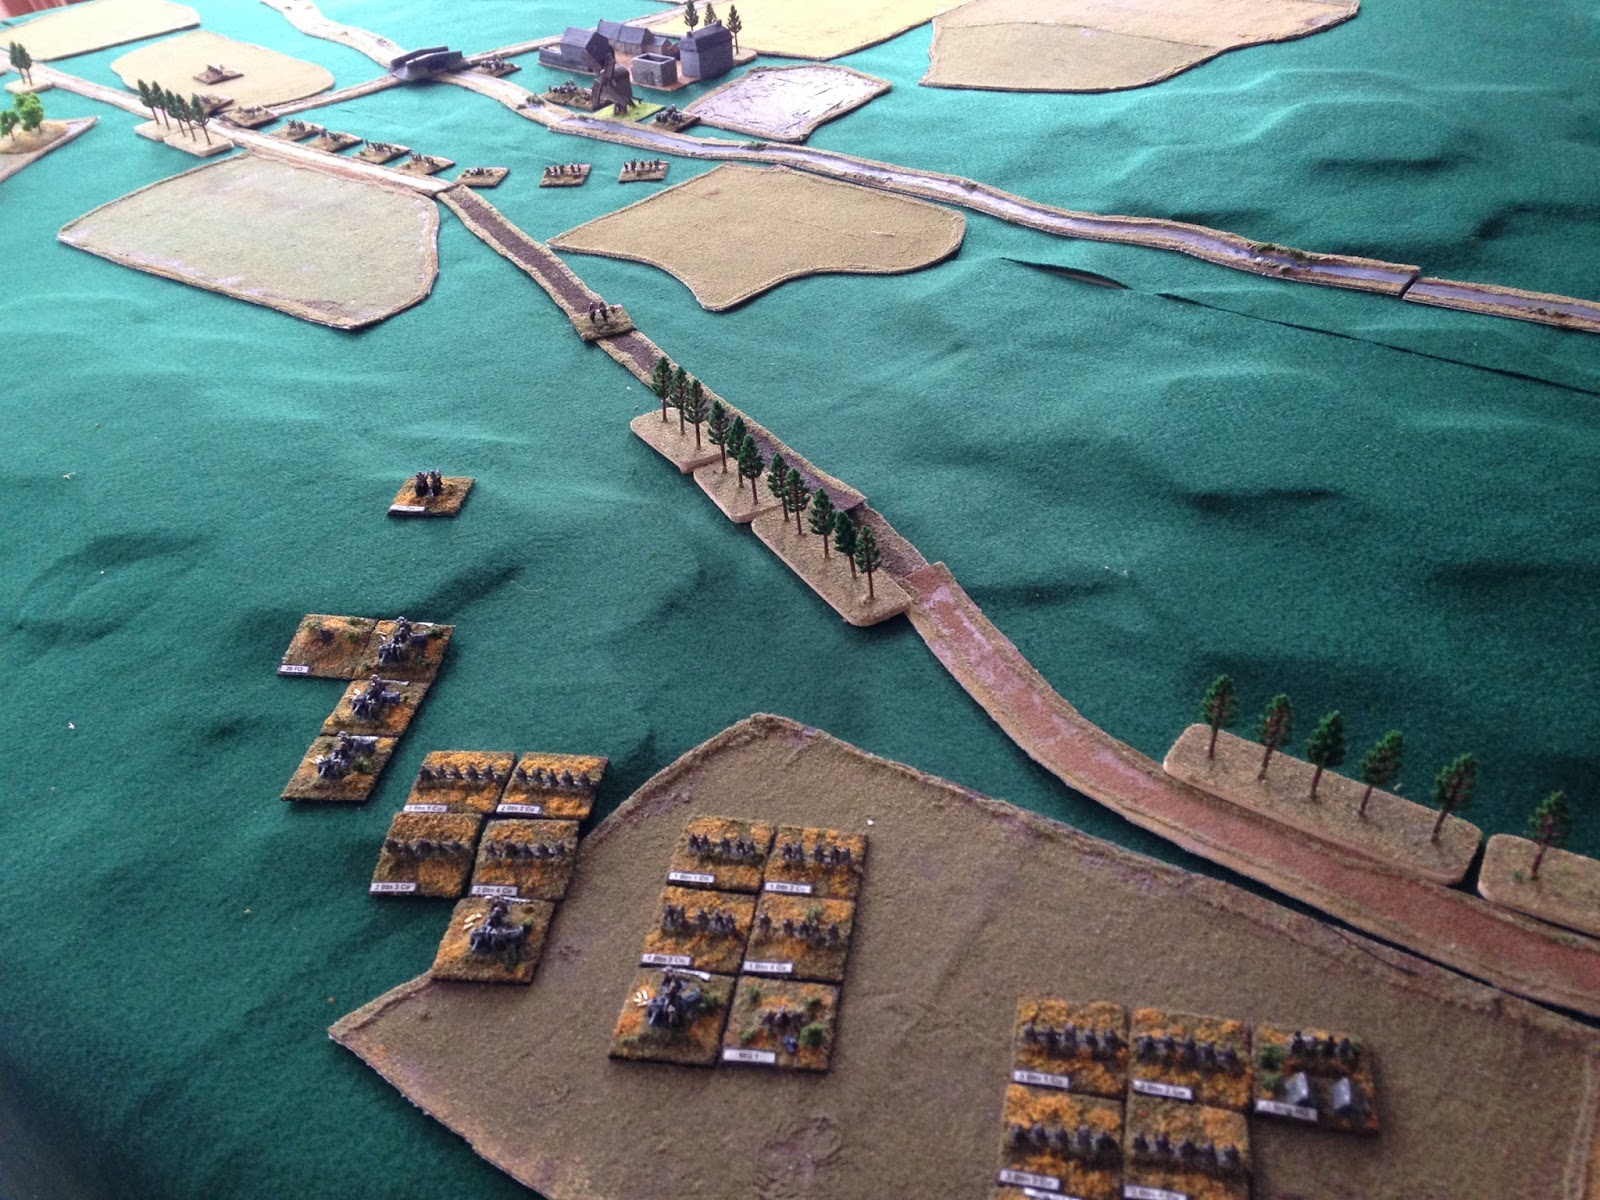
3 bases of Krupp artillery (foreground) and the ‘General’ in the centre. The army list only calls for 1 artillery base but given there were 75 Egyptian guns at Tel El-Kabir, I upped the numbers!

Another shot of the ordinance - I’m a gunner at heart!

Another shot of the irregular infantry 

‘Lurkers’ Bashi-Bazook skirmishers 

The Egyptian army of the Arabi Pasha mustered

Saturday 3 October 2015

6mm scratch-built entrenchments for Great War Spearhead II

I love an excuse to drop everything and scratch build something.

I was setting up for my second game of Great War Spearhead II (GWSH II) with the aim of playing the "A Hot Day's Work" – a tasty little introductory scenario from Robin Sutton's The Great Adventure. This provides another hypothetical rearguard action by the BEF during the Great Retreat of 1914 – this time with a few more troops on each side and the lack of a bridge over an impassable river to focus one's defence on!

I was ready to go when, on rereading the scenario background, I saw that the BEF could start the game entrenched. 'But you don't have any entrenchment markers!', I hear you say.

I've always ben rather keen on the foxholes and trench markets produced by Timecast. So, I thought I'd have a go at something similar and decided to use card bases and form the trenches using caulking compound.

Here's a quick step by step:

Add a blob of acrylic caulking compound to each 30 x 30 mm (1.1/4") square of thick card.
Wet your fingertip (stops it sticking) and smooth it out over the base. Then sprinkle a strip of flocking either side
while wet - be careful to leave the centre clean.
While the caulk was drying a little, I cut a trench-like template from a cheap plastic crate (purchased from a thrift shop - I use them for a range scratch building tasks - e.g. 28mm window frames etc.)
When the caulk is touch dry (20 minutes on a warm day) wet the template and press it into the caulk. Be sure to press each section down firmly - I used a screwdriver blade.
Gently lift out the template. You have a passable trench impression. I then went over each with a palate knife and reshaped the caulk and scratched it away down to the card on the trench floor.
They need some work work in terms of a bit of dry brushing to give the earth more texture. You could also add shell holes and other interesting detail if you are inclined.

Here they are in action (well... abandoned!). As I say, some detailing will take them the next step.
For a quick job, I feel they make a passable trench marker. The template produced a rather deep traverse between each fire bay but for a quick job, I can put up with that.

How did the game go, I hear you ask? The aim for the British was to defend the village in the centre of the board.
The German commander executed a cunning flank march and swept in on the British left.
The BEF suffered heavy losses in the woods as they rushed to establish a new defensive perimeter on their left.  British artillery had been ineffective so far and the German forward observer was having communication problems as a result of the pace of the advance (fire missions called for, never arrived).
Once both sides got into small arms range the casualties were very heavy. With the addition of some indirect fire from a regiment of the Royal Artillery and two regiments of German field guns, things got very sticky indeed. The BEF's machine guns took a heavy toll on the German infantry advancing in the open. In this turn alone, both sides suffered nearly half of the losses they experienced in the whole game!
Despite their steady advance through the woods, the German's eventually lost over half of their  troops (Morale: Regular) and failed their regimental morale check and withdrew from the field. The veteran BEF, while suffering severe losses, held  on and slowed the German advance one more.
Thanks for visiting. This blog has just passed 20,000 page view recently. I really appreciate the interest you all show in On Senlac Hill. A particular thanks to my followers and those who comment too!

Wednesday 30 September 2015

GWSH II - Rolling with the punches, France, August 1914

I am pleased to report that my 6mm Great War project that I started back in July 2014, has finally got off the blocks. After months of (occasional) painting and gathering terrain, I finally played my first game of  Great War Spearhead II last weekend.

I thought it best to start with a simple scenario so I chose Rolling with the Punches - one of Robin Sutton's excellent GWSH II introductory scenarios from his Great Adventure site. This scenario has a small BEF force seeking to delay a German advanced guard during the Great Retreat of August and September 1914.
This gave me the first opportunity to try out my MDF hex terrain. This is a no frills version of the very effective method of using Hexon terrain to build up contours under a terrain mat employed by Robert Dunlop. Alas shipping Hexon terrain to the Antipodes costs more in postage than it cost me to buy this magnificent collection (and you see only a portion of it here) of hand cut (!!!) MDF hexes. I obtained these as a bit of a one off from a local supplier (thanks Mike!). Not that the postage cost is the fault of Kallistra, just a fact of geography!
Hills are laid out in preparation for the felt cloth

I ironed around the hills to improve definition of the contours through the felt.
The aim of this scenario is for this detachment of the British Expeditionary Force (BEF) to hold the bridge for 6 turns to allow the remaining elements (not depicted) of the BEF to secure a defensive position further south. I was playing solo so to add a level of surprise, I set up he BEF and provided four possible lines of attack for the Germans all of which culminated at the bridge.
The Germans took the initiative but drew the furthest entry point from the bridge. They approach in a series of columns while the BEF defends a perimeter in front of the bridge. British artillery lined the far side of the river near the village and their HQ.
The BEF were under 'defend' orders so had to sight the Germans before they could adjust their deployment.  
German infantry are sighted as they advance up the valley. The German commander orders a regiment of  77mm field guns to deploy on the nearby hill (middle left)
On a tight schedule, the Germans surge forward into small arms range.
Small arms fire takes its toll on the German left while a battery of British 18 pdrs open fire. 

Finally, German field gun regiment lays down a barrage on the British centre hoping to punch a hole through which the advance can continue. Despite the fury of the barrage, the Old Contemptibles stood their ground. At this stage I realised the 6 turns given to the Germans was unrealistic given their distant entry point and decided to extend the time
available to 8 turns.

As the volume of fire increased, companies of infantry were being mown down (destroyed companies marked with white skulls on red bases) on both sides and  those remaining troops were largely suppressed (white skull)


Turn 8: The German advance has stalled. The BEF have paid a heavy price but the order is given to fall back as the main body is now well on its way to the next defensive position. The BEF live to fight another day.
I really enjoyed this first touch of the GWSH II rules. I'm sure I made many mistakes but time and rereading in the light of this experience will sort that out.

I know I've got a long way to go towards learning the intricacies of industrial warfare. The overwhelming feeling from this game was that of blundering into contact, with the Germans driven to accept heavy losses to keep to their tight timetable. Not unlike the events of 1914!

Saturday 9 August 2014

German 18th Division - Battle of the Frontiers

The clock seems to have stopped ticking on the 1st of August 1914, here.

Despite a good, solid start to this project, German mobilisation has languished for a couple of months – family, work and a return to study have more than filled my waking hours.

However, I'm pleased to report some progress. In a flurry of recent activity two regiments of the German 18th Division have rolled into the marshalling area.


Alas, just some quick iPhone shots ...

I'm onto artillery next, have a bit of a break from the infantry.

One of the benefits of a return to study at my old university is I get to visit a great antiquarian bookshop that was once a regular haunt of mine - Bradstreet's Books.

I managed to pick up an interesting title: John Laffin, Panorama of the Western Front.

From Amazon:
In 1916 the French illustrator Georges Malfroy decided to produce a series of panoramic views of the entire western front from the english channel to the Swiss border. It was designed to give people an idea of where their children/loved ones were fighting and so they could make sense of the names mentioned in newspapers. He put together his illustrations from topographical survey maps, ariel photos and extensive personal travels to different areas of the front
(http://www.amazon.com/Panorama-Western-Front-John-Laffin/dp/1856279014)

Not a bad little volume - I know there is a collection of ariel photographs of the Western Front been published recently, just out of my price range at the moment. I

Thursday 31 July 2014

The Old Contemptibles at Mons

The build up for my upcomming Great War Spearhead II (GWSH II) scenario has reached it's first milestone with the completion of the British Expeditionary Forces (BEF) OOB for the Battle of Mons (23 August 1914), their first major engagement of the Great War.

The BEF under Sir John French fielded 70,000 troops and 300 guns at the Battle of Mons but faced General Alexander von Kluck's First Army – 160,000 troops with 600 guns. The BEF were charged with holding their line so the French Fifth Army under General Charles Lanrezac, on the right of the British line, could fall back.
Courtesy of: In the footsteps 

The GWSH II scenario focusses on the actions on the right of the BEF's line with elements of the 7th Brigade and the 8th Brigade attempting to hold the salient around the city of Mons against the German IX Corps – represented by two brigades of the 17th Division and the four brigades of the 18th Division. The BEF were dug in along the line of the Mons–Condé Canal with the Germans advancing across open ground to the north.
The German Attack at Nimy Bridge on 23rd August 1914. Courtesy of: In the footsteps 

Below are the completed BEF units based on 30mm x 30mm squares. They are 6mm Irregular Miniatures. While the miniatures lack a bit of clarity in their castings, once painted up I think they look good. As has been said elsewhere, gaming this period in 6mm is more about the terrain than the figures. They have been surprisingly easy and quick to paint. I've tried to put a little extra effort into basing the figures.
Two battalions of the 7th Brigade, BEF

8th Brigade of the BEF

BEF Engineers (not required for the scenario, but I couldn't resist getting a few for later use)

The heavy guns of the BEF – 2 Batteries of Howitzers
(should be 4.5" howitzers – but I only have these 60 pounder's at present)

One of the two 18 pounder Field Gun Regiments supporting the BEF.

Brigade HQ

Detail of the Old Contemptibles – each base is a company of infantry or a machine gun platoon
Also, I've started work on a generic terrain mat for the WWI gaming. I'm using a canvas painter's drop sheet coated in brown latex caulking compound coated in various colours of flocking.

The next step is to start work on the German IX Corps!