Showing posts with label solo DBA. Show all posts

Wednesday 12 September 2012

Rupert routed in Wick Field, 12 Oct 1642

This year I'm repeating the ECW early war campaign I tested last year with the aim of fighting the battled on the actual days. Tonight it was Powick Bridge.

This year I tinkered a little more with the terrain to ensure Colonel Sandys' cavalry regiment had to fight its way down the lane leading Wick Field under fire from Rupert's dragoons behind the hedgerows, while providing some opportunity for Wick Field to come into play a bit more.

Deployment: with the Parliamentary force in the foreground
Rupert, deployed his dragoons in the wood along the lane, while his shot and main force of cavaliers remained in Wick Field. Parliament moved first and was obliged to move down the lane a full movement allowance in this turn.
Position about three turns into the game viewed from Royalist position.
All through the game Rupert's force suffered command issues (no Pips!) giving Parliament the initiative. This allowed Sandys' Regiment to charge down the lane while their dragoons cleared the woods - destroying Rupert's dragoons in the process.

A melee raged back and forth at the entrance to Wick Field but neither side could gain advantage.
Final dispositions on 12th October 1642

The break down in command among the Royalist forces (due to a lack of pips) resulted in teh second loss with Rupert's commanded shot getting caught out in the field on their left - having incautiously ventured out from the safety of the hedgerows - and was ridden down by cavalry and shot on Parliament's right. Rupert, sensing the day was lost, withdrew to Worcester to count the cost.

The Royalists lost one unit of shot and one of dragoons - Parliament had no losses. Replacements were rolled for by the Royalists (4, 5 or 6 on a D6 meaning a unit was replaced before the next battle) with the shot unable to be replaced but the dragoons were successfully reinforced. This will leave the king with only 11 elements at the next battle.

On to Edgehill!


Friday 2 December 2011

Edgehill, Sunday, 23 October 1642

One month after the opening skirmish at Powick Bridge, King Charles' army found itself facing a Parliamentarian army under Robert Devereux, the 3rd Earl of Essex, in Warwickshire. Charles had deployed his force on the escarpment of Edgehill, blocking Essex's march into Oxfordshire to relieve Banbury.

Origin: Beesley, 1841, History of Banbury
reproduced at http://www.battlefieldstrust.com/


Essex deployed among the hedgerows and fields of the Vale of the Red Horse, below Edgehill, taking advantage of the cover to protect both flanks. The Parliamentarians stood firm in their defensive posture through that fateful Autumn morning encouraging the King to march his men down onto the flats to force an engagement. The simple farming folk of Radway abandoned their fields that day, choosing rather to seek what shelter and comfort they could find ... be it Inn or Kirk!

Charles I holds a council of war on the eve of the battle of Edgehill
By Charles Landseer, 1799-1879
Here begins the second encounter of this DBA-RRR 1642 mini campaign (and here we depart from the historical record!).

The Parliamentarian foot outnumbered their Royalist counterparts and were better disciplined and well led. Charles knew his best hope lay in breaking Essex's line with a spirited charge of his cavaliers. After the Parliamentarian victory at the skirmish at Powick Bridge, Prince Rupert of the Rhine had his reputation to recover. Rupert's loss of mounted troops at Powick Bridge had been double that of the Parliamentarians and he had only managed to recover half of that number in the month that followed (thus the King deploys 11 elements). Parliament, however, came to Edgehill at full strength (12 elements). Unlike his historical counterpart, this time Charles decides not to spend the morning on the escarpment awaiting Essex's attack, but marches down early into the fields of the Vale to take advantage of the hedges and enclosed fields to protect his flanks.

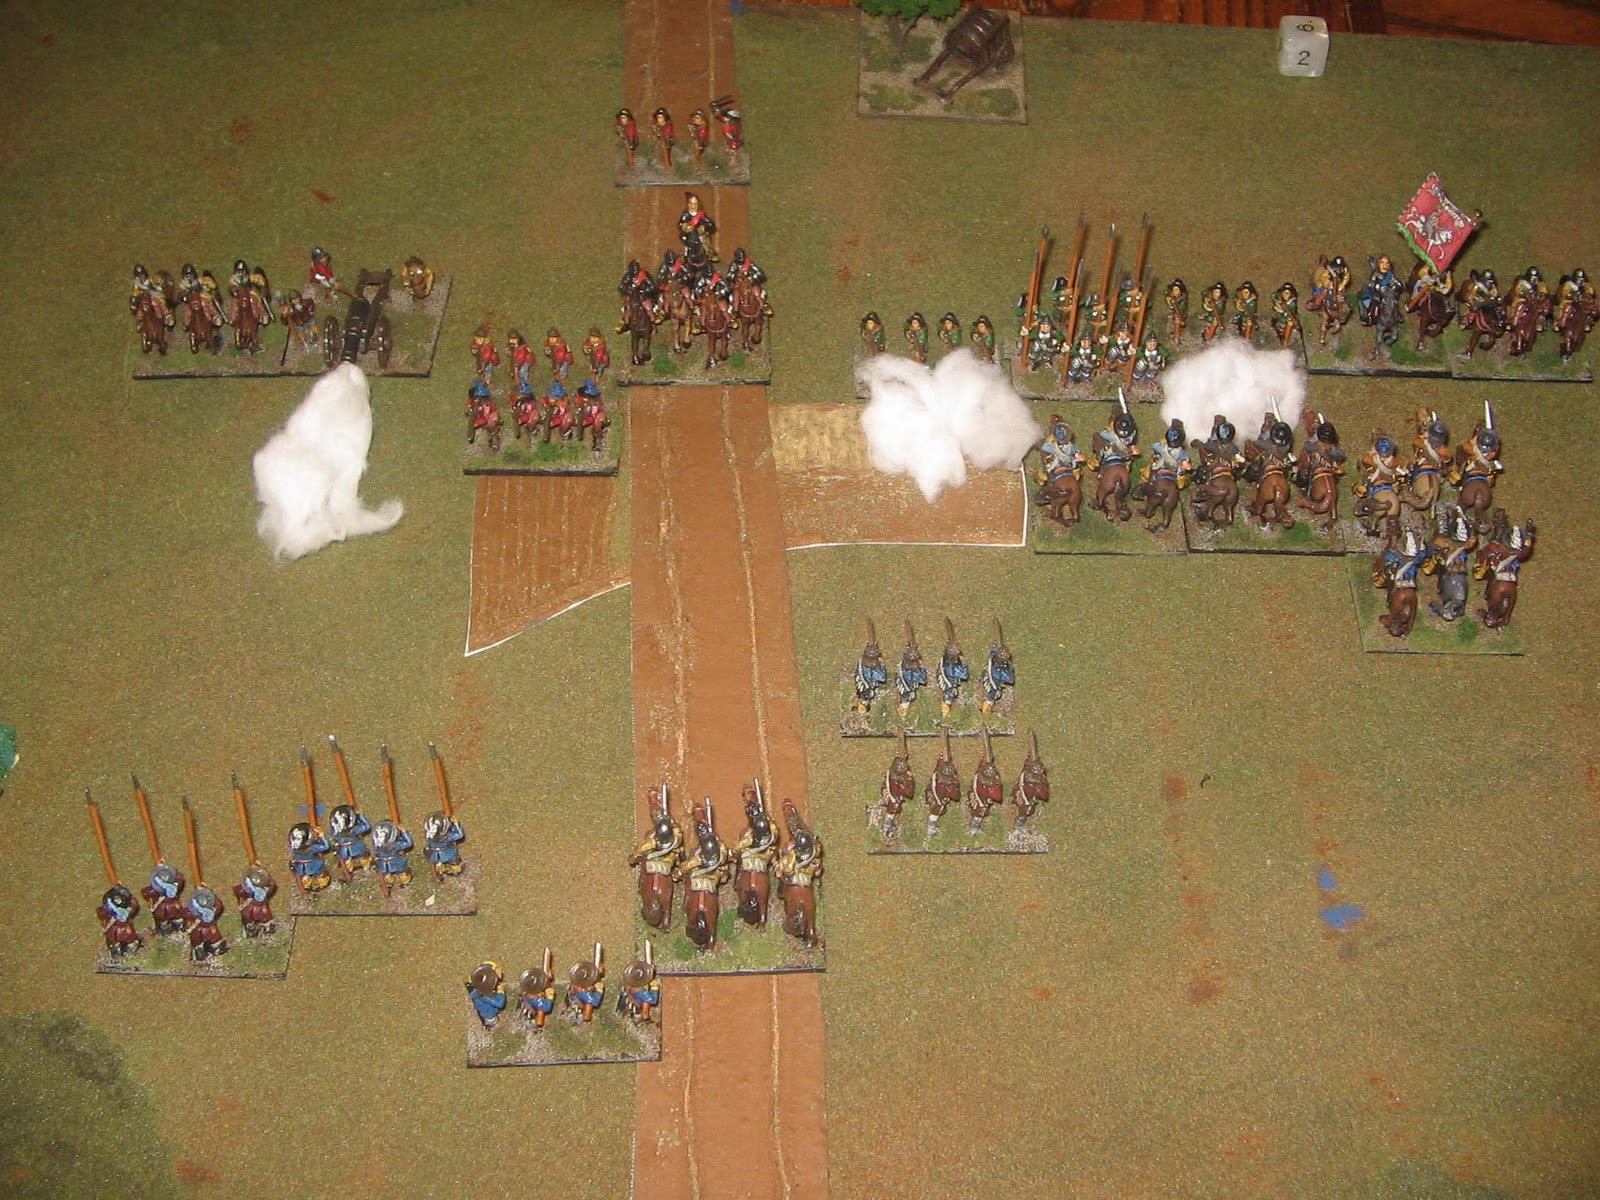
Deployment: The King's army arrayed for battle in the foreground

Charles deployed with his dragoons (x1) on his left, a block of foot (2 x pike, 3 x shot) in this centre and the full weight of his mounted troops under Rupert's command on the right (4 x Knight). The King deployed in reserve with his lifeguard (1 x pistols). Essex deployed to the Parliamentarian right with his artillery (1 x cannon) flanked by his cavalry (1 x Cv) and pistols (1 x Pi). In the centre was a block of foot (2 x pike, 2 x shot) with a column of shot (3 x Sh) and cavalry to the rear.

Rupert seizes the initiative on the Royalist right
As the foot of both armies cautiously formed lines of battle, Prince Rupert sought to gain the initiative with an daring charge on the unprotected Parliamentarian left flank. Essex ordered up his cavalry reserve to secure his left while advancing his shot and artillery on his right. Essex's tercio in the centre stood firm behind the ploughed fields to their front (bad going, in this game). 


Essex's cavalry arrived in time to secure his left and as the King's cavaliers thundered over the field towards the Parliamentarian left. The centre wheeled to threaten Rupert's left flank. As Charles ordered his pistols forward to counter this threat, a sound like rolling thunder informed him that Essex's gunners have found their first targets among the straggling foot on the Royalist left. Rupert's troopers charged into contact as the first salvo from the Parliamentarian musketeers finds its mark.

The opening shots
Rupert orders his troopers to expand their line to contact the Parliamentarian foot and cavalry to the right of the ploughed fields. The lines collide with a sickening crash of flesh and steel, and despite their momentum, the cavaliers can't shake the Parliamentarian tercio. The pike deployed in depth in the centre obliterate the hapless left of Rupert's line, and, with muskets clubbed, the musketeers fight off the determined charge. Essex's cavalry also recoil their attackers on their far left but in the centre the cavaliers strike deep, sweeping away an entire regiment and exploiting the gap in Essex's line. 


The fresh Parliamentarian shot advance through the ploughed fields threatening to overpower the weakened Royalist left and Essex leads his pistols up the road in the centre trying to regain the initiative. On the right, Rupert's flank is in disarray, but by no means beaten.


As the Parliamentarian centre advances, Essex is forced to order the shot on his left to fall back behind the pike block to protect its rear from the reforming Royalist horse. Observing this weakening of the defensive posture in the centre, Rupert orders his troopers to ride down the shot, and they are swept away while the remaining cavaliers converge on the now isolated troopers on the Parliamentarian left.


Essex's left flank collapses and sensing the immanence of his defeat, he leads a desperate charge in the centre supported by his musketeers, hoping to break the Royalist line at its weakest point. Musketry thunders across the Vale of the Horse, flesh feels the terrible bite of hot lead, and eyes on both sides stream from this burning devils breath.


Charles leads his lifeguard into the fray to allay the threat in his centre – the pistols of his heavy cavalry discharge in the faces of the of Parliamentarian musketeers who have hastily formed ranks the ploughed field ... despite this onslaught, they hold! At that very moment, Essex is leading his own desperate charge hoping to sweep away the musketeers on the Royalist centre left. As his cuirassiers pound in, Charles' musketeers give fire and give Essex's men some hot stuffe ...


Charles' musketeers found their mark and obliterated their Parliamentarian counterparts on Essex's left. Essex found himself dangerously exposed by the utter destruction of his left flank. Fully one third of his men lay smashed and bleeding on the fields beneath Edgehill. The resolve of his men was broken and they fell back in disorder. 

Likewise, King Charles' men, few of them having tasted battle before, showed little taste for further slaughter and withdrew to count the cost of this first serious engagement of the Civil War. It would be a cold night for the survivors and wounded of both armies, left to find what shelter and help they could, with empty stomaches turned by the experience of death at close quarters.

"No man nor horse got any meat that night and I had touched none since the Saturday before ... neither could I find my servant who had my cloak so that having nothing to keep me warm but a suit of iron [armour] I was obliged to walk about all night which proved very cold by reason of the sharp frost."
Edmond Ludlow, Officer of Essex's Lifeguard at Edgehill*

*In, Trevor Royle, Civil War: The Wars of the Three Kingdoms 1638–1660 (Abacus, London, 2004) p. 199

Final result: 
  • Royalists lost 1 x Kn (1)
  • Parliamentarian lost 2 x Cv, 2 x Sh (4)
On to Brentford!

Sunday 13 November 2011

1643 ... somewhere in the west country (a solo DBA encounter)

In late summer 1643, a sizeable force of Sir Ralph Hopton's army surprise Waller's Parliamentarians near a hamlet in Somerset. The Royalists quickly deploy their mounted troops to the open ground on their right wing hoping to strike while Waller's foot struggle out of ground domindated by hedges. Knowing his foot is outnumbered in the centre but certain that his left flank is securely pinned on the hamlet where his dragoons lurk, the Royalist commander quickly takes the initiative on the right and charges the Parliamentarian artillery.
View from the Royalist rear - the cavaliers charge on the right is countered by Parliament's  heavy cuirassiers
The Parliamentarian commander, seeking to buy some time while his remaining shotte deploy to reinforce his beleaguered left, leads his heavy cuirassiers in a daring charge to break the Royalist foot that have rushed in to support the cavaliers. The cavaliers try to ride down the exposed Parliamentarian left but the momentum of their charge is broken at cannon's mouth. In the centre the Royalist foot deploy their pike in depth, and the musketeers steady themselves for the maelstrom of lead that will issue from the cuirassiers wheellocks as they smash into their ranks.
The cavaliers falter as the Parliamentarian heavy cavalry countercharge
The failure of the cavaliers to drive their charge home, coupled with the heavy losses among the Royalist mounted troops from cannon and musket fire, gives the Parliamentarian shotte time to deploy. Encouraged by the arrival of the foot, the horse teams are whipped into the melee and manage to draw the heavy guns back out of danger. But, the undaunted cavaliers wheel around and slam into the flank of the muskets forcing them to turn to meet the charge. The din of battle soars as the 'lobsters' drive into the Royalist foot decimating the front ranks of pike and musket, driving all before them with their commander at the very apex of the charge. Yet, seemingly out of nowhere, remnants of the Royalist mountet troops slam into the left flank of the cuirassiers - both commanders sense the moment of decision has come. Who will carry the day?
The high water mark - remnants of the first Royalist charge strike the exposed left of the
Parliamentarians while the cavalry reserve charges to support them.
Battle rages ... the smoke of musketry blinds those engaged ... the commanders rise in their saddles ... the gods of war roll their dice ...
Bella detesta matribus! (Horace)
Wars, the horror of mothers! The lobsters shrug off the challenge to their flank and decimate the Royalist centre. While in the distance, the hard-pressed Parliamentarian musketeers are savaged by the impetuous charge of the few remaining cavaliers, the remaining foot flee. The Royalist commander rushes to plug the gap in his line ... but the day is lost (4:1).
The Royalist heavy cavalry arrive too late.

Sunday 27 February 2011

Somewhere north of Hadrian's Wall, c.300 CE

Picts (II/68 a) vs. Middle Imperial Romans (II/64 a)

It was late Saturday night, I couldn't get into painting, so instead I tried my first DBA game using the latest Solo DBA variant. I have played many solo games over the years, but not with the benefit of this rules variant.

The Romans rolled the lowest aggression score (becoming the non-player general (NPG)) so I styled this encounter as a Pictish raid on the Roman frontier.

For the purposes of this description I assume the Picts are deploying to the north of the battlefield and the Romans to the south. The random terrain placement rules saw a north-south road running along the eastern edge of the battlefield pass through a fortified Pictish village and woods. A steep hill was the centre of the Roman deployment zone.

NPG deployment resulted in a placement that looked like the Romans were leaving their marching camp in columns with cavalry (2 x 3Cv inc. gen.) and light horse (1 x 2LH) to the west (with the general), auxiliaries (3 x 4Ax) marching over a steep hill in the centre, legionaries (4 x 4Bd) and bows (1 x 4Bw) in a reserve column behind the centre and ballistas (1 x Art) advancing along the roadway to the east. (NB: One blade element should have been a 3Bd and the Bw I used only has two figures on base).


Initial deployment from point of view of NPG


The Roman general took a largely defensive stance forming a line of battle with his mounted troops on his left flank and moving the legionaries and bows that were in reserve up towards his centre. His auxiliaries moved quickly to occupy the woods on his right flank with support from the ballistas. Meanwhile the Picts advanced their line largely as deployed with the garrison of the BUA advancing towards the wood to restrict enemy road movement on the left flank.


With the legionaries still struggling through bad going, it fell to the auxiliaries on the Roman right to slow the Pictish advance. A Pictish warband slammed into the centre of the auxiliaries and a deep formation of spears supported by skirmishers (psiloi) attacked their right flank. Pictish spear moved up into the forest on the left to provide some support for the exposed flank of the warband. The warband was repulsed, but the spears took first blood by destroying the auxiliaries caught outside of the woods.


In the woods the Pictish spear advanced to contact with the auxiliaries that were overlapping the left flank of the warband. With its flank secure, the warband again charged forward to contact the remaining unit of auxiliary. The Pictish spears were destroyed being no match for the auxiliaries in the woods, while the warband pushed their opponents back and impetuously followed up their attack. The main Pictish line advanced with the skirmishers on the left flank contacting the Roman bows at the head of the column of legionaries – recoiling the column.


While the legionaries finally formed a line of battle in the centre, the previously repulsed bows let loose a storm of arrows that destroyed the skirmishers to their front. The auxiliaries on the Roman right flank responded by contacting the warband on its front and left flank. However the warband repulsed this assault and fiercely pursued the auxiliaries out of the woods. (Pictured below - Romans 1: Picts 2)


The Pictish centre and right advanced into close combat with the newly formed Roman line with light horse sweeping around to contact the end of the Roman left flank. On the Pictish left the warband supported by spears slammed once more into the unit of auxiliaries now in open ground, while efforts were made to secure the extreme left flank. However the beginning of the end was seen when Roman ballistas rained bolts down on the left flank of the warband causing it to recoil from contact. The Pictish chieftain and his light horse destroyed the Roman light horse on the end of the Roman's left flank but his centre collapsed with a unit each of spear and skirmishers destroyed and the remaining units repulsed.

End result Romans 2: Picts 4

Overall, I found the terrain placement, NPG deployment and tactical engines for the NPG very satisfactory. The Romans successfully played a largely defensive game with the exception of the auxiliaries rushing to grab the bad going on the Roman right – a manoeuvre acceptable for a defensive command according to the Solo DBA system. The Picts came to grief under my command largely through the poor match-ups (particularly psiloi against mounted and the spear against auxiliaries in bad going) and the rather impetuous charge to contact in the centre and right.

A very enjoyable game and one that certainly gives me great enthusiasm to explore this solo DBA system further.