Tuesday 10 December 2013

The polar night approaches at Gruhuken

Not content with on Pulp project on the go, I've started work on the buildings for a Arctic adventure based loosely on the book Dark Matter by Michelle Paver. As the clouds of war are gathering over Europe, a small British expedition leaves for a small island in the Arctic Circle to establish a weather station to map sub-polar weather systems. Ahead, their first experience of overwintering and the months of darkness of the Polar night. Paver writes a jolly good ghost story, the pulp adventure to come will explore in other directions… the harsh polar environment, polar bears, rogue trappers and U-boats, perhaps?

The building is a balsa construction with a corrugated card roof and polystyrene 'skin' to provide the texture of the timber planking. The minis are Bob Murch's excellent Courageous Mountaineers!


Thursday 5 December 2013

Architectural details

In a quiet day at the 'office', I happened across a number of interesting website form the 'miniatures' fraternity (eg. doll's house makers etc.) and I thought they offered some interesting ideas. I'm sure much of this has already been done by the wargaming fraternity but it's always worth looking at what others are up to!

In reality, it's just a good way of keeping links for my own use, but hopefully others may find it useful too!

Making model windowns
 Opening casement window for a dolls house
Craft wood aging solution
 Raw balsa wood, silver grey  and deep brown basswood  created with vinegar/steel wool solutions
Palm trees
 Scale miniature palm tree set behind a porcelain building in a Christmas Nativity set.
Bullrushes
Four dolls house scale cattails made from a variety of materials.
Flint finsish (buildings)
Scale railway ballast and budgie grit used to mimic stone finishes on a dollhouse exterior.
Shingles

"The illusion of moss/lichen on shingles can be created by washing the lower areas (or shaded areas if you are using trees) with a light wash of sap green acrylic or watercolor. Actual patches of lichen can be applied by dabbing small amounts of bright green, tan, and orange chalk on in tiny irregular patches. The chalk can be fixed in place with an artist's fixative, or by a light coating of matte varnish."

And let's not forget the wallpaper:
http://www.jennifersprintables.com/printables1.html


Friday 8 November 2013

Middle Eastern village in cork

In the words of 6mmPhil at LAF:
I swear this is some form of hypnotic control developed by Matakishi, however to what ends I couldn't say, but there's many gamers who've disappeared under piles of cork buildings never to be seen again. It starts with just a couple of small buildings, works it's way up to a town scape and then before you know it you've bought enough cork tiles to cover a football pitch and your home is packed with buildings of every type and there's not enough room to move.  
The only cure, partial as it is, means encouraging other folk to start modelling with cork too, so welcome to the sinister cult club.
Oh yes, I can attest to the  appeal of creating cork buildings - I've spent every 'spare' moment (for me, they are rare) thinking or doing something related to my current cork building project and have more than once, started planning for other projects to follow!

The current project is a Middle Eastern village which will see use in my Pulp Alley adventures to come. During the project, I have realised the range of uses (other than the multitude of Pulp opportunities) that they may have: colonial; modern skirmishes – giving me a great excuse to purchase some Eureka Miniatures 'modern range including the excellent Afghans and Somalis; and, possible Sci-Fi uses.


The basic shells of the buildings appeared quite quickly. The great challenges have been learning how to add sufficient detail to make them interesting and to paint them appropriately. I went down the path of using paint only rather than using a textured finish under the paint. 


Learning on the job has lead to too many coats of paint going on. :( They started a red earth colour, then morphed to a rich, sandy yellow, then to antique white (was looking better by now but lacking depth), then a raw umber wash (to pick up the texture again) and finally with a dry brush of antique white with a hint of Vallejo dark sand.


In future, I'll just paint with antique white, wash with raw umber then highlight with the antique white tinted with some dark sand. It seems to work OK.


I experimented with a bit of faded colour on the two story building (in the style used by Matakishi) and a small domed building (trying to capture a faded orange-red paint job). I think with some follow-up to mute the colour a little more the two story building it will be OK. I'm not happy with the orange-red dry brush on the central building - it's likely to go back to the standard white at some stage.


Anyway, some pictures (not the best, sorry, only had my phone on hand):

The village has a main administration building in the foreground, its Mosque in the rear right, and the market in the centre and top left. Of course, the whole thing is modular so can take many shapes.


The compound for the main administration building. I will eventually create a wall section with double gates to close it off completely giving it the opportunity of being used as a stylised Afghan compound as detailed by Matakishi


I'm planning on using the red washed building as your typical Den of Iniquity where all sorts of favours and troubles can be found! As I mention above, I'm thinking of going back to the white wash look.
The main market area will soon have many canopies on the buildings and some central under cover stalls as well.


I've recently stumbled across this British Pathé film of life in an Egyptian village (1940-49) which will be used for further inspiration. The first stand out feature is the amount of palms and plans in the village - have a look! 


Another challenge I have to overcome is whether I base the buildings (which would assist with fixing the canopies to the market buildings), or whether to leave them as they are and devise a way to make the canopies self supporting (eg. diagonal struts to the side of the building). One problem with moving to bases is it makes the use of the modular wall sections a little more difficult as they will need to sit up on the base and this will leave a gap underneath between building bases.


I'll post again when I've make the next step.


Any comments and ideas most welcome!


Sunday 27 October 2013

Adobe buildings using cork

So, I've been agonising about the possible price of buying the buildings I need for my Pulp Alley venture having no 28mm terrain to speak of. I found an interesting Desert Village paper terrain kit at RPG Now by Papermodels which provided the inspiration (and plans) for a test run with balsa - wanting something a little more durable than paper terrain. I found the stock I was using way to light and lacked the substantial feel I had hoped for. My eye drifted over the pile of 7mm cork tiles I'd recently snapped up at the local hardware (being hard to find at times) and it came to me in a flash what a great building material it would be.

I quickly cut out and assembled the shell of a simple building and saw this was the way to go. Now, fellow wargamers, I thoughts I was pretty clever for about 30 minutes thinking I'd come up with something new. A notion that about 10 minutes searching the web completely disabused! I trawled over forums finding all sorts of interesting work using cork tiles but all roads led to Matakishi's Tea House.

So, 36 hours later, I fond myself well under way. The simple building style for desert villages makes for quick results. I'm even getting to the stage of splaying the first coats of paint on a few. Here's some initial pics – much is held together with pins (glue still dying) and the canopies are just slapped on. Once they are completed and weathered they'll look much better. A couple are awaiting a dome as well.


I've decided to draw some inspiration from Matakishi's Afghan buildings as well. I'm starting to realise that these will open up a world of gaming - Pulp, colonial, modern. Hmm. I'll keep on working on getting more of a market town feel to it all then populate it with some of Eureka's excellent Middle Eastern civilians.

Thursday 17 October 2013

Wilhelm, the unknown Krupp.

I hope you enjoy my first hesitant steps into the world of VSF and Pulp!

The Great Panic of 1873 saw Alfred Krupp spread his financial interests beyond the family's steelworks into Spanish mines and Dutch Shipping. While on business in Rotterdam, Krupp's little-known half brother, Wilhelm Krupp, saw an opportunity to combine the family's passion for armaments with the growing interest in clockwork automation among the Clockmaker's Guild in Rotterdam.

Wilhelm had spent time in the Far East and had seen first hand the devastating effect of Richard Gatling's monstrous machine during the Boshin War in Japan. He returned to Europe in time to serve as a staff officer in the war of 1870, and through his connections in the Prussian high command had heard talk of the potential of weapons such as the French Mitrailleuse volley gun (used rather ineffectually in 1870) on dense infantry formations. Krupp spent many a long night pondering the potential of a mobile, rapid fire weapon on the serried ranks for the Poilu when the opportunity came for a return to hostilities.

For years, Wilhelm slaved in his secret workshop in a rat infested corner of Rotterdam perfecting an armoured suit that could deliver the devastating fire of the Gatling where and when it was needed on the battlefield. The need for secrecy was paramount. British spies were everywhere in the Netherlands, so Wilhelm rarely ventured out. His Oriental mistress and his two Bavarian clockmakers, Ernst and Heinrich, were his only companions. Nevertheless, his plans crystallised and slowly, a new machine of war was born.

It was on a grey July morning in 1882, in a secluded polder, that Wilhelm unveiled his ultimate prototype of his Kreighosen to a distinguished visitor – none other than Prince Leopold of Bavaria! The Prince had served alongside Wilhelm in 1870 and had heard of his top secret work. Wilhelm had acquiesced to the Prince's insistence, that he be the one to give the suit it's first field trial. So, after several false starts – the Dutch mud playing hell with the exposed mechanism – the Prince navigated the sodden fields with ease and, despite Wilhelm's protests, insisted in firing a burst of the terrible Gatling Gun.
Sorry, ghastly photo!

After a gruelling trip back to the workshop under the cover of darkness, Wilhelm and the Prince toasted their success and made plans for more extensive tests of the Kreighosen, hopefully under battle conditions. The news of the following day, that the British Imperialists had bombarded Alexandria, provided the ideal opportunity. The Prince had a connection in the Suez Canal Company in Port Said who arranged a bogus invitation for the party to inspect the canal. While the Prince called in favours in diplomatic circles, Wilhelm busied himself with packing his monstrosity in grease and arranging for its transport on a Krupp family ship. "On to Port Said", he mused, as he departed on the Krupp family steamer a week later.
Little did Wilhelm know, that as they steamed out of Rotterdam a mysterious crate was being hoisted from the hold of a British steamer in Alexandria. Wilhelm would soon discover that the British spy network in the Netherlands were not as incompetent as he had believed.

Monday 2 September 2013

A vexing Vauban venture pt 1

After many months with ruler and compass, I have finally taken the first step towards building a section of Vauban fortress to grace the corner of the occasional 6mm WSS battlefield. Not only does the complexity of these works make for a design challenge, the well-documented short comings of many models weighs on my mind – for instance see this TMP thread.


I was very interested to see the approach being taken by The Kingdom of Wittenberg in their excellent Fortress Fever posts. Particularly good to see such efforts pit into the Glacis which would seem to overcome must of the criticism of other models.

I took to the shed today and had a first attempt at cutting a bastion from a nice piece of cedar I have been holding onto for years. The initial plan is to construct a modular Vauban fortification mostly for the fun of it at present but also with the impending publication of Vauban Wars ruleset.

I have begun with a bastion to see if I can overcome some of the modelling issues I will face with managing the issues associated with getting the wall height to look right in conjunction with ditch and glacis. Here's the results of the first day's efforts with some bases of 6mm Baccus figures and buildings thrown in to give a sense of scale.

 My first impressions is the wall is too tall but I'm working on the bedding this down into the terrain considerably.
You can see the proposed height for the bottom of the ditch roughly marked on the outer edge of the bastion in the photograph below.
Using cedar for the construction has proved quite a success at least at this initial stage. It is so easily worked with hand tools for the initial cutting into shape and the parapet was then formed freehand with a router. It also has the advantage of being quite strong, yet light. The only struggle I'm having is the ex-joiner inside me keep thinking how nice this would look well sanded up and oiled, but I know I should give it a faux masonry skin!

Monday 19 August 2013

Eureka Skeletal pirates

Much as these undead denizens of Davy Jones' Locker are the result of powerful enchantments, so have I been taken under the spell of a new (non-historical) genera!

In a project that began years ago with my daughter (then 6, now 9 and dead keen on gaming, bless her!) wanting to paint some Eureka Teddy Bear Pirates, I have, at last, found some renewed passion for miniatures and gaming (sorely lacking in the past 6 months).

I came away from an all-too-long overdue visit with the kiddies to Eureka Miniatures on the weekend, with some new projects - the first to hit the painting table are Eureka's Skeletal Pirates in 28mm. I've not tried anything like this before and while I feel like my 28mm painting skills have a long way to go (having been focussing on 6mm lately), I'm really happy with the results. 

A model brig is on the workbench in the shed and will soon take to the seas to host the first encounter between skeletons and teddy bears! Despite their appearance, I'm not underestimating the courage of these furry bed companions when it comes to a good bit of biffo using Eureka's Fifteen Men rules.

Alas, these photos are only with the old iPhone, so not very clear, but give you an impression. More to follow.


Friday 2 August 2013

Acceptance

Thanks to the Monday Knights for this cracking motivational poster!

Source: http://www.mondayknights.org.au/gallerys/category/2-posters


Tuesday 14 May 2013

Sabre Drill, Patten 1862


A recent discussion on Fanaticus was questioning a rather unusual Sabre grip used when delivering a thrust during a cavalry charge. The method saw the little finger looped over on the other side of the grip to the other three fingers.

A quick search came up with an excellent collection of 19th Century swordsmanship resources from the Schola Forum: http://www.fioredeiliberi.org/phpBB3/viewforum.php?f=22

I should also mention the Schola Gladiatoria Victorian Marital Arts page as an useful resource: http://www.fioredeiliberi.org/victorian/

Among these is the Cavalry drill and sabre exercise: compiled agreeably to the latest regulations of the War Department, from standard military authority by George W Patten (1862).

Below are some of the key plates that may be of some assistance.

1. Instructions in the small sword exercise (Patten, 1861)

In his subsequent work on Sabre and Cavalry drill (1862), Patten refers back to his earlier work on infantry tactics for anything not covered in this later work. I found this description of the sword grip.


Source:
Patten, G. Washington. (1861). Patten's infantry tactics, bayonet drill ..: Comp. agreeably to the latest regulations of the War department, from standard military authority. New York: J.W. Fortune.
Reproduced at: http://babel.hathitrust.org/cgi/pt?id=uc1.b4236832


2. Sabre Drill, Patten 1862


See 'Present' (middle of page) for description of sabre grip. This is the only reference I found to the position of the little finger when gripping a sabre.

The following pages then go on to describe the method used to practice the thrust of a sabre.


Source:
Cavalry drill and sabre exercise: compiled agreeably to the latest regulations
of the War Department, from standard military authority ...
Patten, George Washington, 1808-1882.
Richmond : West & Johnston, 1862.
http://hdl.handle.net/2027/dul1.ark:/13960/t10p1w656

Thursday 4 April 2013

Ulsan again!

Having last night tested a new set of simple, quick play rules with the Russo-Japanese War scenario, Battle off Ulsan, I felt inspired to give another ruleset a go tonight. This time I used Rob Heath's Coaling Stations  – rules for pre-dreadnougt naval wargaming.

I'll skip the preamble as that's covered in my previous post, the order of battle is as follows:

Russia

Vladivostok cruiser force
Rear Admiral Karl Iessen

Armoured cruisers:
Rossia (flag)
Gromoboi
Rurik

Japan

2nd Squadron
Vice Admiral Hikonojo Kamimura

2nd Unit: armoured cruisers:
Izumo (flag)
Azuma
Tokiwa
Iwate

4th Unit: protected cruisers:
Naniwa
Takachiho

The action opened at 06:00 with the Admiral Iessen's squadron on a north-west heading in the Sea of Japan, off Ulsan, spotting four Japanese armoured cruisers around 2 nautical miles to the east. It was a clear morning with good visibility and light seas.


Iessen and Kamimura both ordered their squadrons to open fire with the Iwate scoring a single hit on the Rossia although no significant damage was caused. Kamimura ordered his cruisers to 'make smoke' as the lines of cruisers continued to close on one another.
The Rossia is hit but makes its 'armour save' so records no damage
Kamimura's cruisers 'make smoke' providing a +1 to to hit rolls in the next round
 Admiral Iessen takes the initiative and orders his squadron to 'flank speed' (the fastest speed of which a warship is capable) while a second salvo form the Russian guns sees the Rossia score a hit (but no damage) on the Izumo and the Gromoboi hits and scores a point of damage on the Azuma. Iessen orders his squadron to make smoke in preparation for the next Japanese salvo.

As Kamimura's 2nd unit attempts to catch up and close on the Russians, a quick change in weather sees a light mist form in the sea of Japan reducing visibility down to 1 nautical mile. Iessen sees an opportunity to break contact from his foe and make for Vladivostok.
Hoping to disable his opponents flagship before making for port, Iessen seeks to cross the T and disable the Izumo with a broadside, but the visibility is too poor for gunnery at that range. 

Crossing the T
Kamimura's evasive manoeuvres in the mist pay off as he avoids the deadly trap being set by the Russians.

Iessen orders his squadron onto a north-westerly heading while just managing to stay our of range in the early morning mist. Despite a close encounter in the final turn, the Russians succeed in exiting all three cruisers from the board un-damaged. Kamimura's 2nd Unit only managed two salvos before the mist settled in and the protected cruisers of his 4th Unit never managed to engage the enemy at all. 

The Vladivostok cruisers live to fight another day!
Coaling Stations performed really well in this scenario (my second use of these rules). Playing solo, the uncertainty built in by the command rules made for an interesting action. More comments about the game mechanics will follow.

Tuesday 2 April 2013

A 'quick' battle off Ulsan (14 August 1904)

At dawn on the 14 August 1904, returning from a patrol, Vice Admiral Hikonojo Kamimura of the 2nd Squadron of the Imperial Japanese Navy (IJN) sighted the three heavy cruisers of the Imperial Russian Navy's Vladivostok Squadron off Ulsan (on the Korean peninsular) in the Sea of Japan, just north of the Tsushima Strait.


Rear Admiral Karl Iessen, commanding the armoured cruisers Rossia, Gromoboi and Rurik, had sortied out of Vladivostok to try and meet up with the Port Arthur Squadron which the Russian High Command believed would be able to break out of the Japanese blockade of Port Arthur into the Sea of Japan.

The Port Arthur Squadron had failed to break out of Port Arthur after an unsuccessful engagement with Admiral Togo in the Yellow Sea just 4 days prior. Admiral Iessen had ordered his squadron back to Vladivostok but found himself cut off from his base by Admiral Kamimura who commanded the more modern armored cruisers: Izumo, Azuma, Tokiwa, Iwate, and two protected cruisers Naniwa and Takachiho.
The lightening day clarified the two columns of warships, whose converging tracks gradually closed the range. At 0520 hrs the range was down to 8,500 yards, and both Admirals checked with opening salvos. Soon the 8-inch batteries were ablaze and, as the range shrank further, the 6-inch rifles joined in. 
(Source: http://www.russojapanesewar.com/ulsan.html)

In the engagement that followed, Admiral Iessen lost the Rurik and the Rossia, Gromoboi were heavily damaged. Admiral Kamimura's squadron, despite having a full summer's day ahead of them to pursue Iessen, broke off from the engagement after three hours. He retuned to Busan to a hero's welcome despite having let two of the Russian heavy cruisers escape.

Wargaming the Battle off Ulsan

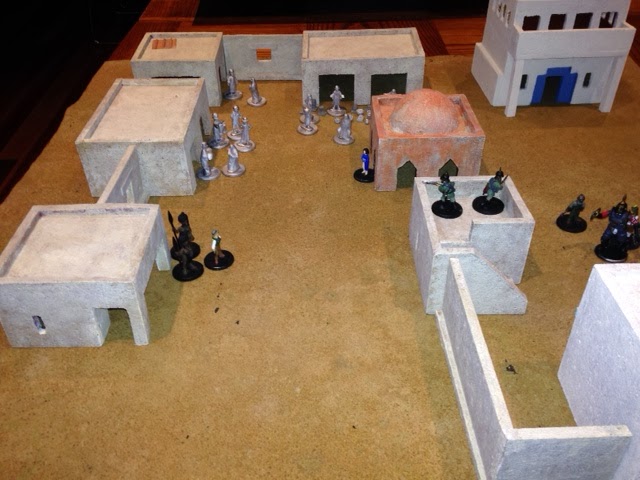
Having assembled the two squadrons for this scenario using 1:2400 Panzerschiffe models, I have been trying a few rule sets. I've not got the time to play more detailed naval wargaming rules so have been trying our some simple rulesets. I've had an initial trial of Rob Heath's Coaling Stations which I quite enjoyed - particularly the no record keeping and interesting command rules - but this time, I'm using an even simpler set by Konstantinos Travlos – FAST RULES FOR SMALL SHIPS AND BIG MINDS.

I started the scenario with the Russians and Japanese steaming in parallel, but with converging headings, at about 05:20 when the first ranging shots were fired by both commanders. For simplicity (and because of the table size) I left the protected cruisers Naniwa and Takachiho out of the scenario.

These rules allow for three ship types – battleship, armoured cruiser or torpedo boat. All the ships for this scenario were classified as armoured cruisers. These had a maximum movement rate of 6 inches and they used four D6 for 'to hit' dice. Armoured cruisers will sink if they take four 'hull points' of damage (battleship = 6 hull points; torpedo boat = 2 hull points).


Unfortunately, I got my bearings mixed up and reversed the historical positions of the Russians and Japanese on deployment - oh well! For the purposes of testing these rule it makes no difference at all.

During the first movement phase both squadrons steamed strait ahead for their full movement rate of 6 inches (battleship = 4 inches; torpedo boat = 8 inches). The movement system allows ships to do anything from remain stationary to move their entire movement range in a turn. A ship may pivot up to 45 degrees only at the end of its move – even if it remained stationary.

Both squadrons opened fire at maximum range. In these rules there are no modifiers for range – my understanding is that for 1:2400 scale all guns have a 24 inch range for this ruleset. However, I did find the rules are slightly ambiguous about this. They state:
All guns have a 24 inch range if the largest ship is 3 inches and above and 12 inches if the largest ship is 2 inches and below. 
The Panzerschiffe models I used saw the largest ship measure 2.5 inches! Falling right in that no-man's land between 2 and 3 inches. So I leant towards 24 inch maximum range.


A ship may use its 'hit dice' on one target or divide it between a number of ships that are within range – although may only fire within one arc in a turn. The arcs of fire are not defined by the rules so I just used a line from the centre of the model to each corner of the base to define forward, aft and port/starboard arcs. Armoured cruisers shoot with 4 'to hit' D6 - hitting another armoured cruiser on a 5 or above.

The first salvo by Iessen's cruisers was deadly in its accuracy with the Izumo, Azuma and Tokiwa each receiving a single hit and the Iwate, two hits. Kamimura's gunnery failed to find its mark with only one hit on the Rossia from the salvos of 4 cruisers! It was only 05:30 and already the decks of the Japanese squadron were awash with blood and the fire crews were busy!

The Russians sensed that victory could be within their grasp and Iessen ordered his squadron to close on the Japanese line. Unfortunately, by this stage the Japanese rangefinders had found their mark and the next salvo saw a hit on each of the Russian cruisers. The Russian gunnery was inaccurate with only a single hit on the Tokiwa (now with 2 hits).
Kamimura ordered his squadron to port to execute the classic 'crossing the T' manoeuvre. The superior Japanese range-finders (although, differences in gunnery abilities are not represented in these rules) saw a deadly salvo smash into the Rossia with three hits brining her total to 5, leaving Admiral Issen's smashed flagship burning, and dead in the water. The Gromoboi also received a hit. Despite the fury of the Japanese salvo, Russian gunnery was not without impact – with one hit each to the Tokiwa (now with 2 hits) and Iwate (now with 3 hits).


The Russian flag was transferred to the Gromoboi and an order given to turn to starboard to ensure a full broadside could be directed towards the Japanese line that was now almost dead ahead. It is hard to know if the Russian sailors had a moment to ponder the fate of the Rossia as the manoeuvred around its smoking wreckage as at that moment the full force of the Japanese gunnery smashed into the Gromoboi – three hits sending it to the bottom. Gromoboi's broadside was ineffective as was the salvo from Rurik, using only 3 to hit dice as she was firing out of her forward arc.
Now alone, Rurik swung to starboard seeking cover from the smoke of its burning comrades. While no line of sight rules are suggested by these rules, it was decided that the smoke blocked the line of sight for the three rear Japanese cruisers leaving the Izumo and Rurik to exchange fire. Izumo's guns scored a single hit on the Rurik (now 2 points) while the Rurik's gunners found their mark with two hits on Kamimura's flagship (now 2 hits).
But the fate of sole remaining Vladivostok cruiser was sealed, as the Rurik cleared the smoke she lay in range of the full broadside of the Japanese squadron. A massive salvo hit with full force with five hits causing the cruiser to erupt in a sheet of flame and quickly sink into the icy depths. But the Rurik fought to the bitter end with her gunners, still valiantly manning their stations amidst the destruction, sent a final salvo in return that smashed into the Tokiwa and left her a mangled wreck. Perhaps some Russian pride was maintained – cold comfort for the few lucky Russian sailors who shivered in life-rafts in the early morning light.

Final results:

Imperial Japanese Navy
  • Izumo (Flag) – 3 hits
  • Azuma – undamaged
  • Tokiwa – 4 hits, sunk
  • Iwate – 3 hits
Imperial Russian Navy
  • Rossia (Flag) – 5 hits, sunk
  • Gromoboi – 5 hits, sunk
  • Rurik – 7 hits, sunk

In conclusion

At the outset its appropriate to note that some poor decisions by the Russian commander aided the Japanese victory in this re-fight of the Battle off Ulsan. If the initial Russian salvo was followed up with some accurate shooting, and the Russian commander had of manoeuvred to keep as many guns as possible trained on the Japanese, there was sufficient damage on either side that the end result could have gone either way.

Overall, the rules performed well. Although, they did require some interpretation (gunnery range, arcs of fire) and at times the situation invited the player to interpret the situation and make some 'sensible' interventions (eg. like limiting line of sight in some circumstances).

My main concern is the number of hit points a ship can sustain are small so the encounters are very deadly. I wonder if there is a case for expanding on these a bit and allowing two stages in receiving damage – maybe for an armoured cruiser it could be 6 points of damage with the first three being taken with no effect on movement or gunnery and the second three reducing gunnery by 1 hit dice and speed to a suitable fraction of the maximum.

It would also be interesting to trial a scenario with the other ship types and test the torpedo rules. 

It's important to remember that the author notes that this is a set of rules that is 'not intended as a simulation of naval tactics but just as a very simple system of rules for fun fast games.' To my mind they do that quite well. I make no claim to being an experienced rule reviewer or naval wargamer (as some of my actions above will indicate!). 

The author notes on his blog that these rules may receive a 'tweaking' in the future – I look forward to that and hope these few comments are of some assistance. Thanks for making these rules freely available.

Next, I plan to refight this engagement having a second go with Rob Heath's Coaling Stations ruleset.