Showing posts with label 2mm. Show all posts

Wednesday, 8 May 2024

Backs (or flank) against the wall, Heavenfield, 633 CE

The Battle of Heavenfield (ca. 633-634) was fought between a Northumbrian army under Oswald of Bernicia and a British/Welsh army under Cadwallon of Gwynedd. Bede, who refers to it as the 'Battle of Deniseburna' notes the proximity of the battle to a section of Hadrian's Wall - which it is thought that Cadwallon secured one flank of his army on.
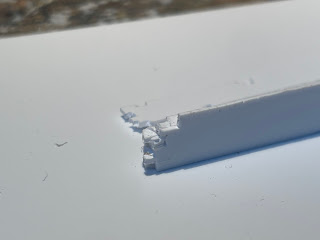
'The place, on its noth side, is close to the wall with which the Romans once girded the whole of Britain from sea to sea to keep off the attacks of the barbarians...' Bede, Baedae Historia ecclesiastica gentis Anglorum, iii.2 My 2mm DBA (v.2.2) forces being complete for Oswald's Northumbrians (II/73 Old Saxon) and Cadwallon's Britons/Welsh (III/19a Welsh), it is time for some terrain! The most iconic item of terrain is surely the (then ruinous) Roman wall! Here is a prototype section scratch built from pvc sheet. Paint job is a WIP with Vallejo grey undercoat and Army Painter Speed Paint first coat (Runic Grey for the wall and Sand Golem for the ground and to highlight the 'fill' in broken areas of the wall. More pictures to follow once I get a few sections done.
Miniatures by Irregular Miniatures, of course!

Friday, 2 September 2022

Split rail fences for 2mm ACW

Felling the timber, splitting it into rails and stacking it along your farm boundaries must have been a punishing task in the 19th century.

Punishing, in a very different way, is an apt description for scratch building split rail (snake) fencing for my 1:800 (eg. 2mm) ACW terrain!

I have to admit these little guys spent more time stuck to my fingers than to their bases. Nevertheless, the struggle yielded the equivalent of 14 chains (chain = 22 yards) of fencing for Wilmer McLean’s farm.

The method, while fiddly, is fairly strait forward.

I cut a series of 50mm x 1mm strips (sorry, back to metric for this) of 0.5mm Evergreen Styrene sheet which was scored every 5mm on opposite sides.

I then bent each scored point to form a zigzag long enough for my bases. This was attached to the base (via being glued to various fingertips) using Superglue. Then 5mm lengths were scored in the centre and bent into a right angle piece using tweezers. These were glued to the outward facing points of the fence to represent the crossed over rails.

The roughed up 45mm x 10mm base of styrene was coated carefully with fine sand (using PVA) and then undercoated with Vallejo grey primer (73.601). I washed the dry undercoat with Liquitex raw umber acrylic ink. Then, I painted the fence rails dark brown. These were dry-brushed with Army Painter Drake Tooth. My flower meadow mix of flocking was glued in place then a light coat of Vallejo Mecha Dark Rust wash (a staple in my paint collection) was applied on the rails. Done!


These simple 2mm terrain pieces add, I feel, some period flair to ACW battlefields at this scale. Maybe cornfields and a peach orchard next!

Saturday, 28 September 2019

2mm ACW (with updates)

Amidst the mountain of rules I’ve downloaded over the years, I’ve recently found a copy of  Who Shall Rule this American Nation? - simple ACW rules written with the 2mm gamer in mind. They are aimed at divisional or corps level gaming.

Update: I have since discovered that the rules are part of a collected set by John Bobek, The Games of War: A Treasury of Rules for Battles with Toy Soldiers, Ships and Planes (2007): https://boardgamegeek.com/boardgame/37718/games-war-treasury-rules-battles-toy-soldiers-ship  A copy is on its way in the next week or two! I will review the rules in more detail then.

The mechanics of movement, shooting, melee and morale are provided but the set lacks a turn sequence and the morale rules are a bit unclear - but the rest is solid. I’m playing through a game to the identify gaps and will write up some homegrown solutions.

Update: thanks for a Review by Ryan Morgan on the above BGG page, I have learned that 'In chapter one Mr. Bobek lays out the ground work for interpreting his rules in the further chapters as well as discusses his philosophy for wargaming.'

At this point I just wanted to post some shots of the initial few turns and I will update on my thoughts soon. This blog has been quiet for too long!


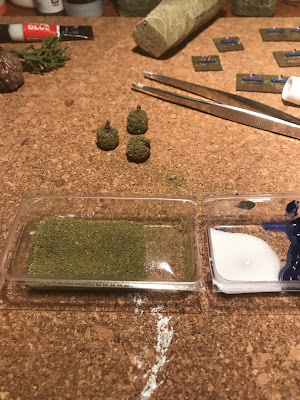
I’ve also been experimenting with creating woods terrain for 2mm using Casuarina cones coated in flock - there are some WIP images below.  I'll post a short tutorial next.


Sunday, 1 April 2018

Thirty Years War in 2mm - basing using 17th century military texts

I've had a Thirty Years War (TYW) project in 2mm on the 'back burner' for a long time. A very long time! As I have mentioned in a previous post, there are some terrific 2mm gamers out there who I am 'leaning on' heavily for this project.
For instance, for the 2mm enthusiast I thoroughly recommend a wander around Sydney Roundwood's blog (Roundwood's World) and check out his wonderful Lützen (1632) and Nördlingen (1634) projects in 2mm. I liked the result so much, I have shamelessly copied the winter basing Sydney has used. After all, Imitation is the sincerest form of flattery that mediocrity can pay to greatness!
What I love about 2mm as a scale, one small bag contains a few weekends of work!
Hmmmm. So, what to do with them...
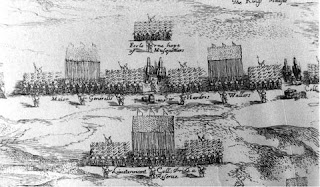
However, I have added my own mark to the project by indulging my interest in 17th century military theory when basing the 2mm blocks. Rather than limiting myself to the standard approach of pike with two wings of musket, I have sought to reproduce the various deployments outlined in tomes such as Richard Elton's The Complete Body of the Art Military (1650) and Collonel (sic) William Bariffe's Military Discipline, for the Young Artilleryman (1657).

While in many cases the deployments of foot troops discussed in these manuals tend towards the theoretical rather than actually reflecting those used in the field, it helped me better understand the texts and posed interesting challenges in working with the blocks and the space available on the base.

Overall, the main Irregular Miniatures blocks I used for these bases were:
  • RBG7, 45 figure 1-2 pike/shot unit (15 pike/30 shot);
  • RBG12, 3-rank Forlorn Hope - 15 figures;
  • RBG33, 15 figure Pike block;
  • RBG25 Command - 2 figures;
  • RBG9, Swiss/Landsknecht pike unit (40 pikes);
  • BG2, Infantry in three ranks (24 figures) (these are from the Horse and Musket range; but make great musket units);
  • Oh, and of course, the Tercio! - RBG10, Tercio (100 figures 40 pike/60 shot).
What rules, you ask? I have yet to track down a set of rules that I am totally happy with for either TYW or ACW gaming in 2mm. Nevertheless, for TYW, I have been considering Polemos ECW, the 2 by 2 variants from the 2mm Yahoo Group, Jackson Gamers' English Civil War Rules 'Charge yr Pike! and the free older version of Father Tilly (version 3).

My basing scheme is using a 50mm x 25mm bases (c. 2"x1") for foot and cavalry with each foot base being a regiment and each cavalry base a squadron. Command and artillery (and possibly detachments of shot) will be on 25 x 25mm (c. 1" x 1") bases. So, basically, a scaled down Polemos basing system.
For larger regiments of foot I used the RBG9 pike block with wings of two blocks of BG2 for the musket. In come cases I  used some RBG12 as musket either deployed forward as the Forlorn Hope or to the
rear as reserves.
When laying out the regiments I found it very useful to rule up the base to help with positioning the pike and musket blocks (RGB12 and RGB33 in this case). It gave them a nice, crisp military feel.
In this case, I'm laying out 'a squadron or third part of a Swedish Brigade' as described by Bariffe, in Military Discipline..., p. 172.
All three squadrons deployed in the style of the Swedish Brigade.
Rather than laying out some units in with their pike to the left or right (depending on their flank), and with musket in reserve at the rear, I based all of the three squadrons as laid out on p. 172 - assuming the commander would deploy as necessary!
Bariffe goes on to describe a series of deployments for 'imbattelling larger numbers' (Military Discipline..., p. 130. In the next series of bases I have adopted various forms of the 'double Crosse-Battle.' In describing these forms of deploying regiments/squadrons of foot, Bariffe notes they '...may bring most hands to the fight, with conveniency, so that one part of your Battle doe not cumber or hinder the other...' (p. 130).
In this second form, after the musketeers have '...fired once or twice over, the Front-division of Pikes may move forwards, porting, until they range-even with the front of the Musquettiers, and there charge their Pikes: The Musquettiers still continuing their Firing. The Reer divisions of Pikes, in the mean time facing to the right and left-outward, and sleeving-up the flanks of the Reer-division of Musquettiers; there in like manner charging their Pikes. either to the front or flanks...' (p. 132)

Finally, below are a few pictures of my first attempts to pain some of the above bases. I have gone for fairly generic colour schemes. I have used the same approach as my ACW 2mm basing where I paint a discoloured patch to the rear of units to represent their footprints in the frost/snow.


Wednesday, 14 March 2018

Fields of Blue & Grey - 2mm ACW AAR

Fields of Blue & Grey by Dan Abbott are a set of American Civil War war-gaming rules for fighting up to Corps sized battles with a regiment being the smallest maneuver unit. Abbott notes that "Ground scale is 1 inch = approx 50 yards and the players are meant to be divisional and corp commanders, instead of brigadiers."

Abbott's rules are successful, I feel in making effective command and control as important to victory ad combat outcomes. Brigades are given orders by Division (and Corps) commanders at the beginning of the game and these can be changed under certain conditions. Brigade commanders can also request an order change by sending a messenger with a status report to his superior.

The combat mechanism is fairly simple based around opposing d6 rolls modified by the presence of leaders, terrain, the level of fatigue of the brigade and morale. Combat losses are essentially reflected by a build-up of fatigue at the Brigade level each time a regiment is in action. As the fatigue level of the Brigade increases it can effect the combat factor of the unit (called its 'volume of fire') and the morale status.

I used an older version of the rules (attached as a PDF at the bottom of the page linked to above) win which Brigades (and divisions) must pass a morale test every turn. A 2012 update moves away form Brigade and Division morale checks. Instead, the units fatigue and morale impact on the brigade's capacity to activate each turn.

Overall, I feel the first use of these rules gave an interesting game and I really liked the 'orders' mechanism and the inevitable consequence of the build up of fatigue. The impact of sustained combat on brigades is well modeled by the fatigue rules - a nice touch. I felt it gave quite a good 'feel' for the challenges faced by brigade and divisional commanders during the Civil War.

As a first time player, I did find the occasional situation where the rules were not explicit. For example, it was not clear on the difference between mounted an dismounted cavalry (except a reduction in movement for dismounted).

One of the difficulties I had was around understanding the impact of varying morale levels (disordered, shaken, beaten) on game play. Again, I believe this is addressed by the new activation system. There was a bit of record keeping (orders, morale status, commander ability and troop quality) but with a little planning and some more subtle on-board counters and a simple roster sheet, it would be handled easily.
Example of some of the on-board counters that I used. The Litko skulls record the build-up of fatigue. Cardboard counters note the morale status of the unit/brigade. I used a Litko skull on a red base to show when a brigade commander is killed (they are replaced with a commander of lesser ability after 1 full turn. The red Litko 'cross hairs' mark a brigade commander that is wounded. I'll work on reducing the visual impact of these for future games.
Here are a few images of the first battle I fought using my 2mm Irregular ACW forces. The scenario was sent early in the war and saw the Confederate forces (top of board) pursuing a Union infantry brigade that had retreated from an earlier fight. The Union commander had some support (cavalry, sharpshooters and artillery) hurrying in from the bottom of the board to reinforce the line.
The Union 1st Brigade  holds the open ground NE of a village (let's assume the top of the image is north) having fallen back in good order from a previous engagement. A column of union artillery (2 batteries) and cavalry regiment enter from the SW. Union sharpshooters hold the hill on the Union left flank.
Brigadier General Tyndale's Brigade deployed in line of battle with a small reserve and his right flank holding the heights.
From the SE, elements of Anderson's Brigade pursue the remnants of a Union division that fell back after an  action that earlier that morning.
From the SW, Brown's Brigade march quickly to deploy in the open ground to the south of the Union position. Brown's men are fresh having been in reserve during the morning's action. His men are still in column having marched hard to keep pressure on the retreating Union troops.
The Union relief column cross the stream and the cavalry swing wide on the left flank. Tyndale's Brigade has hold orders while the cavalry and artillery have orders to advance to Tyndale's left flank and hold.

The Confederates deploy into line. The final advance begins.
Tyndale's Brigade have rifled muskets so get the first volley in as the Confederates close on their line.
The Union troops are spooked as the Rebs advance and their musketry has little impact.
The Confederate line advanced to musket range (being armed with smooth bore muskets) and loose the first volley in return. The Union sharpshooters march down into the woods on Tyndale's left to deal with the Confederate overlap. they are elite troops and hold their own!
The musketry of the Confederate left flank finds its mark and the forced a Regiment back over the crest of the hill. On the Union left, the artillery unlimbers at the foot of the hill.
The musketry over the next couple of rounds takes a toll on the Brigade commanders. Tyndale is out of action for a full turn. The Confederate Brigadier, Anderson, is shot from his horse and falls to the ground, dead.
The lines of infantry continue to hammer each other with lead as the fatigue (white skulls) builds up. The intensity of the musketry from the Confederate left drives back yet another Union regiment. On the left, the Union cavalry seeks to take the mill on the Confederate right flank. Anderson's cavalry (dismounted) forms a line in front of the mill and holds firm!
The last remaining Union regiment has to fall back under sustained fire from the Confederates.
The Confederate advance falters on their left with a regiment driven back form the hill-top. Moral on both sides is beginning to falter. Both sides are now shaken but the Confederate advance pushes on.
The Union cavalry assault on the left fails. The Union morale falls again - Tyndale's Brigade is battered!
Finally, the union artillery opens fire on the second Confederate line on the right flank and yet another Confederate Brigade commander falls! However, sensing the Union troops are nearly spent, a yell springs up from the Confederate line on the right and they charge into the woods to clear out the Union sharpshooters.
A Change of orders on the Confederate right redirects their attack towards the undefended artillery. Brown's Brigade (Confederate left) keep up the musketry on the Union troops that have now fallen back to the stream.
On the Confederate right flank, Anderson's cavalry push forward. Both sides have been contact for a couple of hours now and exhaustion is setting in. Ammunition is short and morale sits on a knife edge! Anderson and Brown know that all they have to do is keep pressure on the Union troops and they will break soon.
The Union Brigade commander on the left is still out of action having been wounded in the melee in the woods. The Union forces have been battered but are not yet defeated. This is where the action concluded, without a clear victory for either side (although, definitely advantage to the Confederates). I expect another turn or two of Confederate musketry might have tipped the balance in their favour.