Showing posts with label scratch build. Show all posts

Friday 2 September 2022

Split rail fences for 2mm ACW

Felling the timber, splitting it into rails and stacking it along your farm boundaries must have been a punishing task in the 19th century.

Punishing, in a very different way, is an apt description for scratch building split rail (snake) fencing for my 1:800 (eg. 2mm) ACW terrain!

I have to admit these little guys spent more time stuck to my fingers than to their bases. Nevertheless, the struggle yielded the equivalent of 14 chains (chain = 22 yards) of fencing for Wilmer McLean’s farm.

The method, while fiddly, is fairly strait forward.

I cut a series of 50mm x 1mm strips (sorry, back to metric for this) of 0.5mm Evergreen Styrene sheet which was scored every 5mm on opposite sides.

I then bent each scored point to form a zigzag long enough for my bases. This was attached to the base (via being glued to various fingertips) using Superglue. Then 5mm lengths were scored in the centre and bent into a right angle piece using tweezers. These were glued to the outward facing points of the fence to represent the crossed over rails.

The roughed up 45mm x 10mm base of styrene was coated carefully with fine sand (using PVA) and then undercoated with Vallejo grey primer (73.601). I washed the dry undercoat with Liquitex raw umber acrylic ink. Then, I painted the fence rails dark brown. These were dry-brushed with Army Painter Drake Tooth. My flower meadow mix of flocking was glued in place then a light coat of Vallejo Mecha Dark Rust wash (a staple in my paint collection) was applied on the rails. Done!


These simple 2mm terrain pieces add, I feel, some period flair to ACW battlefields at this scale. Maybe cornfields and a peach orchard next!

Sunday 20 December 2020

Scratch building Old West Buildings in 28mm

My youngest came up to me recently and said, wouldn't it be cool to play a miniatures game based around Cowboys and Aliens (not so much the movie, but the genera in general)! Well, I'd never considered gaming the Old West as an option - no reason, just wasn't my scene. But the idea was intriguing and we were heading toward (what would be months of) isolation and I knew a large terrain project would be just the ticket!

In terms of gaming, there was a plethora of rules to choose from. I wanted a simple set of Old West skirmish rules and have selected Shootin Iron by Dave Bezio's Grey Area Games.  I also thought the Weird West gaming sub-genera might offer a good setting as well and have purchased Dracula's America: Shadows of the West by Osprey Publishing which looks like it will fill that need admirably.

Construction technique
The main structure of the buildings was made from 5mm foamcore which I got cheap from my local art supplier as it was 'water damaged' (but was fine in reality). In general, I used a wall height of 50mm with the false fronts of the commercial buildings being around 120mm tall. To ensure all the interior spaces were playable, I used removable gable and skillion roof types also made of foamcore.


The exterior wall cladding was made with 190mm x 6mm coffee stirrers using a range of techniques including weatherboard/clapboard, vertical wood sidings and a board and batten siding - a style of exterior siding that uses vertical boards with “batten,” a vertical strip of wood to cover the seams.


Once the cladding was applied with hot glue I textured and weathered it by scratching an exaggerated wood grain into the coffee stirrer and then randomly bevelling the edges and cutting cracks into the ends of planks.


The false fronts common to this era of commercial buildings were cut to a range of shapes to add a bit of interest and a combination of vertical and horizontal cladding applied to create a space for the signage and to add some character.

Flooring was added using the same coffee stirrers and textured the same way as the cladding.


Roofing types used included tar paper and battens, shingles and occasionally some corrugated iron. The shingles were cut from cardboard with each shingle being 5mm x 5mm. For the tar paper I used very fine grit 'wet and dry' sandpaper with wood battens. Corrugated iron was just corrugated craft paper.


The finish I wanted for the buildings was that of very aged timber - timber that had not been painted for a long time (if at all) - giving a run down, or possibly abandoned appearance. I used Platypus Scotsman's Grimdark Church as inspiration. I also took some inspiration from an old church I saw in West Bendigo during a stay in the Victorian Goldfields last winter (in the 2 weeks between months-long lockdowns for COVID!).
This old Protestant Church was converted into a recording studio

Poppet head on the Nell Gwynne Reef in West Bendigo. It was a cold, foggy stay (just as I like it) 

The exterior surfaces were painted using the following technique:
  1. Coat all surfaces with a mix of Matte Mod Podge and black paint (using the method described by Black magic Craft).
  2. Brush all surfaces with a dark grey using a fairly wet brush to get good coverage (but leaving a little back in the deeper texture.
  3. Dry brush with a light grey
  4. Then add a very light dry brush of white.
  5. Using an Army Painter mid-brown wash I add some semi-random colour variations tot he planks
  6. Coat the whole surface with a black wash - like Mel describes here:
  7. Once it is completely dry, add very selective light grey and then white dry brushing to highlights using downward stroked to pick up surfaces light would hit.
  8. Finally, using a flat scraper in a carving tool set, I gently work all the surfaces to scrape off any thick areas of colour - this gives a very worn, aged look tot he exterior surface.

Blurry, but atmospheric! Figures by Artizan.


Doors are wither cut from wider 'tongue depressor' style sticks or were legend and brace doors made up using the coffee stirrers.

Windows were made using thick clear plastic from take away food containers (the rectangular type) and very thin basswood strips obtained from a model railway supplier. I cut the plastic to the size of the window opening (all windows included vertical window frames that the plastic could be glued to) and then glued (with super glue) the basswood to the outer edge and to provide the mullions in the window. Just make sure you paint it to the final colour before you glue it onto the plastic as you can see the timber colour from the insider (found that out the hard way!).


Eyeing off the 'hoopleheads' from the balcony of the saloon.

All of my techniques need a lot of refining - especially the doors and windows - but this project certainly kept me entertained in the quiet moments of the first wave of COVID.


Monday 28 January 2019

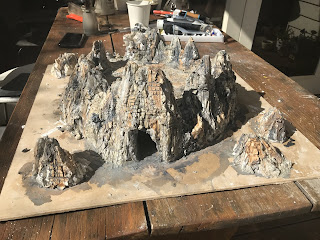
A craggy protuberance

I need a craggy hill for the D&D adventure I’m working on - a great opportunity to try out my new interest in foam crafting! Still a WIP but here’s a progress shot or two.


Monday 31 December 2018

Crafting for D&D 5e

At a pre-Christmas get together with some gaming buddies I was discussing how the Netflix series Stranger Things had reenlivend interest in Dungeons and Dragons with my kids. I had been using AD&D manuals that I had since my early days of role playing in the late 1970s. The chap I was yarning with suggested I try fifth edition (5e) suggesting there was a lot of news stuff we were missing out on. I was keen to see where D&D had gone over the years, so challenge accepted!

So, the young bloke’s Christmas stocking was stuffed with some Eureka dungeoneer miniatures, the 5e Dungeon Masters’ Guide and a DM’s screen as a bit of a kick starter. I find using some miniatures and dungeon tiles or terrain helps the kids engage with the action sequences better (although in many parts of an adventure we stick to ‘pure’ paper and dice role playing).

Of course, I need very little encouragement to take up a new crafting project and swiftly got onto making some dungeon tiles. There is a wealth of advice on YouTube for dungeon crafting and I adopted the 2.5 D dungeon tile approach used by The DMG with reasonable success. I used foamcore instead of cardboard which worked fine. I have created a basic set of about 20 tiles but am working towards the full set of tiles outlined by DMG:


While searching for some additional goodies to populate the dungeon with I happened across the Black Magic Craft channel on YouTube which, among the huge catalogue of really useful videos, has a great tutorial for crafting an Earth Elemental out of foam here. Here’s my attempt at the build - I’m happy with the results. I particularly think adding some areas of ‘dirt’ using model railway ballast gives the model even more of a feel of having just having been conjoured from the landscape!

I highly recommend you check out The DMG.info and Black Magic Craft - great channels.

More dungeon goodness will follow. Thanks for dropping by.
NB: this is my first post using an iPad - not a happy choice for Blogger - apologies for formatting issues!

Wednesday 12 September 2018

Something's afoot at Mosquito Creek

Far to the south of the troubled waterways of the Murray-Darling river system, something's afoot in a gloomy corner of Westernport Bay. Despite the recent storms, there's been a a noticeable increase in ferry traffic out to French Island in the past few weeks. The Master at Tankerton Jetty has been unwilling to discuss the contents of the barges that were doing nightly runs just muttering something about a government project.

The master's son was driving tarp-covered loads out to somewhere near Mosquito Creek by night - sodden, poor land, no good for grazing. By daytime he was ferrying working parties of prisoners and their guards to an 'undisclosed location'.
The island's only General Store was alive with rumour - was a factory being set up at the island's prison farm?  Could the government be finally electrifying the island (long overdue), or was it something to do with upgrading the cable line to Tasmania? One thing was sure, if any of the Islanders new what was going on, they were keeping tight lipped. Les Johnston, who usually knows everything that's going on on French Island,  says that when he was out near Mosquito Creek shooting foxes last week, he saw a strange glow off over the mangroves. Someone needs to go out and have a look - but because the prison is involved, nobody is game...


Saturday 10 June 2017

Ottoman fort for V-Beach

Preparations continue for the next game - A Bloody Morning at V-Beach. This is based on the 2010? TFL Christmas Special scenario using the If the Lord Spares Us rules. It covers the Cape Helles Landings at V-Beach on 25 April 1915.


I have the board pretty much set up having (since the picture above) added a considerable number of barbed wire entanglements to the collection (you can never have too many!)  leaving only the two forts at either end of V-Beach to be completed, something to represent the SS River Clyde and some landing boats.

Tonight , I finished a very quick scratch guild (in cork) of a small, rather generic, Ottoman fort that will act at Ertogharal Fort sitting above the low cliffs at the west end of V-Beach. The above map suggests the fort was largely a gun emplacement so I'm looking into converting it to include some large naval guns to give the right feel.

However I've kept it pretty generic as I want to use if for my other ITLSU scenarios in Palestine and Mesopotamia. And who knows when I might need a fort in Belgium for some Western Front action!

Wednesday 24 August 2016

The Three Headed Dog: HMVS Cerberus scratchbuild in 1:600

 The wreck of the breastwork monitor HMVS Cerberus sits in Half Moon Bay, Melbourne, Australia, where she was sunk in 1926 as a breakwater. She sits there, decaying away, despite valiant efforts to preserve what is one of the last of the monitors. See: http://www.cerberus.com.au
Since reading an interesting account of the birth of the Victorian Navy (eg. of the Colony of Victoria ... not the era) by Wilson P Evans - "Deeds Not Words: The Victorian Navy", The Hawthorn Press, Melbourne 1971 - I've longed to have a scale model I could do some "what if" naval gaming with.


Why buy, when you can build, I say! Here is the first steps towards bring the Three Headed Dog back to life again - if only on the gaming table. The scale is 1:600.


With the basic turret roof in place, the pile of PVC begins to reflect the Three Headed Dog!
Interior of the aft turret awaiting the gun ports to be cut and the main guns fitted.
Gun ports cut and barrels fitted.
With the upper deck sitting in place, it's not looking right - too thick? Maybe it'll improve when the superstructure, mast and ship's boats are in place.
Well, the Flying Deck did improve visually when I cut it to the correct width (original was 20 feet wide). Then I've added the mast, fighting top, funnel and rear access to gangway.