Saturday, 3 October 2015

6mm scratch-built entrenchments for Great War Spearhead II

I love an excuse to drop everything and scratch build something.

I was setting up for my second game of Great War Spearhead II (GWSH II) with the aim of playing the "A Hot Day's Work" – a tasty little introductory scenario from Robin Sutton's The Great Adventure. This provides another hypothetical rearguard action by the BEF during the Great Retreat of 1914 – this time with a few more troops on each side and the lack of a bridge over an impassable river to focus one's defence on!

I was ready to go when, on rereading the scenario background, I saw that the BEF could start the game entrenched. 'But you don't have any entrenchment markers!', I hear you say.

I've always ben rather keen on the foxholes and trench markets produced by Timecast. So, I thought I'd have a go at something similar and decided to use card bases and form the trenches using caulking compound.

Here's a quick step by step:

Add a blob of acrylic caulking compound to each 30 x 30 mm (1.1/4") square of thick card.
Wet your fingertip (stops it sticking) and smooth it out over the base. Then sprinkle a strip of flocking either side
while wet - be careful to leave the centre clean.
While the caulk was drying a little, I cut a trench-like template from a cheap plastic crate (purchased from a thrift shop - I use them for a range scratch building tasks - e.g. 28mm window frames etc.)
When the caulk is touch dry (20 minutes on a warm day) wet the template and press it into the caulk. Be sure to press each section down firmly - I used a screwdriver blade.
Gently lift out the template. You have a passable trench impression. I then went over each with a palate knife and reshaped the caulk and scratched it away down to the card on the trench floor.
They need some work work in terms of a bit of dry brushing to give the earth more texture. You could also add shell holes and other interesting detail if you are inclined.

Here they are in action (well... abandoned!). As I say, some detailing will take them the next step.
For a quick job, I feel they make a passable trench marker. The template produced a rather deep traverse between each fire bay but for a quick job, I can put up with that.

How did the game go, I hear you ask? The aim for the British was to defend the village in the centre of the board.
The German commander executed a cunning flank march and swept in on the British left.
The BEF suffered heavy losses in the woods as they rushed to establish a new defensive perimeter on their left.  British artillery had been ineffective so far and the German forward observer was having communication problems as a result of the pace of the advance (fire missions called for, never arrived).
Once both sides got into small arms range the casualties were very heavy. With the addition of some indirect fire from a regiment of the Royal Artillery and two regiments of German field guns, things got very sticky indeed. The BEF's machine guns took a heavy toll on the German infantry advancing in the open. In this turn alone, both sides suffered nearly half of the losses they experienced in the whole game!
Despite their steady advance through the woods, the German's eventually lost over half of their  troops (Morale: Regular) and failed their regimental morale check and withdrew from the field. The veteran BEF, while suffering severe losses, held  on and slowed the German advance one more.
Thanks for visiting. This blog has just passed 20,000 page view recently. I really appreciate the interest you all show in On Senlac Hill. A particular thanks to my followers and those who comment too!

Wednesday, 30 September 2015

GWSH II - Rolling with the punches, France, August 1914

I am pleased to report that my 6mm Great War project that I started back in July 2014, has finally got off the blocks. After months of (occasional) painting and gathering terrain, I finally played my first game of  Great War Spearhead II last weekend.

I thought it best to start with a simple scenario so I chose Rolling with the Punches - one of Robin Sutton's excellent GWSH II introductory scenarios from his Great Adventure site. This scenario has a small BEF force seeking to delay a German advanced guard during the Great Retreat of August and September 1914.
This gave me the first opportunity to try out my MDF hex terrain. This is a no frills version of the very effective method of using Hexon terrain to build up contours under a terrain mat employed by Robert Dunlop. Alas shipping Hexon terrain to the Antipodes costs more in postage than it cost me to buy this magnificent collection (and you see only a portion of it here) of hand cut (!!!) MDF hexes. I obtained these as a bit of a one off from a local supplier (thanks Mike!). Not that the postage cost is the fault of Kallistra, just a fact of geography!
Hills are laid out in preparation for the felt cloth

I ironed around the hills to improve definition of the contours through the felt.
The aim of this scenario is for this detachment of the British Expeditionary Force (BEF) to hold the bridge for 6 turns to allow the remaining elements (not depicted) of the BEF to secure a defensive position further south. I was playing solo so to add a level of surprise, I set up he BEF and provided four possible lines of attack for the Germans all of which culminated at the bridge.
The Germans took the initiative but drew the furthest entry point from the bridge. They approach in a series of columns while the BEF defends a perimeter in front of the bridge. British artillery lined the far side of the river near the village and their HQ.
The BEF were under 'defend' orders so had to sight the Germans before they could adjust their deployment.  
German infantry are sighted as they advance up the valley. The German commander orders a regiment of  77mm field guns to deploy on the nearby hill (middle left)
On a tight schedule, the Germans surge forward into small arms range.
Small arms fire takes its toll on the German left while a battery of British 18 pdrs open fire. 

Finally, German field gun regiment lays down a barrage on the British centre hoping to punch a hole through which the advance can continue. Despite the fury of the barrage, the Old Contemptibles stood their ground. At this stage I realised the 6 turns given to the Germans was unrealistic given their distant entry point and decided to extend the time
available to 8 turns.

As the volume of fire increased, companies of infantry were being mown down (destroyed companies marked with white skulls on red bases) on both sides and  those remaining troops were largely suppressed (white skull)


Turn 8: The German advance has stalled. The BEF have paid a heavy price but the order is given to fall back as the main body is now well on its way to the next defensive position. The BEF live to fight another day.
I really enjoyed this first touch of the GWSH II rules. I'm sure I made many mistakes but time and rereading in the light of this experience will sort that out.

I know I've got a long way to go towards learning the intricacies of industrial warfare. The overwhelming feeling from this game was that of blundering into contact, with the Germans driven to accept heavy losses to keep to their tight timetable. Not unlike the events of 1914!

Monday, 14 September 2015

20,000 camels - quenching the thirst of the EEF

By early 1916, the Egyptian Expeditionary Force was using nearly 20,000 camels in its transport lines. Camels were organised in companies of about 2,000 led by Egyptian drivers.
Well with horn bucket, Palestine
The water needs of troops on the front line was often supplied by camel convoys with each camel carting two small 12.5 gallon tanks known as fanatis.
Filling fanatis near Jaffa, 1918
I could not resist having a well and camel train (of sorts) to populate a corner of the battlefield. As warmers, I think we often politely ignore the presence of the transport required to get troops into the firing line and supply them when they are there.
Camels with 'well sets'
So, in recognition of all this necessary 'graft' going on behind the lines, here is a scratch build of a couple of hardy engineers pumping up the brackish water from a desert well 'somewhere in Palestine' into the fanatics - ready for carting off to the line.
A05802. Probably PALESTINE, C. 1917. WATER PUMPS USED BY 1ST FIELD SQUADRON ENGINEERS
The two Royal Engineers are Eureka British in Sinai gun crew (yes, I use them for everything!) and the camel are Irregular Miniatures Egyptian Camel Corps (FZ88) with their riders lopped off.

Assembling the well - I'm a slow bricklayer!

Engineer at the well building up a sweat on the water pump
The fanatis display their balsa construction - should have used card!
Its enough to make a chap thirsty. Thanks for looking.

Monday, 7 September 2015

EEF digs in - Battlefield Accessories' Hasty Entrenchments

Not a great deal of progress was made on miniatures this weekend - although a scratch-built Ottoman blinkgerat is on the painting table (second from left in picture below).  These were a signalling lamp powered by acetylene gas and that could be used when there was no sun.
However, I was able to finish off a set of 'hasty entrenchments' I'd purchased a while ago from Battlefield Accessories. These will provides my slowly expanding Egyptian Expeditionary Force (EEF) with some cover while they await the Turks!


Sunday, 30 August 2015

Heliograph team, Egypt and Palestine c1915 - Eureka 15mm British in Sinai conversion

In the BEF signals were dealt with by the Royal Engineers:

In 1914 each infantry Division included a Signals Company with a total strength of 162 men. It was organised into a Company HQ and 4 Sections, of which No 1 Section was responsible for communications with Divisional HQ and Nos 2-4 with the Brigades of the Division.
Source: http://www.1914-1918.net/whatfieldcoy.htm

Among the equipment available to the signallers, was the heliograph which employed a mirror (often mounted on a tripod) that was used to 'flash' Morse Code.

You can see some original footage of a heliograph in action here:

The heliograph was valued for its mobility, being quick to set up. It was a cheap signalling system with an impressive communication range in the right terrain. A 5 inch reflector had a signalling distance of some 50 miles (80 km), whilst the 9 or 12 inch models had a range of up to 80 miles (130 km). Best of all, in the Middle East theatre, there was plenty of sun!

Signals posts play an important role in the command system of If the Lord Spares us (ITLSU) rules by increasing the distance over which Battalion COs can operate effectively from the Brigade Commander-in-Chief.

There are no signals figures among the Eureka 15mm range so some conversion was necessary to obtain some signal posts. I have always liked the iconic images of heliograph teams operating in Egypt and Palestine, so wanted to put together some for my British.
The figures that provided the best conversion opportunity were the British in Sinai Artillery Crew (300HBC84). Here's a few pictures of how I approached the conversion.
The tripod is made of brass wire with a thin section of PVC tube for the mirror frame (white) and a circle of foil for the mirror itself (added after painting). Each 'leg' of the tripod was about 12mm / 0.5 inch.
I made some holes for the tripod using a heated nail. This is a 30mm base (~ 1 1/4 ") and the holes are 6mm (1/4") apart.
The tripod legs are glued in place.
The heliograph operator is made from the Eureka artillery crewman holding a shell. With the shell cut out it leaves his hands in quite a good position - looking like they are operating the Morse key behind the mirror.
The crewman with the coincidence-type range finder is adapted to a signaller holding binoculars. Most heliograph pictures show the spotter using a telescope - in this case I use some poetic license for convenience. It would be possible to scratch build a nice telescope on a tripod and cut away the second binocular lens.


The standing signaller has his base trimmed so the front foot will fit between the tripod legs.
Then, the signallers are ready to go!
For the first team I mounted the upright mirror frame strait on the apex of the tripod which was fiddly. This time I mounted a second piece of tube over the end as a base for the upright mirror. The made it easier, to mount the mirror frame but had the effect of raising the height of the heliograph a little. 
The mirror 'frame' is then glued in place.
The crew are mounted in place.
Heliograph completed. I painted the figures (in this case just the main colours blocked in) before I added the foil 'mirror'
on the front of the PVC tube frame.

Note that this was the first one I made - the above 'how to' pictures are of the second attempt where I used the second piece of PVC tube on top of the apex - you can see this earlier attempt sits a bit lower - I think this original team looks better, but it's quite fiddly getting the mirror frame to stick on the apex of the tripod.
I'm sure there are improvements that can be made to this approach - but this provides a quick and easy heliograph post.

As these teams will be supporting units of the 42nd Division (East Lancashire), I'm designating these as signallers from the 427th Field Company - identified thanks to the excellent resource on the Field Companies of the Royal Engineers on The Long, Long Trail.
A group of men of 527 (2nd Durham) Field Company, a Territorial unit that served under command of 5th Division. 


Wednesday, 26 August 2015

If the Lord Spares Us - Eureka Miniatures 'British in Sinai' 15mm

It seems the blogging hiatus is over! I'm back at the painting table and have started on a new project based on the Too Fat Lardies rules - If the Lord Spares Us - WW1 in the Middle East!

"Away from the quagmire of the Western Front ITLSU proves that brigade level games the Great War in the Middle East have components of everything; camels, arab war bands, sweeping cavalry attacks, opposed beach landings, massed machine guns, gas attacks, tanks, armoued cars, fighting in the mirage, water shortages, trench assaults, river gunboats - and enough command and control dilemmas to test the most cunning Pasha."

I'd been working on a 6mm (Irregular Miniatures) project for Gallipoli and the Middle East using Great War Spearhead II (and it's not abandoned), but I've wanted an excuse to buy some of Eureka Miniatures very nice WW1 15mm range – who can resist the Imperial Camel Corps, after all?          

To give me a little inspiration, I'm reading The Palestine Campaign by Field Marshal Earl Wavell P.C, G.C.B, G.C.S.I, G.C.I.E, M.C. (3rd Edn. by Constable, London, 1954). 

My intention is to begin with the defence of the Suez and work on slowly from there. 
Actions around the Suez, 1915-1916, from Wavell (1954).
Terrain is something I'll have to get working on, but the main effort will be on painting up a few infantry battalions for the British (and her dominions) and Ottomans, then onto some mounted, artillery, and armoured cars!

I must also thank Mark Hargreaves of the Over Open Sights for his generous provision of painting guides covering the Middle East campaigns - I strayed away from his recommendations (painting with what I had), but the inspiration was very well received. Thanks Mark!

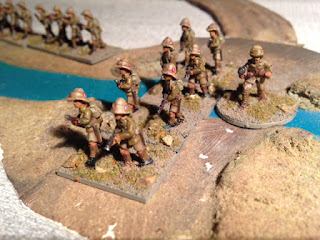
Well, I am unashamedly a 'middle of the road' painter of miniatures - nevertheless, I enjoy it. Here's a few snaps of my first attempt. Two companies (4 bases per company in ITLSU) of the 42nd (East Lancashire) Territorial Division. These stout fellows did it all - defence of the Suez (1915), Cape Helles (May 1915 to January 1916), Egypt and the Sinai Campaign (1916 to 1917), and Western Front (1917 to the Armistice in 1918).

Their battle honours include:
  • Battle of Gallipoli: Second Battle of Krithia; Third Battle of Krithia; Battle of Krithia Vineyard
  • Battle of Romani
  • Third Battle of Ypres
  • First Battle of the Somme (1918): First Battle of Bapaume
  • Second Battle of the Somme (1918): Battle of Albert (1918); Second Battle of Bapaume
  • Battle of the Canal du Nord
  • Battle of the Selle
But, as they say, 'Pictures! Or it didn't happen!'