Showing posts with label 28mm. Show all posts

Sunday 12 March 2017

Skirmish Sangin: Patrol Scenario set up

More experimentation with Afghanistan terrain. I'm feeling like I need to ditch the palms and come up with some different - less European looking trees.


Sunday 19 February 2017

Terrain boards for Afghanistan

A chance find of ten sample posts of a promising looking paint color at the local hardware store has prompted a weekend of terrain board building for my Afghanistan project. The idea is to build some fairly generic rocky desert boards that I can also for gaming WW1 in the Middle East.

Having tried my hand at terrain mats in the past - and finding attempts to built contours up under mats largely unsatisfactory -  I am going to try using flat terrain boards and add-on terrain for the various features. I'm using 6mm MDF for the base boards.

The paint I found was an acrylic 'suede finish' in a mid grey. It dries with almost a chalky surface. As mentioned, they were a series of unwanted color post being sold off for $1 a can - bargain. I'd never seen this finish before and I could see the potential for this use.
Few people would welcome that color sample as being of interest - rich pickings for a wargamer!
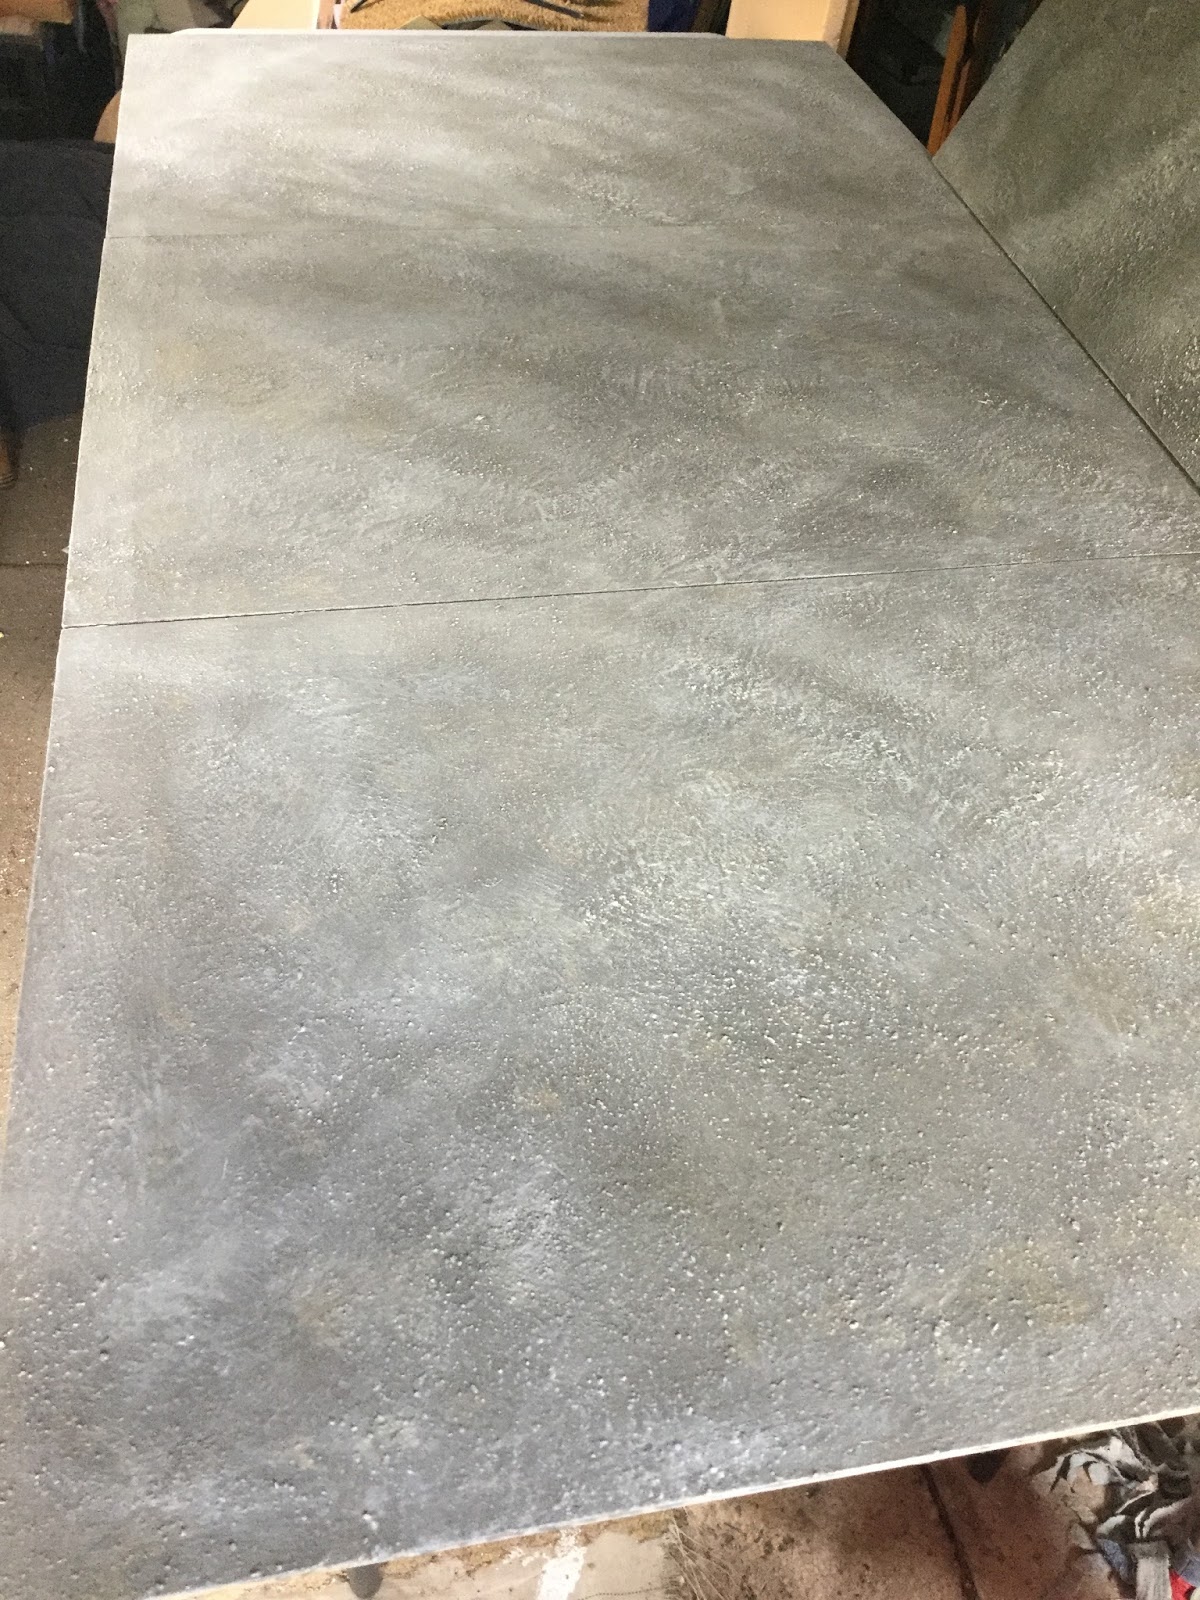
I started with a based coat on lightly sanded MDF and scattered some grit over the top while wet. I just used the sandy colored gravel I have use for landscaping, which you can see on my miniature bases as well - a lifetime supply of basing materials!
Once it dried, I knocked off the larger pieces of gravel with a scraper, leaving the more sandy textured finish. To this I added a second coat of suede paint - and a coat on the underside to overcome warping.

Leaving that to dry well - I then sponged on some yellow ochre craft paint and then dry-brushed with a 'sand' colored acrylic.

I finished the boards with a spray of a clear varnish I had at hand - the result is fairly good for an  unplanned project (which, let's face it, most of mine are!).

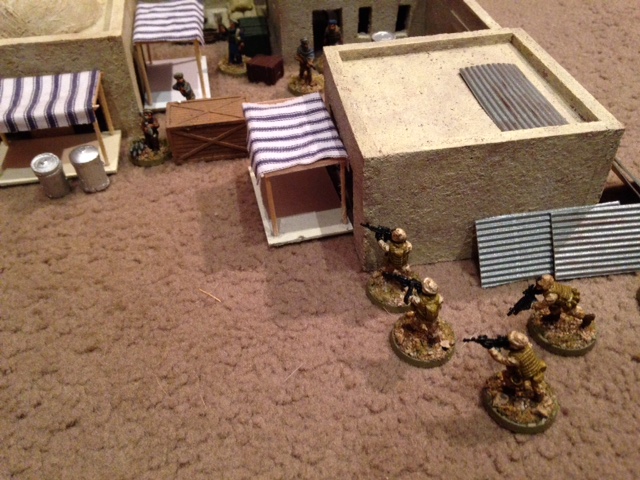
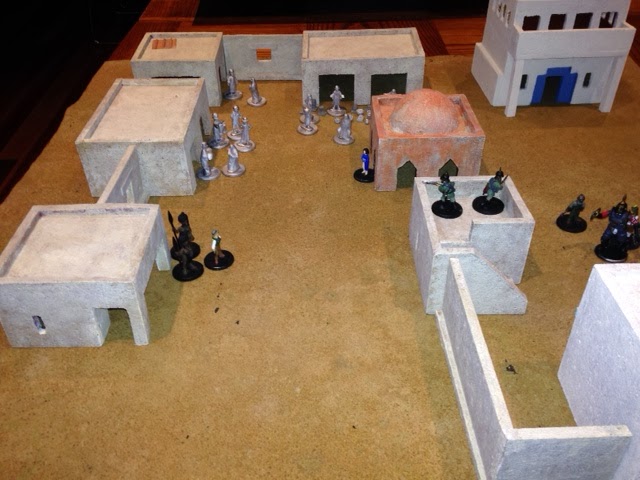
I couldn't resist taking a a few pictures of the growing collection of terrain and some of the completed Eureka USMC and Afghani 28mm miniatures. The compound design and technique is thanks to Matakishi. My terrain has a long way to go, but the boards are a huge step up from what I was using!


Tuesday 22 November 2016

USMC in Afghanistan

I am fortunate enough to have a 30 minute ride each way to work on the bus. This, coupled with the contents of the university's libraries at my disposal, makes for some good time to catch up on reading. Having read solidly on the Falklands for a couple of months, I was hankering for something new.

A recent visit to the Australian War Memorial in Canberra highlighted how little I knew about the more recent conflicts our country has been involved in - particularly the Gulf Wars and the counter insurgency efforts in Afghanistan. A new wargaming era to dabble in ... why not!

This led me, of course, to consider Eureka Miniatures release of 'Modern' US Marines and Afghan insurgents Sculpted by Kosta Heristanidis. Beautiful figures.

As per the advice on the Eureka Miniatures website for the Marines, I have used the following paint scheme for the Marines:

  • uniform is 60% Vallejo 321 Highlight British Tank crew (from the Panzer Ace range) and 40% Vallejo 951 White (Model Colour range)
  • The flak jacket is 50% Vallejo 923 Japanese Uniform WWII and 50% Vallejo 879 Green Brown
  • The light digitised camouflage used Vallejo 983 Flat Earth (Eureka article suggests 826 German Camouflage Medium Brown) stippled over the base colour.
  • Boots were a 50:50 mix of Vallejo 984 Flat Brown and Vallejo 317 British Tank Crew.
Here are some pics of the first batch with a little scenery:


Monday 14 July 2014

Mayan Temple for Pulp adventures - complete!

It's amazing the motivation posting work in progress pictures on forums give me when completing projects. A few days after deciding to make a Mayan-style temple for Pulp Alley adventures to come, I have managed to completed it (although some final painting will be completed/details will be added in time).

I'm quite pleased with the result and am grateful for the useful advice I've received on TMP and Pulp Alley Forums.
The painting was largely inspired by this thread on painting stonework on TMP.
Details to come include:
  • crafting a sacrificial alter to sit on the summit of the temple
  • some more shading on the stairs
  • a little dry brushing to knock back the colours used to highlight different tones among the stones
  • possibly one final wash to help define the shadows a little more
  • adding some moss/lichen to increase the 'lost ruin in the jungle' look
The next project is some trees for the jungle setting.

Friday 11 July 2014

Mayan temple pt 2

After some great advice on  TMP and Pulp Alley forum about possible approaches to texturing the
surface of the Mayan-style temple, I have settled on building up a clockwork texture using thin card 'stone slabs' glued on and then covered with tissue paper brushed in diluted PVA glue.

I think some of my efforts to lay the tissue paper over the 'slabs' of cardboard are a little sub standard, but in general I'm liking the texture. Of course, the immediate benefits of this approach is that it is cheap and I can get moving on it strait away.

The question will be whether to undercoat and dry-brush, or to use some sort of texture over the tissue paper. The advantage of another layer is it will make the surface more durable, but I may end up losing some of the effect I've created.

Another pice of advice I received was to seal/reinforce the edges of the corrugated cardboard with thin strips of card glued on. It's a little too late for the edges of the bottom two levels, but I will try this on the steps and possibly the upper level.

Some other products mentioned by fellow wargamers that I will be looking at for future projects such as this will be:


Thursday 10 July 2014

Scratch built Mayan temple - of sorts!

My pulp adventures need more locations - I fancy a steamy jungle ruin.

The aim here is to produce a cheap, useful bit of terrain without it spending months on the craft table like all my other projects do.

I am loosely basing this (very loosely) on the Tikal Temple II in Northern Guatemala.
Ok, I confess I was originally planning on the standard Mayan temple with the staircase on each face but I could see the job bogging down if I had to make four staircases! So a quick web search found the temple at Tikal, and Bob's your uncle!

So, the basic structure (sans stairs) has been constructed our of heavy corrugated cardboard. I'm pondering how to manage the summit shrine - partly because I've not allowed enough space - but in the mean time am wanting to get the main exterior finish sorted.

Here's how it looks at the moment:
28mm miniature to give a sense of scale.
I've contemplated covering it with tissue paper soaked in PVA glue to give it a uniform, rough finish, then dry brush and add a bit of vegetation. However, it would be good to get a bit of a stonework feel to the surface. The question is how?

The role of this bit of terrain is just to be a serviceable bit of pulp terrain - so it does not need a refined finish. The other criteria, is to continue with the 'no cost' strategy!

I'll post more pictures as it progresses.

Saturday 8 March 2014

Pulp Alley character cards

'We are nostalgic for the old and the analog'

Despite the many and various joys of the digital age for this aged researcher, one cannot help but feel nostalgic for the intensely tactile experience of searching the card file catalogue in a library. The feel, the smell, the frustration of the missing card!

As my first Pulp Alley leagues are nearly off the painting table, my mind has turned to charter cards and league rosters! While searching for images that could be used for the card, I happened across this groovy Catalogue Card Generator created by John Blyberg.

With very little effort, some 'atmospheric' charter cards can be pieced together (the photo is added later by me). These are two of the League Leaders for my upcoming Pulp Alley adventure – 'On to Port Said!'


Tuesday 10 December 2013

The polar night approaches at Gruhuken

Not content with on Pulp project on the go, I've started work on the buildings for a Arctic adventure based loosely on the book Dark Matter by Michelle Paver. As the clouds of war are gathering over Europe, a small British expedition leaves for a small island in the Arctic Circle to establish a weather station to map sub-polar weather systems. Ahead, their first experience of overwintering and the months of darkness of the Polar night. Paver writes a jolly good ghost story, the pulp adventure to come will explore in other directions… the harsh polar environment, polar bears, rogue trappers and U-boats, perhaps?

The building is a balsa construction with a corrugated card roof and polystyrene 'skin' to provide the texture of the timber planking. The minis are Bob Murch's excellent Courageous Mountaineers!


Thursday 5 December 2013

Architectural details

In a quiet day at the 'office', I happened across a number of interesting website form the 'miniatures' fraternity (eg. doll's house makers etc.) and I thought they offered some interesting ideas. I'm sure much of this has already been done by the wargaming fraternity but it's always worth looking at what others are up to!

In reality, it's just a good way of keeping links for my own use, but hopefully others may find it useful too!

Making model windowns
 Opening casement window for a dolls house
Craft wood aging solution
 Raw balsa wood, silver grey  and deep brown basswood  created with vinegar/steel wool solutions
Palm trees
 Scale miniature palm tree set behind a porcelain building in a Christmas Nativity set.
Bullrushes
Four dolls house scale cattails made from a variety of materials.
Flint finsish (buildings)
Scale railway ballast and budgie grit used to mimic stone finishes on a dollhouse exterior.
Shingles

"The illusion of moss/lichen on shingles can be created by washing the lower areas (or shaded areas if you are using trees) with a light wash of sap green acrylic or watercolor. Actual patches of lichen can be applied by dabbing small amounts of bright green, tan, and orange chalk on in tiny irregular patches. The chalk can be fixed in place with an artist's fixative, or by a light coating of matte varnish."

And let's not forget the wallpaper:
http://www.jennifersprintables.com/printables1.html


Friday 8 November 2013

Middle Eastern village in cork

In the words of 6mmPhil at LAF:
I swear this is some form of hypnotic control developed by Matakishi, however to what ends I couldn't say, but there's many gamers who've disappeared under piles of cork buildings never to be seen again. It starts with just a couple of small buildings, works it's way up to a town scape and then before you know it you've bought enough cork tiles to cover a football pitch and your home is packed with buildings of every type and there's not enough room to move.  
The only cure, partial as it is, means encouraging other folk to start modelling with cork too, so welcome to the sinister cult club.
Oh yes, I can attest to the  appeal of creating cork buildings - I've spent every 'spare' moment (for me, they are rare) thinking or doing something related to my current cork building project and have more than once, started planning for other projects to follow!

The current project is a Middle Eastern village which will see use in my Pulp Alley adventures to come. During the project, I have realised the range of uses (other than the multitude of Pulp opportunities) that they may have: colonial; modern skirmishes – giving me a great excuse to purchase some Eureka Miniatures 'modern range including the excellent Afghans and Somalis; and, possible Sci-Fi uses.


The basic shells of the buildings appeared quite quickly. The great challenges have been learning how to add sufficient detail to make them interesting and to paint them appropriately. I went down the path of using paint only rather than using a textured finish under the paint. 


Learning on the job has lead to too many coats of paint going on. :( They started a red earth colour, then morphed to a rich, sandy yellow, then to antique white (was looking better by now but lacking depth), then a raw umber wash (to pick up the texture again) and finally with a dry brush of antique white with a hint of Vallejo dark sand.


In future, I'll just paint with antique white, wash with raw umber then highlight with the antique white tinted with some dark sand. It seems to work OK.


I experimented with a bit of faded colour on the two story building (in the style used by Matakishi) and a small domed building (trying to capture a faded orange-red paint job). I think with some follow-up to mute the colour a little more the two story building it will be OK. I'm not happy with the orange-red dry brush on the central building - it's likely to go back to the standard white at some stage.


Anyway, some pictures (not the best, sorry, only had my phone on hand):

The village has a main administration building in the foreground, its Mosque in the rear right, and the market in the centre and top left. Of course, the whole thing is modular so can take many shapes.


The compound for the main administration building. I will eventually create a wall section with double gates to close it off completely giving it the opportunity of being used as a stylised Afghan compound as detailed by Matakishi


I'm planning on using the red washed building as your typical Den of Iniquity where all sorts of favours and troubles can be found! As I mention above, I'm thinking of going back to the white wash look.
The main market area will soon have many canopies on the buildings and some central under cover stalls as well.


I've recently stumbled across this British Pathé film of life in an Egyptian village (1940-49) which will be used for further inspiration. The first stand out feature is the amount of palms and plans in the village - have a look! 


Another challenge I have to overcome is whether I base the buildings (which would assist with fixing the canopies to the market buildings), or whether to leave them as they are and devise a way to make the canopies self supporting (eg. diagonal struts to the side of the building). One problem with moving to bases is it makes the use of the modular wall sections a little more difficult as they will need to sit up on the base and this will leave a gap underneath between building bases.


I'll post again when I've make the next step.


Any comments and ideas most welcome!


Sunday 27 October 2013

Adobe buildings using cork

So, I've been agonising about the possible price of buying the buildings I need for my Pulp Alley venture having no 28mm terrain to speak of. I found an interesting Desert Village paper terrain kit at RPG Now by Papermodels which provided the inspiration (and plans) for a test run with balsa - wanting something a little more durable than paper terrain. I found the stock I was using way to light and lacked the substantial feel I had hoped for. My eye drifted over the pile of 7mm cork tiles I'd recently snapped up at the local hardware (being hard to find at times) and it came to me in a flash what a great building material it would be.

I quickly cut out and assembled the shell of a simple building and saw this was the way to go. Now, fellow wargamers, I thoughts I was pretty clever for about 30 minutes thinking I'd come up with something new. A notion that about 10 minutes searching the web completely disabused! I trawled over forums finding all sorts of interesting work using cork tiles but all roads led to Matakishi's Tea House.

So, 36 hours later, I fond myself well under way. The simple building style for desert villages makes for quick results. I'm even getting to the stage of splaying the first coats of paint on a few. Here's some initial pics – much is held together with pins (glue still dying) and the canopies are just slapped on. Once they are completed and weathered they'll look much better. A couple are awaiting a dome as well.


I've decided to draw some inspiration from Matakishi's Afghan buildings as well. I'm starting to realise that these will open up a world of gaming - Pulp, colonial, modern. Hmm. I'll keep on working on getting more of a market town feel to it all then populate it with some of Eureka's excellent Middle Eastern civilians.